HarmonyOS4.0 ArkTs 学习笔记
目录
前言
ArkTs组件的简单用法,在此记录,欢迎大家来指正。
1.ArkTS工程目录结构(Stage模型)
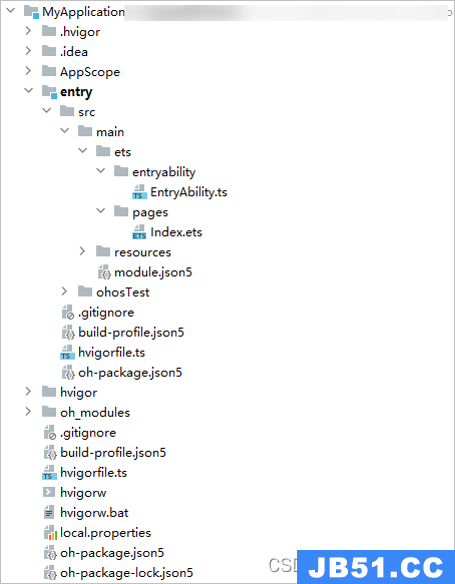
- AppScope > app.json5:应用的全局配置信息。
- entry:HarmonyOS工程模块,编译构建生成一个HAP包。
- src > main > ets:用于存放ArkTS源码。
- src > main > ets > entryability:应用/服务的入口。
- src > main > ets > pages:应用/服务包含的页面。
- src > main > resources:用于存放应用/服务所用到的资源文件,如图形、多媒体、字符串、布局文件等。关于资源文件,详见资源分类与访问。
- src > main > module.json5:Stage模型模块配置文件。主要包含HAP包的配置信息、应用/服务在具体设备上的配置信息以及应用/服务的全局配置信息。具体的配置文件说明,详见module.json5配置文件。
- build-profile.json5:当前的模块信息、编译信息配置项,包括buildOption、targets配置等。其中targets中可配置当前运行环境,默认为HarmonyOS。
- hvigorfile.ts:模块级编译构建任务脚本,开发者可以自定义相关任务和代码实现。
- oh_modules:用于存放三方库依赖信息。关于原npm工程适配ohpm操作,请参考历史工程迁移。
- build-profile.json5:应用级配置信息,包括签名、产品配置等。
- hvigorfile.ts:应用级编译构建任务脚本。
2.ArkUI组件
1. Image组件
语法:Image(src: string | Resource | media.PixelMap)
-
本地资源
创建文件夹,将本地图片放入ets文件夹下的任意位置。
Image组件引入本地图片路径,即可显示图片(根目录为ets文件夹)。
Image('images/view.jpg') .width(200) -
网络资源
引入网络图片需申请权限ohos.permission.INTERNET,具体申请方式请参考权限申请声明。此时,Image组件的src参数为网络图片的链接。
Image('https://www.example.com/example.JPG') // 实际使用时请替换为真实地址 -
Resource资源
使用资源格式可以跨包/跨模块引入图片,resources文件夹下的图片都可以通过$r资源接口读取到并转换到Resource格式。
Image($r('app.media.icon')) -
还可以将图片放在rawfile文件夹下
Image($rawfile('snap'))
2. Text组件
Text组件有两种声明方式:
-
string格式,直接填写文本内容
Text('图片宽度') -
Resource格式,读取本地资源文件
Text($R('app.string.width_label'))
3. TextInput组件
格式:TextInput({placeholder?:ResourceStr,text?:ResourceStr})
TextInput({placeholder:'请输入内容',text:'组件'})
4. Button组件
格式:Button(lable?:ResourceStr)
类型为文字型按钮和自定义按钮
-
文字型按钮
Button('点击') -
自定义按钮(在Button内嵌套其他组件)
Button(){
    Image($r('app.media.search'))
    .width(20)
    .margin(10)
}
5. Slider组件
格式:Silder({
min:0,
max:100,
value:30,
step:10,
style:SliderStyle.OutSet,
direction:Axis.Horizontal,
reverse:false
})
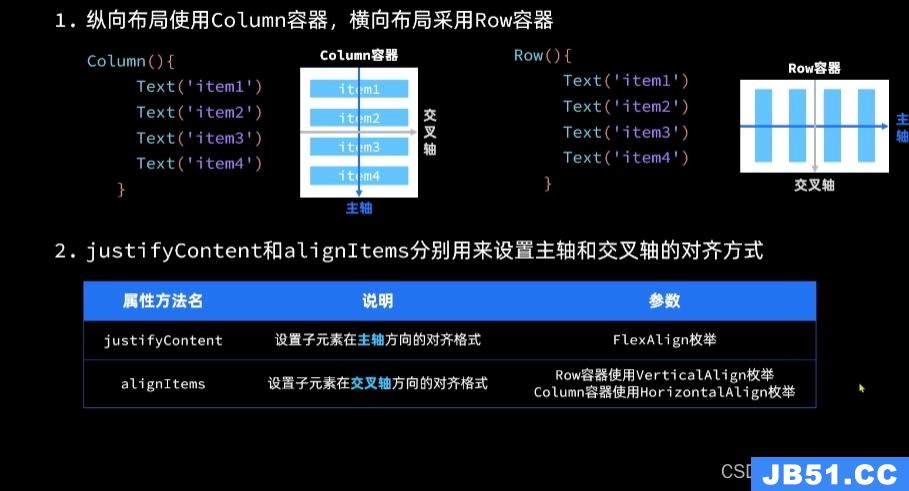
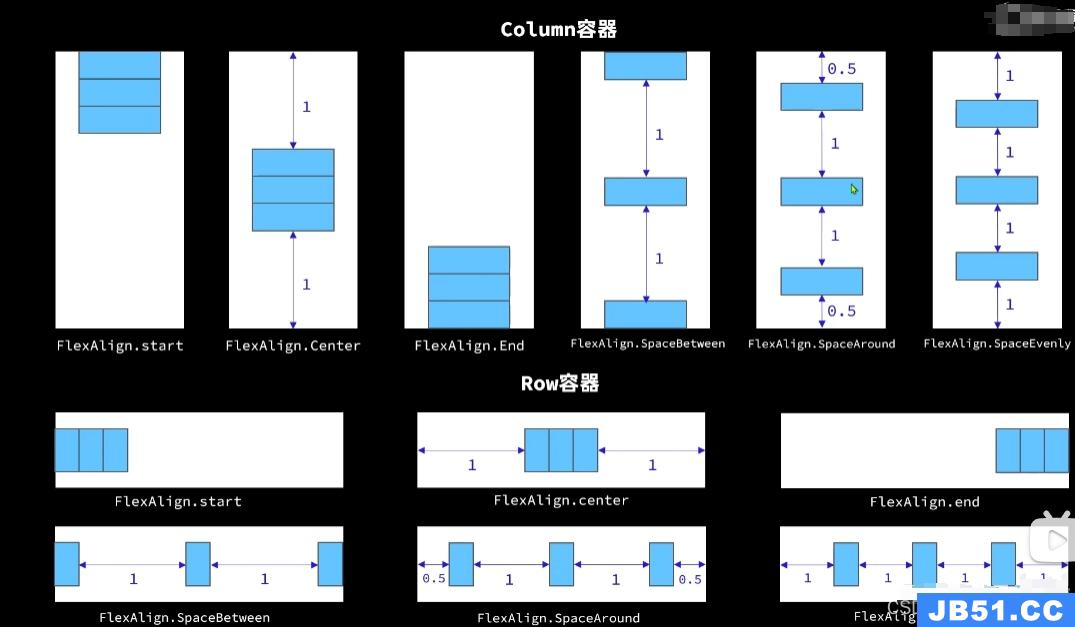
6. Column和Row组件
- Columnw容器
- 从上到下为主轴,从左到右为交叉轴
- 属性方法名:
- justifyContent:设置子元素在主轴方向的对齐格式(参数为FlexAlign)
- alignItems:设置子元素在交叉轴方向的对齐格式(Row->VerticalAlign,Column->HorizontaAlign)
3. 循环控制
-
ForEach和if else
- ForEach语法:ForEach(item,(item)=>{},唯一标识)
- if(){}else{} 在此不做叙述
4. List
/**
 * 1.List容器不可以嵌套其他容器,只能嵌套ListItem。
 * 2.ListItem只能有一个根容器
 * 3.List容器可以支持滑动效果
 * 4.List更改布局方向,横向V。纵向H
 */
5. 自定义组件
-
自定义组件
-
Header.ets页面(子组件)
//自定义组件 @Component//组件声明 export struct ShopTitle{ private title:ResourceStr//接收的参数 build(){ Row() { Text(this.title) .width('100%') .fontSize(50) } } } -
index.ets(父组件)
//导入自定义组件
import { ShopTitle } from '../components/Header'
@Entry
@Component
struct ItemPage {
  build() {

    Column() {
      /**
       * 1. 自定义组件调用-----自定义组件------
       * 2. 在调用的组件上设置样式
       */
      ShopTitle({ title: '商品列表' })
        .padding(10)
        .backgroundColor('gray')
    }
  }
}
-
-
自定义构建函数(全局/局部)
/**
 * 自定义构建函数----(全局/局部)
 * 全局(写在组件外面的):
 *  定义全局构建函数时要加上function标识,并且调用的时候直接使用全局构建函数的名字即可
 * 局部(写在build()函数里面的):
 *  定义局部构建函数时不需要生命function标识,并且调用局部构建函数的时候需要使用this.
 *
 */
示例代码:
//全局类 class Items { ImageName: ResourceStr ShopName: string ShopPrice: number ShopPreferential: number constructor(ImageName: ResourceStr, ShopName: string, ShopPrice: number, ShopPreferential: number) { console.log('构造函数') this.ImageName = ImageName this.ShopName = ShopName this.ShopPrice = ShopPrice this.ShopPreferential = ShopPreferential } } //导入自定义组件 import { ShopTitle } from '../components/Header' /** * 自定义构建函数 */ @Builder function ShopList(Item: Items) { Row() { Image(Item.ImageName) .width(70) .height(70) .margin(20) Column() { if (Item.ShopPreferential) { Text(Item.ShopName) .fontSize(20) .fontWeight(FontWeight.Bold) Text('原价:¥' + Item.ShopPrice) .fontSize(15) .fontColor('gray') .decoration({ type: TextDecorationType.LineThrough, color: 'black' }) Text('折扣价:¥' + (Item.ShopPrice - Item.ShopPreferential)) .fontSize(18) .fontColor('red') Text('补贴:¥' + Item.ShopPreferential) .fontSize(18) .fontColor('red') } else { Text(Item.ShopName) .fontSize(20) .fontWeight(FontWeight.Bold) Text('¥' + Item.ShopPrice) .fontSize(18) .fontColor('red') } } .height('100%') .justifyContent(FlexAlign.Center) .alignItems(HorizontalAlign.Start) } .height(100) .width('95%') .backgroundColor('#fff') .margin({ top: 20, left: 10, right: 10, }) .borderRadius(15) } @Entry @Component struct ItemPage { //商品数据 private items: Array<Items> = [ new Items($r('app.media.icon'), '商品1', 3699, 8), new Items($r('app.media.icon'), '商品2', 3799, 0), '商品3', 3899, '商品4', 3999, '商品5', 4699, '商品6', '商品7', '商品8', 0) ] build() { Column() { /** * 自定义组件调用-------------------------自定义组件 */ ShopTitle({ title: '商品列表' }) .padding(10) .backgroundColor('gray') List({ space: 8 }) { //循环 ForEach( this.items, (Item: Items) => { ListItem() { //调用自定义构建函数(传参)----------自定义构建函数 ShopList(Item) } } ) } .height('100%') .width('100%') .backgroundColor('#EFEFEF') .padding(10) } } } -
@Styles装饰器(仅可以封装组件通用属性)
class Items { ImageName: ResourceStr ShopName: string ShopPrice: number ShopPreferential: number constructor(ImageName: ResourceStr, ShopPreferential: number) { console.log('构造函数') this.ImageName = ImageName this.ShopName = ShopName this.ShopPrice = ShopPrice this.ShopPreferential = ShopPreferential } } //公共全局样式 @Styles function publicStyle(){ .height('100%') .width('100%') .backgroundColor('#EFEFEF') .padding(10) } @Entry @Component struct ItemPage { //商品数据 private items: Array<Items> = [ new Items($r('app.media.icon'), 0) ] build() { Column() { ShopTitle({ title: '商品列表' }) .padding(10) .backgroundColor('gray') List({ space: 8 }) { ForEach( this.items, (Item: Items) => { ListItem() { ShopList(Item) } } ) } .publicStyle()//调用全局样式 } } } -
@Extend装饰器(仅可定义在全局,可以设置组件特有属性)
@Extend(Text) function TextStyle(size:number,color:string='black') {
  .fontSize(size)
  .fontColor(color)
}

//构建函数
@Builder function ShopList(Item: Items) {
  Row() {
    Image(Item.ImageName)
      .width(70)
      .height(70)
      .margin(20)
    Column() {
      if (Item.ShopPreferential) {
        Text(Item.ShopName)
          .TextStyle(20)
          .fontWeight(FontWeight.Bold)
        Text('原价:¥' + Item.ShopPrice)
          .TextStyle(18,'gray')//调用私有属性的全局方法
          .decoration({ type: TextDecorationType.LineThrough, color: 'gray' })
        Text('折扣价:¥' + (Item.ShopPrice - Item.ShopPreferential))
          .TextStyle(18,'red')//调用私有属性的全局方法
        Text('补贴:¥' + Item.ShopPreferential)
          .TextStyle(18,'red')//调用私有属性的全局方法
      } else {
        Text(Item.ShopName)
          .TextStyle(20)
          .fontWeight(FontWeight.Bold)
        Text('¥' + Item.ShopPrice)
          .TextStyle(18,'red')
      }
    }
    .height('100%')
    .justifyContent(FlexAlign.Center)
    .alignItems(HorizontalAlign.Start)
  }
  .height(100)
  .width('95%')
  .backgroundColor('#fff')
  .margin({
    top: 20,
  })
  .borderRadius(15)
}
6. 状态管理
-
状态(State):指驱动视图更新的数据(被装饰器标记的变量)
-
视图(View):基于UI描述渲染得到用户界面
说明 :
- @State装饰器标记的变量必须初始化,不能为空值
- @State支持Object、class、string、number、boolean、enum类型以及这些类型的数组
- 嵌套类型以及数组中的对象属性无法触发视图更新
-
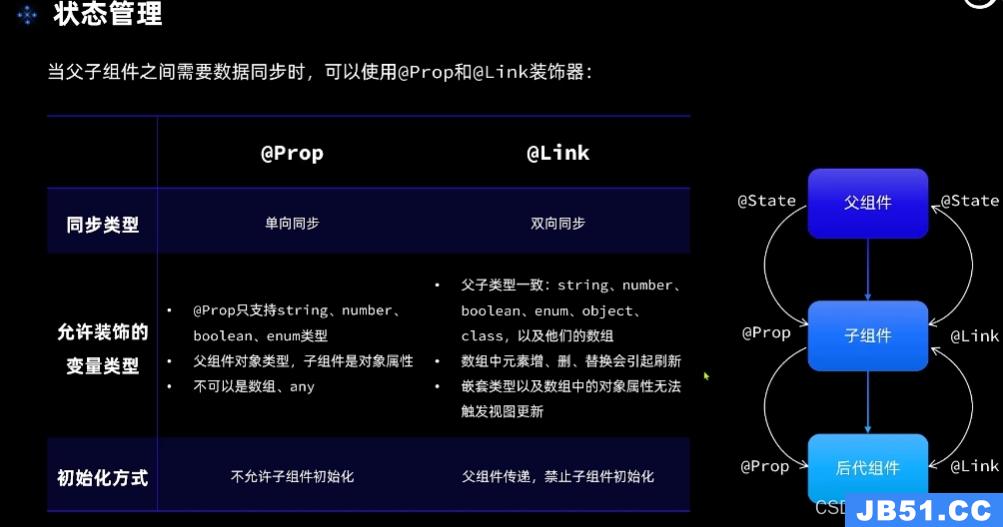
@Prop和@Link(可以跨组件提供类似于@State和@Link的双向同步)
- @prop和@link使用修饰符装饰变量不能给变量进行初始化
- @link修饰的变量,父组件传递时需要使用$引用
-
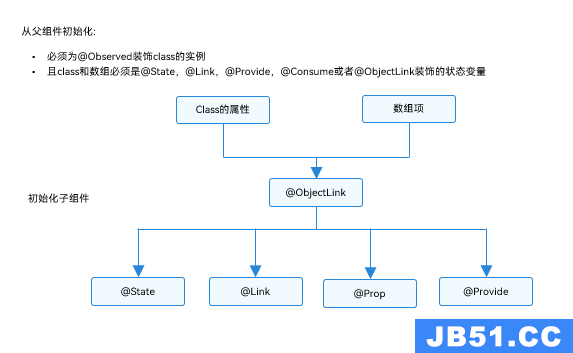
@ObjectLink和@Observed装饰器用于在设计嵌套对象或数组元素为对象的场景中进行双向数据同步
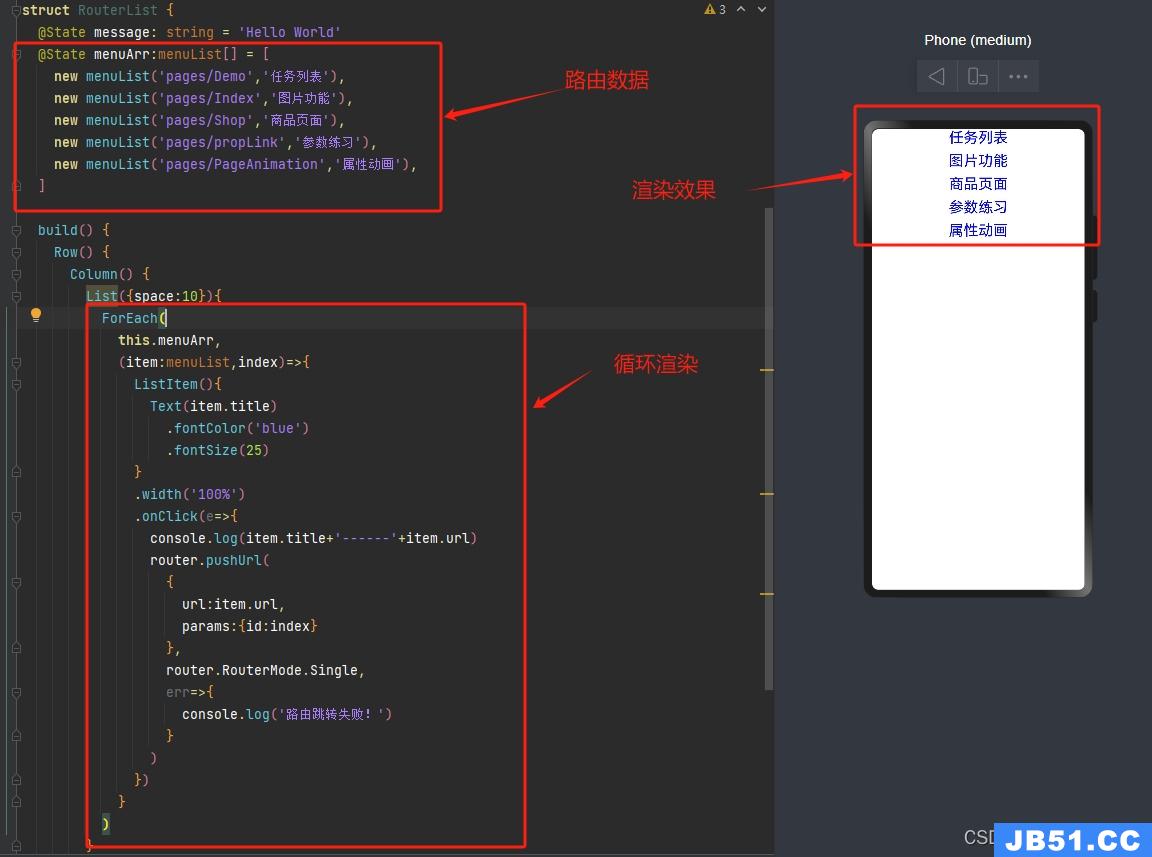
7. 页面路由
路由是指在应用程序中实现不同页面之间的跳转和数据传递
-
页面栈的最大容量上限为32个页面,使用router.clear()方法可以清空页面栈,释放内存
-
Router有两种页面跳转模式,分别是:
- router.pushUrl():目标也不会替换当前页,而是压入页面栈,因此可以用router.back()返回当前页
- router.replaceUrl():目标页替换当前页,当前页会被销毁并释放资源,无法返回当前页
-
Router有两种页面实力模式,分别是:
- Standard:标准实力模式,每次跳转都会新建一个目标页并压入栈顶,默认就是这种模式
- Single:单实例模式,如果目标页已经在栈中,则离栈顶最近的同Url页面会被移动到底栈顶并重新加载
-
步骤
-
-
首先要导入HarmonyOS提供的Router模块:
import router from '@ohos.router' -
利用Router实现跳转,返回等操作
router.pushUrl( { url:'page/ImagePage',//跳转的路径 params:{id:1}//可选,跳转时所带的参数 }, router.RouterMode.Single,//页面模式 err=>{ if(err){ console.log('路由跳转失败!') //100001:内部错误,可能是渲染失败 //100002:路由地址错误 //100003:路由栈中页面超过32 } } ) -
跳转到的页面获取参数
//获取获取的参数 params:any = router.getParams() //返回上一页 router.back() //返回到指定的页面,并携带参数 router.back({ url:'page/Index', params:{id:19} }) -
注意 路由跳转时需要配置路径(src/main/resources/base/profile/)下的main_pages.json文件,需要把要跳转的路径都配置上,要不然跳转不了!!!
-
-
8. 属性动画和显式动画
9. 转场动画
组件的插入、删除过程即为组件本身的转场过程,组件的插入、删除动画称为组件内转场动画。通过组件内转场动画,可定义组件出现、消失的效果。js transition(value: TransitionOptions)
注意:transition函数的入参为组件内转场的效果,可以定义平移、透明度、旋转、缩放这几种转场样式的单个或者组合的转场效果,必须和animateTo一起使用才能产生组件转场效果。
1.常见用法:
type用于指定当前的transition动效生效在组件的变化场景,类型为TransitionType。js Button() .transition({ type: TransitionType.All,scale: { x: 0,y: 0 } })
- TransitionType.All:组件的插入、删除使用同一个动画效果
- TransitionType.Insert:组件插入的效果
- TransitionType.Delete:组件删除的效果
2.if/else产生组件内转场动画
 @Entry
 @Component
 struct IfElseTransition {
   @State flag: boolean = true;
   @State show: string = 'show';
   build() {
     Column() {
       Button(this.show).width(80).height(30).margin(30)
         .onClick(() => {
           if (this.flag) {
             this.show = 'hide';
           } else {
             this.show = 'show';
           }
           animateTo({ duration: 1000 }, () => {
             // 动画闭包内控制Image组件的出现和消失
             this.flag = !this.flag;
           })
         })
       if (this.flag) {
         // Image的出现和消失配置为不同的过渡效果
         Image($r('app.media.mountain')).width(200).height(200)
           .transition({ type: TransitionType.Insert, translate: { x: 200, y: -200 } })
           .transition({ type: TransitionType.Delete, opacity: 0, scale: { x: 0, y: 0 } })
       }
     }.height('100%').width('100%')
   }
 }
10. 网络连接-Http请求数据
 // 引入包名
 import http from '@ohos.net.http';

 // 每一个httpRequest对应一个HTTP请求任务,不可复用
 let httpRequest = http.createHttp();
 // 用于订阅HTTP响应头,此接口会比request请求先返回。可以根据业务需要订阅此消息
 // 从API 8开始,使用on('headersReceive',Callback)替代on('headerReceive',AsyncCallback)。 8+
 httpRequest.on('headersReceive', (header) => {
     console.info('header: ' + JSON.stringify(header));
 });
 httpRequest.request(
     // 填写HTTP请求的URL地址,可以带参数也可以不带参数。URL地址需要开发者自定义。请求的参数可以在extraData中指定
     "EXAMPLE_URL",
     {
         method: http.RequestMethod.POST, // 可选,默认为http.RequestMethod.GET
         // 开发者根据自身业务需要添加header字段
         header: {
             'Content-Type': 'application/json'
         },
         // 当使用POST请求时此字段用于传递内容
         extraData: {
             "data": "data to send",
         },
         expectDataType: http.HttpDataType.STRING, // 可选,指定返回数据的类型
         usingCache: true, // 可选,默认为true
         priority: 1, // 可选,默认为1
         connectTimeout: 60000, // 可选,默认为60000ms
         readTimeout: 60000, // 可选,默认为60000ms
         usingProtocol: http.HttpProtocol.HTTP1_1, // 可选,协议类型默认值由系统自动指定
     }, (err, data) => {
         if (!err) {
             // data.result为HTTP响应内容,可根据业务需要进行解析
             console.info('Result:' + JSON.stringify(data.result));
             console.info('code:' + JSON.stringify(data.responseCode));
             // data.header为HTTP响应头,可根据业务需要进行解析
             console.info('header:' + JSON.stringify(data.header));
             console.info('cookies:' + JSON.stringify(data.cookies)); // 8+
             // 取消订阅HTTP响应头事件
             httpRequest.off('headersReceive');
             // 当该请求使用完毕时,调用destroy方法主动销毁
             httpRequest.destroy();
         } else {
             console.info('error:' + JSON.stringify(err));
             // 取消订阅HTTP响应头事件
             httpRequest.off('headersReceive');
             // 当该请求使用完毕时,调用destroy方法主动销毁。
             httpRequest.destroy();
         }
     }
 );
 文章浏览阅读1.4k次。被@Observed装饰的类,可以被观察到属性...
 文章浏览阅读1k次。Harmony OS_harmonyos创建数据库
 文章浏览阅读1.1k次,点赞25次,收藏23次。自定义组件Header...
 文章浏览阅读952次,点赞11次,收藏25次。ArkUI是一套构建分...
 文章浏览阅读735次。错误: 找不到符号符号: 变量 Layout_l...