公司要做压力测试,有Linux服务器一台,系统Centos6.5,为了直观的展示系统性能,更好的去分析服务器,故要搭建一个监控。闲言休讲,直奔主题。
首先,Linux服务器一台:系统Centos6.5
其次,在我的笔记本上安装监控软件客户端
软件下载地址链接:
链接:http://pan.baidu.com/s/14Vwlw 密码:tmw4
配置spotlight登陆用户,注意spotlight默认不能使用root用户进行连接,需要用户自己创建一个具有root权限的用户。具体方法新建账号分配权限的问题就自己百度吧,这里重点说的是linux Centos下搭建性能监控Spotlight on Unix
(1)useradd spotlight(2)passwd spotlight;
(3)vim /etc/passwd
(4)将spotlight的UID和GID改成0:0
下面,我们开始在服务器上安装sysstat。
使用iostat、mpstat、sar
yum install sysstat -y
sysstat的安装包是:sysstat-9.0.4-20.el6.x86_64.rpm,装完了后 就会有iostat、mpstat、sar、sa的功能
启动sysstat
/etc/init.d/sysstat start
设置sysstat自启动
chkconfigsysstat on
---------------------
sysstat工具包提供的主要命令:iostat mpstat sar
mpstat是Multiprocessor Statistics的缩写,是实时系统监控工具。其报告与cpu的一些统计信息,这些信息存放在/proc/stat文件中。在多cpus系统里,其不 但能查看所有cpu的平均状况信息,而且能够查看特定cpu的信息。下面只介绍 mpstat与cpu相关的参数,mpstat的语法如下:
mpstat [-P {|ALL}] [internal [count]]
mpstat -P 0 1 5
mpstat -P ALL 1 5
sar –n DEV 1 5
命令后面 1 4 意思是:每一秒钟取一次值,取5次。 IFACE:LAN接口
rxpck/s:每秒钟接收的数据包
txpck/s:每秒钟发送的数据包
rxbyt/s:每秒钟接收的字节数
txbyt/s:每秒钟发送的字节数
rxcmp/s:每秒钟接收的压缩数据包
txcmp/s:每秒钟发送的压缩数据包
rxmcst/s:每秒钟接收的多播数据包
-
16时35分25秒IFACErxpck/stxpck/srxbyt/stxbyt/srxcmp/stxcmp/srxmcst/s
-
16时35分26秒lo0.000.000.000.000.000.000.00
-
16时35分26秒eth03.002.00258.00284.000.000.000.00
-
16时35分26秒eth151.0089.005680.00122874.000.000.000.00
-
16时35分26秒sit00.000.000.000.000.000.000.00
-
16时35分26秒IFACErxpck/stxpck/srxbyt/stxbyt/srxcmp/stxcmp/srxmcst/s
-
16时35分27秒lo0.000.000.000.000.000.000.00
-
16时35分27秒eth04.003.00274.00834.000.000.000.00
-
16时35分27秒eth181.00106.0011816.00138982.000.000.000.00
-
16时35分27秒sit00.000.000.000.000.000.000.00
-
16时35分27秒IFACErxpck/stxpck/srxbyt/stxbyt/srxcmp/stxcmp/srxmcst/s
-
16时35分28秒lo4.004.00422.00422.000.000.000.00
-
16时35分28秒eth01.001.0070.00598.000.000.000.00
-
16时35分28秒eth19.0020.001811.0025787.000.000.000.00
-
16时35分28秒sit00.000.000.000.000.000.000.00
-
16时35分28秒IFACErxpck/stxpck/srxbyt/stxbyt/srxcmp/stxcmp/srxmcst/s
-
16时35分29秒lo0.000.000.000.000.000.000.00
-
16时35分29秒eth08.917.92629.707144.550.000.000.00
-
16时35分29秒eth120.7922.771927.7232144.550.000.000.00
-
16时35分29秒sit00.000.000.000.000.000.000.00
-
16时35分29秒IFACErxpck/stxpck/srxbyt/stxbyt/srxcmp/stxcmp/srxmcst/s
-
16时35分30秒lo8.088.08607.07607.070.000.000.00
-
16时35分30秒eth06.065.05418.181969.700.000.000.00
-
16时35分30秒eth12.022.02153.54177.780.000.000.00
-
16时35分30秒sit00.000.000.000.000.000.000.00
-
Average:IFACErxpck/stxpck/srxbyt/stxbyt/srxcmp/stxcmp/srxmcst/s
-
Average:lo2.402.40204.60204.600.000.000.00
-
Average:eth04.603.80330.402176.400.000.000.00
-
Average:eth132.8048.004281.2064057.000.000.000.00
-
Average:sit00.000.000.000.000.000.000.00
iostat 1 2
-
[root@localhosthome]#iostat12
-
Linux2.6.32-358.el6.x86_64(localhost.localdomain)2013年07月11日_x86_64_(1cpu)
-
0.070.000.120.070.0099.74
-
Device:tpsBlk_read/sBlk_wrtn/sBlk_readBlk_wrtn
-
scd00.000.000.002880
-
sda0.232.585.69168800372132
-
dm-00.792.445.69159410372080
-
dm-10.000.040.0023760
-
0.000.000.000.000.00100.00
-
Device:tpsBlk_read/sBlk_wrtn/sBlk_readBlk_wrtn
-
scd00.000.000.0000
-
sda0.000.000.0000
-
dm-00.000.000.0000
-
dm-10.000.000.0000
注意,以上安装确保成功后,要设置服务自动启动。
第二,
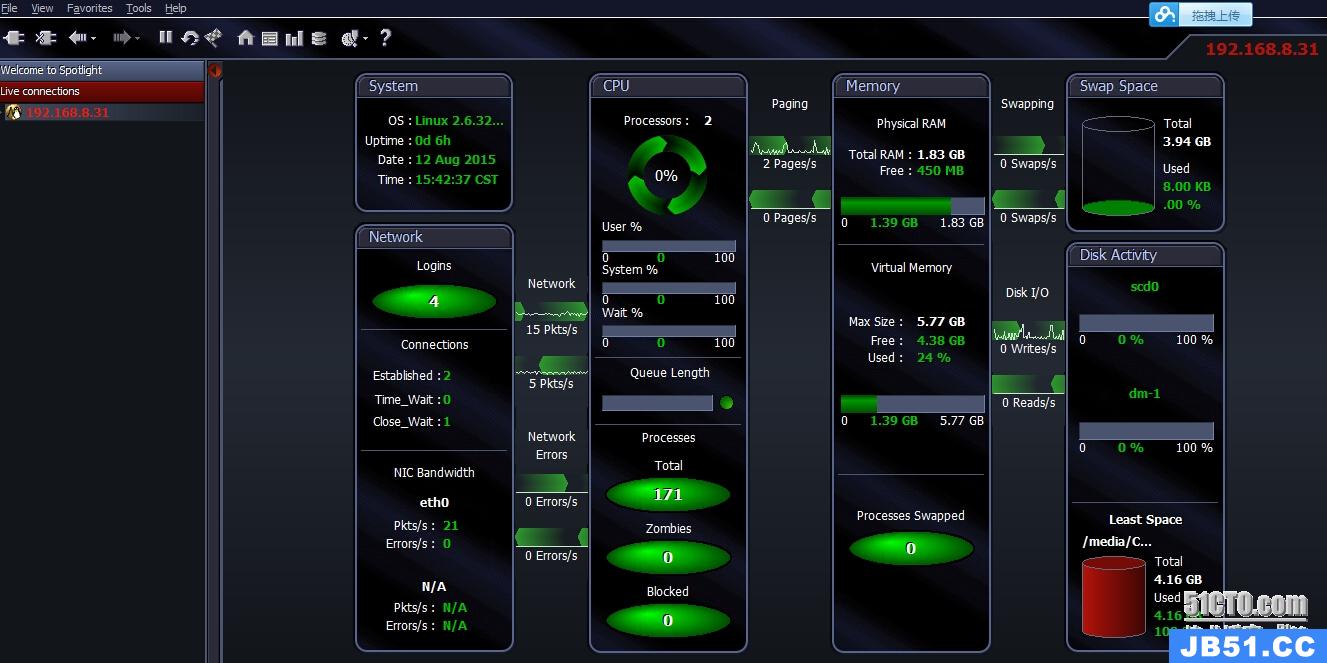
本机安装SpotlightonUnix_70.exe
这个地方安装就是下一步下一步,就不??铝恕?/p>
完成后在软件里面配置你的数据库环境。
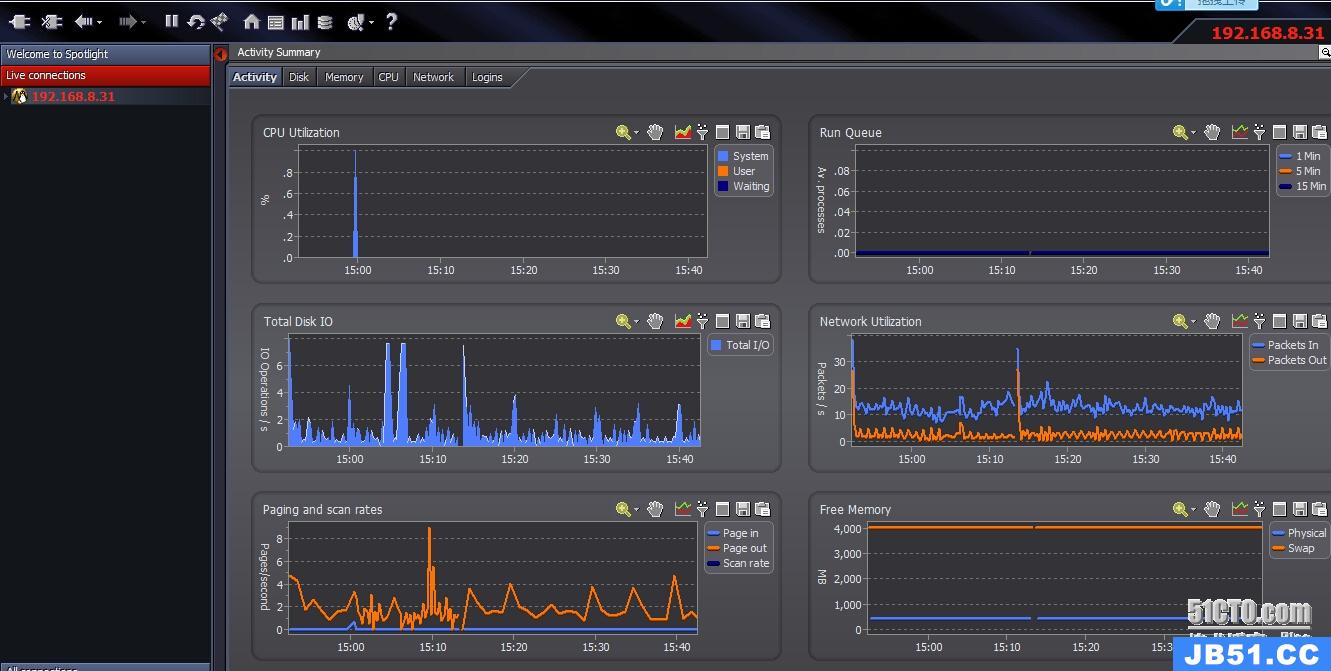
如图