目录

一、IoC容器
跳转到目录
在上一篇文章中已经介绍过了IoC的思想,这里不再赘述!
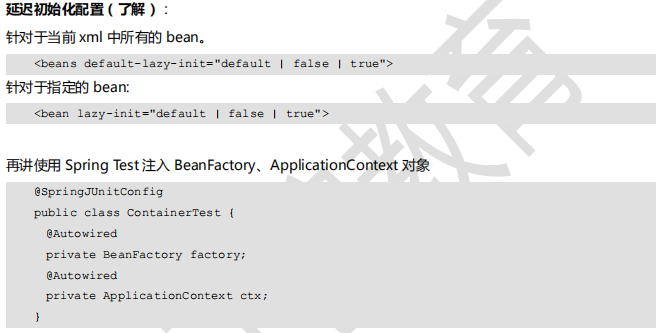
Spring IoC容器 (Container):
-
BeanFactory: Spring最底层的接口, 只提供了IoC的功能, 负责创建、组装、管理bean,所以一般不适用BeanFactory, 推荐使用ApplicationContext(应用上下文)
-
ApplicationContext : ApplicationContext接口继承了BeanFactory, 还提供了AOP继承、国际化处理、事件传播、统一资源价值等功能; 可以查看该接口的继承体系;
1、BeanFactory和ApplicationContext两者的区别
跳转到目录
bean的创建时机不同:
-
BeanFactory有
延迟初始化(懒加载)的特点,在创建Spring容器的时候,不会立刻去创建容器,管理Bean对象,而是要等到从容器中获取对象的时候,才去创建对象. -
ApplicationContext在创建Spring容器的时候,会把容器中管理的Bean立刻初始化,而不会等到获取Bean的时候才初始化.
// Person
@Data
public class Person {
    private String name;
    private int age;

    public Person(){
        System.out.println("Person对象创建啦!");
    }
}

// person.xml
<!-- 使用IoC来管理对象的创建和依赖注入-->
<bean id="person" class="com.sunny.domain.Person">
    <property name="name" value="CoderZYGui"/>
    <property name="age" value="23"/>
</bean>

// PersonTest(非Spring Test)
public class PersonTest {

    // 使用BeanFactory创建Spring IoC容器
    /**
     * --------------------------------
     * Person对象创建啦!
     * Person(name=CoderZYGui, age=23)
     *
     * 结论: BeanFactory有延迟初始化(懒加载)的特点,在创建Spring容器的时候,不会立刻去创建容器,
     *      管理Bean对象,而是要等到从容器中获取对象的时候,才去创建对象.
     */
    @Test
    public void test1(){
        Resource resource = new ClassPathResource("xmls/person.xml");
        BeanFactory factory = new XmlBeanFactory(resource);
        System.out.println("--------------------------------");
        Person person = factory.getBean("person", Person.class);
        System.out.println(person);
    }

    // 使用ApplicationContext创建Spring IoC容器
    /**
     * Person对象创建啦!
     * --------------------------------
     * Person(name=CoderZYGui, age=23)
     *
     * 结论: 在创建Spring容器的时候,会把容器中管理的Bean立刻初始化,而不会等到获取Bean的时候才初始化.
     */
    @Test
    public void test2(){
        ApplicationContext ctx = new ClassPathXmlApplicationContext("xmls/person.xml");
        System.out.println("--------------------------------");
        Person person = ctx.getBean("person", Person.class);
        System.out.println(person);
    }
2、Bean实例化的四种方式
- 构造器实例化(无参构造器),使用最多
- 静态工厂方法实例化(了解)
- 实例工厂方法实例化(了解)
- 实现FactoryBean接口实例化:实例工厂的变种
2.1、使用构造器实例化(无参构造器)
// 类
public class Cat1 {
    public Cat1(){
        System.out.println("构建Cat1");
    }
}

// createBean.xml
<!--1、构造器实例化(无参构造器),使用最多-->
<bean id="cat1" class="com.sunny.createbean._01_constructor.Cat1"/>
2.2、静态工厂方法实例化(了解)
// 类
public class Cat2 {
}
// Cat2工厂
public class Cat2Factory {
    public static Cat2 createInstance(){
        Cat2 cat2 = new Cat2();
        return cat2;
    }
}

// createBean.xml
<!--2、静态工厂方法实例化(了解)
        以前使用静态工厂方法: Cat2 cat2 = Cat2Factory.createInstance();来创建,
        现在只不过把这种方式,设置到配置文件中来了
-->
<bean id="cat2" class="com.sunny.createbean._02_static_factory.Cat2Factory"
        factory-method="createInstance"/>
2.3、实例工厂方法实例化(了解)
// 类
public class Cat3 {
}
// Cat3工厂
public class Cat3Factory {

    public Cat3 createInstance(){
        Cat3 cat3 = new Cat3();
        return cat3;
    }
}

// createBean.xml
<!--3、实例工厂方法实例化(了解)
        第一个bean是创建实例工厂对象,第二个bean是通过实例工厂对象调用工厂方法创建Cat3的对象
-->
<bean id="cat3Factory" class="com.sunny.createbean._03_instance_factory.Cat3Factory"/>
<bean id="cat3" factory-bean="cat3Factory" factory-method="createInstance"/>
2.4、实现FactoryBean接口实例化
// 类
public class Cat4 {
}
// Cat4工厂
public class Cat4Factory implements FactoryBean<Cat4> {
    private String name;

    public void setName(String name) {
        this.name = name;
    }

    // 实例工厂的方法(对比方式三,这种方式固定了工厂实例方法)
    public Cat4 getObject() throws Exception {
        System.out.println("name=:" + name);
        Cat4 cat4 = new Cat4();
        return cat4;
    }

    public Class<?> getObjectType() {
        return Cat4.class;
    }
}

// createBean.xml
<!--4、实现FactoryBean接口实例化:实例工厂的变种
    Cat4Factory工厂类的创建实例的方法已经固定实现了,Cat4Factory通过实现方法getObject来
        创建Cat4的对象
-->
<bean id="cat4" class="com.sunny.createbean._04_factory_bean.Cat4Factory">
    <property name="name" value="猫猫4"/>
</bean>
测试
Spring Test(基于Junit4)
@RunWith(SpringJUnit4ClassRunner.class)
@ContextConfiguration("classpath:applicationContext.xml")
public class SpringJunit4 {

    // @Autowired:表示从Spring IoC容器中根据类型找到对应的bean,并自动注入到某个字段上
    // ------- 4种Bean实例化的方式---------
    @Autowired
    private Cat1 cat1;
    @Autowired
    private Cat2 cat2;
    @Autowired
    private Cat3 cat3;
    @Autowired
    private Cat4 cat4;

    // 不使用Spring容器的时候,使用这4种方式的实例化步骤
    @Test
    public void testOld() throws Exception {
        // 使用构造器_实例化bean
        Cat1 cat1 = new Cat1();
        // 使用静态工厂方法_实例化bean
        Cat2 cat2 = Cat2Factory.createInstance();
        // 使用实例工厂方法_实例化bean
        Cat3 cat3 = new Cat3Factory().createInstance();
        // 实现FactoryBean接口实例化_实例化bean
        Cat4 cat4 = new Cat4Factory().getObject();
    }
    @Test
    public void test2(){
        System.out.println(cat1);
        System.out.println(cat2);
        System.out.println(cat3);
        System.out.println(cat4);
    }
}
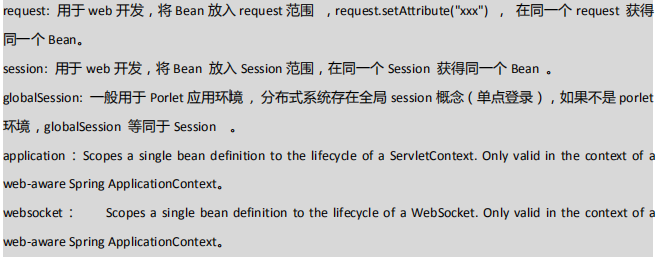
3、Bean作用域
跳转到目录
在Spring容器中是指其创建的Bean对象相对于其他Bean对象的请求可见范围,语法格式:
<bean id="" class="" scope="作用域"/>
singleton: 单例, 在Spring IoC容器中仅存在一个Bean实例(默认缺省就是scope)prototype: 多里, 每次从容器中调用Bean时,都返回一个新的实例,每次调用getBean()时,相当于执行 new XxxBean(), 不会在容器启动时创建对象.
其他的
// 类
public class Dog {
}

// Dog.xml
<!--Bean的作用域,
    单例: 缺省是singleton,从容器中拿到的对象都是同一个对象
    多例: prototype, 从容器拿到的对象不是同一个对象
-->
<bean id="dog" class="com.sunny.scope.Dog" scope="singleton"/>

// Spring Test
// ----------bean的scope范围-----------------
// 表示从容器中拿到实例化的dog对象
@Autowired
private Dog dog1;
@Autowired
private Dog dog2;

@Test
public void test3(){
    // 因为bean的scope默认就是singleton,所以容器生成的Dog对象就是同一个
    System.out.println(dog1);
    System.out.println(dog2);
}

4、Bean的初始化和销毁
跳转到目录
比如DataSource、SqlSessionFactory 最终都需要关闭资源; 在Bean销毁之前都要调用close方法, 而在Spring IoC容器中可以帮我们管理对象的创建, 如何帮我们管理对象在创建之后的初始化操作和回收资源的操作呢,语法如下:
<bean id="" class="" init-method="该类初始化方法名"
     destroy-method="该类销毁方法名"/>
- init-method: 调用ds对象的初始化方法,在初始化执行之前,立刻执行
- destroy-method: 调用ds对象的销毁方法,在销毁执行之前,调用
使用Spring IoC容器时的操作
测试使用的是Spring Test
MyDataSource类
/**
 * 模拟数据库连接池
 * 当使用连接池的时候,都需要初始化和销毁,使用Spring IoC容器后,如何
 * 让容器帮助我们进行初始化和销毁呢?
 */
public class MyDataSource {

    public MyDataSource(){
        System.out.println("创建对象...");
    }

    public void open(){
        System.out.println("开启资源...");
    }

    public void close(){
        System.out.println("销毁资源...");
    }

    public void doWork(){
        System.out.println("工作...");
    }
}

// mydatasource.xml
<!--
    init-method: 调用ds对象的初始化方法,在初始化执行之前,立刻执行
    destroy-method: 调用ds对象的销毁方法,在销毁执行之前,调用
-->
<bean id="ds" class="com.sunny.lifecycle.MyDataSource" init-method="open"
    destroy-method="close"/>

//Spring Test测试
// ------bean的初始化和销毁--------
// 没有使用Spring容器的操作
@Test
public void testOld1(){
    // 创建对象
    MyDataSource ds = new MyDataSource();
    System.out.println("-------");
    // 初始化操作
    ds.open();
    // 工作
    ds.doWork();
    // 销毁
    ds.close();
}
// 使用Spring容器的方式
@Autowired
private MyDataSource ds;

@Test
public void test4(){
    ds.doWork();
}
使用普通的测试方法
在这里没有打印出销毁资源,这就是普通测试和Spring测试的区别;
- Spring测试会正常释放资源
- 普通的单元测试不会正常释放资源,这时就需要手动来释放资源了
xml文件和类同上.
public class MyDataSourceTest {
    /**
     * 在这里没有打印出销毁资源,这就是普通测试和Spring测试的区别;
     * Spring测试会正常释放资源
     * 普通的单元测试不会正常释放资源,这时就需要手动来释放资源了
     */
    @Test
    public void test(){
        ClassPathXmlApplicationContext ctx = new ClassPathXmlApplicationContext("xmls/mydatasource.xml");
        MyDataSource ds = ctx.getBean("ds", MyDataSource.class);
        ds.doWork();
        ds.close(); // 手动释放资源
    }

    @Test
    public void test1(){
        @Cleanup //使用第三方框架lombok中的Clearup注解来释放.
        ClassPathXmlApplicationContext ctx = new ClassPathXmlApplicationContext("xmls/mydatasource.xml");
        MyDataSource ds = ctx.getBean("ds", MyDataSource.class);
        ds.doWork();
    }

    @Test
    public void test2(){
        ClassPathXmlApplicationContext ctx = new ClassPathXmlApplicationContext("xmls/mydatasource.xml");
        MyDataSource ds = ctx.getBean("ds", MyDataSource.class);
        ds.doWork();
        // 这种方式是将Spring线程作为JVM的子线程,当JVM关闭后,该Spring线程也会被关闭
        ctx.registerShutdownHook();
    }
}
5、Bean的实例化过程
跳转到目录
bean的声明周期: bean从出生–>销毁的整个过程
<bean id="" class="" init-method="该类初始化方法名"
     destroy-method="该类销毁方法名"/>
1、启动Spring容器
2、创建Bean对象 ----> 实际是在调用Bean对象的构造器
3、给Bean添加属性
4、调用Bean对象的初始化init-method
5、getBean获取某个bean对象,调用bean对象的某一个方法
6、调用Bean对象的销毁方法destory-method
7、Spring容器销毁
二、DI操作
1、 什么是注入操作?

注入的方式:
- setter方法注入
- 构造器注入
注入值类型:
- 常量值(简单类型) -----
value 元素 - 对象 -----
ref元素 - 集合 -----
对象集合类型元素
2、XML自动装配(不推荐)
- 设置
<bean/>元素的:autowire属性<bean id="person2" class="Person的全限定名" autowire="byName"/> - autowire属性: 让Spring按照一定的规则方式自己去找合适的对象,并完成DI注入操作.
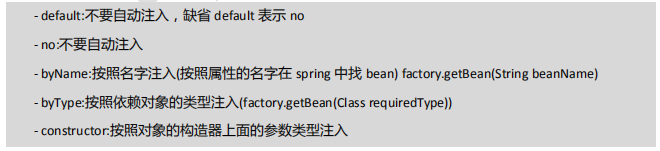
注意:- 如果按照
byName自动注入,要求所有的属性名字和id的名字必须保证一种规范的命名 - 如果安装
byType注入,如果Spring容器中同一个类型有多个实例,报 bean不是唯一类型错误;
- 如果按照
// 需求: 让Spring帮我们创建Person对象,而Person对象还需要依赖Dog对象;所以需要创建两个Bean
public class Person {
    private Dog dog;

    public void setDog(Dog dog){
        this.dog = dog;
    }
    @Override
    public String toString() {
        return "Person{" + "dog=" + dog + '}';
    }
}

// .xml
<bean id="dog1" class="com.sunny._01_xml_autowired.Dog"/>
<bean id="person2" class="com.sunny._01_xml_autowired.Person" autowire="byName"/>

// Spring Test测试
// @Autowired:表示从Spring IoC容器中根据类型找到对应的bean,并自动注入到某个字段上
@Autowired
private Person person;

@Test
public void test(){
    System.out.println(person);
}
3、Setter方法注入(重点)
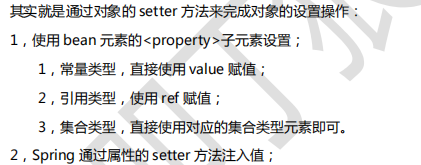
3.1、注入常量
跳转到目录
注入常量值,也称之为注入简单类型 :
<property name="对象属性名称" value="注入的值"/>
// 类
@Setter
@ToString
public class Employee {
    private String name;
    private Integer age;
    private BigDecimal salary;
}
3.2、注入对象
跳转到目录
注入对象,就是把一个对象,通过setter方法设置给另一个对象:
<property name="对象属性名称" ref="被注入对象的bean的id"/>
// 类
public class Cat {
}
public class Person {
    private Cat c1;
    public void setC1(Cat c1) {
        this.c1 = c1;
    }
    @Override
    public String toString() {
        return "Person1{" +
                "c1=" + c1 +
                '}';
    }
}
3.3、注入集合
跳转到目录
注入集合,就是把一个集合类型的数据,通过setter方法设置给另一个对象:
 <property name="集合类型">
            <set>
                <value>set1</value>
                <value>set2</value>
            </set>
 </property>
// 类
@Setter
public class CollectionBean {
private Set<String> set;
private List<String> list;
private String[] array;
private Map<String, String> map;
private Properties prop;
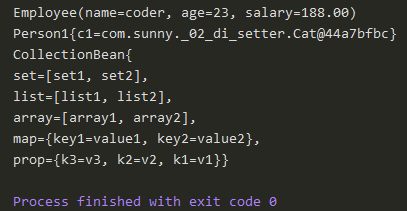
@Override
public String toString() {
return "CollectionBean{" +
"\nset=" + set +
", \nlist=" + list +
", \narray=" + Arrays.toString(array) +
", \nmap=" + map +
", \nprop=" + prop +
'}';
}
}
XML文件
<?xml version="1.0" encoding="UTF-8"?>
<beans xmlns="http://www.springframework.org/schema/beans"
       xmlns:xsi="http://www.w3.org/2001/XMLSchema-instance"
       xsi:schemaLocation="http://www.springframework.org/schema/beans http://www.springframework.org/schema/beans/spring-beans.xsd">

    <!--属性注入: 注入常量类型-->
    <bean id="employee" class="com.sunny._02_di_setter.Employee">
        <property name="name" value="coder"/>
        <property name="age" value="23"/>
        <property name="salary" value="188.00"/>
    </bean>

    <!--属性注入: 注入对象类型-->
    <bean id="cat" class="com.sunny._02_di_setter.Cat"/>
    <bean id="person" class="com.sunny._02_di_setter.Person">
        <property name="c1" ref="cat"/>
    </bean>

    <!--属性注入: 注入集合类型-->
    <bean id="collectionBean" class="com.sunny._02_di_setter.CollectionBean">
        <!--set类型-->
        <property name="set">
            <set>
                <value>set1</value>
                <value>set2</value>
            </set>
        </property>
        <!--list类型-->
        <property name="list">
            <list>
                <value>list1</value>
                <value>list2</value>
            </list>
        </property>
        <!--array类型-->
        <property name="array">
            <array>
                <value>array1</value>
                <value>array2</value>
            </array>
        </property>
        <!--map类型-->
        <property name="map">
            <map>
                <entry key="key1" value="value1"/>
                <entry key="key2" value="value2"/>
            </map>
        </property>
        <!--properties类型-->
        <!--<property name="prop">
            <props>
                <prop key="key1">value1</prop>
                <prop key="key2">value2</prop>
            </props>
        </property>-->
        <property name="prop">
            <value>
                k1=v1
                k2=v2
                k3=v3
            </value>
        </property>
    </bean>
</beans>

测试类
@RunWith(SpringJUnit4ClassRunner.class)
@ContextConfiguration("classpath:applicationContext.xml")
public class DiSetterTest {
    // @Autowired:表示从Spring IoC容器中根据类型找到对应的bean,并自动注入到某个字段上
    @Autowired
    private Employee employee;
    @Autowired
    private Person person;
    @Autowired
    private CollectionBean cb;

    @Test
    public void test1(){
        System.out.println(employee);
        System.out.println(person);
        System.out.println(cb);
    }
}
输出
4、构造器注入
- setter方式注入使用
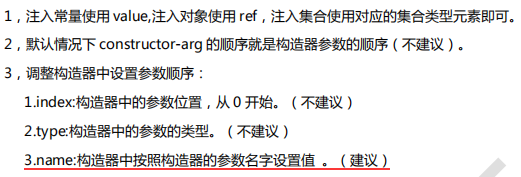
<property /> 元素 - 构造器方式注入使用
<constructor-arg/>元素
Java类
// 注入常量的类
@ToString
@AllArgsConstructor
public class Employee1 {
    private String name;
    private Integer age;
    private BigDecimal salary;
}
// 注入对象的类
public class Cat1 {
}
public class Person1 {
    private Cat1 c1;
        public Person1(Cat1 c1) {
        this.c1 = c1;
    }
    @Override
    public String toString() {
        return "Person1{" +
                "c1=" + c1 +
                '}';
    }
}
// 注入集合类型的类
@AllArgsConstructor //生成全参数构造器
@ToString
public class CollectionBean1 {
    private Set<String> set;
    private List<String> list;
    private String[] array;
    private Map<String, String> map;
    private Properties prop;
}
xml文件
<?xml version="1.0" encoding="UTF-8"?>
<beans xmlns="http://www.springframework.org/schema/beans"
       xmlns:xsi="http://www.w3.org/2001/XMLSchema-instance"
       xsi:schemaLocation="http://www.springframework.org/schema/beans http://www.springframework.org/schema/beans/spring-beans.xsd">

    <!--构造器注入: 常量类型-->
    <bean id="employee1" class="com.sunny._03_di_constructor.Employee1">
        <constructor-arg name="name" value="zygui"/>
        <constructor-arg name="age" value="23"/>
        <!--<constructor-arg name="salary" value="9999.00"/>-->
        <constructor-arg name="salary">
            <null/>
        </constructor-arg>
    </bean>

    <!--构造器注入: 对象类型-->
    <bean id="cat1" class="com.sunny._03_di_constructor.Cat1"/>
    <bean id="perosn1" class="com.sunny._03_di_constructor.Person1">
        <constructor-arg name="c1" ref="cat1"/>
    </bean>

    <!--构造器注入: 集合类型-->
    <bean id="collectionBean1" class="com.sunny._03_di_constructor.CollectionBean1">
        <!--set类型-->
        <constructor-arg name="set">
            <set>
                <value>set1</value>
                <value>set2</value>
            </set>
        </constructor-arg>
        <!--list类型-->
        <constructor-arg name="list">
            <list>
                <value>list1</value>
                <value>list2</value>
            </list>
        </constructor-arg>
        <!--array类型-->
        <constructor-arg name="array">
            <array>
                <value>array1</value>
                <value>array2</value>
            </array>
        </constructor-arg>
        <!--map类型-->
        <constructor-arg name="map">
            <map>
                <entry key="key1" value="value1"/>
                <entry key="key2" value="value2"/>
            </map>
        </constructor-arg>
        <!--properties类型-->
        <constructor-arg name="prop">
            <value>
                k1=v1
                k2=v2
                k3=v3
            </value>
        </constructor-arg>
    </bean>
</beans>
测试类
    // @Autowired:表示从Spring IoC容器中根据类型找到对应的bean,并自动注入到某个字段上
    @Autowired
    private Employee1 emp;
    @Autowired
    private Person1 p1;
    @Autowired
    private CollectionBean1 cb1;

    @Test
    public void test1(){
        System.out.println(emp);
        System.out.println(p1);
        System.out.println(cb1);
    }
5、Bean元素继承
跳转到目录
多个bean元素共同配置的抽取,实则是bean配置的拷贝,和Java的继承不同
- Java继承: 把多个类共同的代码抽取到父类中
- bean元素的继承: 把多个bean元素
共同的属性配置抽取到另一个公用的bean元素中
Java类
@Setter
@ToString
public class SomeBean1 {
    private String name;
    private Integer age;
    private Double weight;
}

@Setter
@ToString
public class SomeBean2 {
    private String name;
    private Integer age;
    private Double height;
}
xml配置
<?xml version="1.0" encoding="UTF-8"?>
<beans xmlns="http://www.springframework.org/schema/beans"
       xmlns:xsi="http://www.w3.org/2001/XMLSchema-instance"
       xsi:schemaLocation="http://www.springframework.org/schema/beans http://www.springframework.org/schema/beans/spring-beans.xsd">

    <!--多个bean共同配置的抽取-->
    <bean id="baseBean" abstract="true">
        <property name="name" value="Tom"/>
        <property name="age" value="23"/>
    </bean>

    <bean id="someBean1" class="com.sunny._04_bean_tag_inheritance.SomeBean1" parent="baseBean">
        <!--可以覆盖-->
        <property name="name" value="lucy"/>
        <property name="weight" value="60.0"/>
    </bean>
    <bean id="someBean2" class="com.sunny._04_bean_tag_inheritance.SomeBean2" parent="baseBean">
        <property name="height" value="175.0"/>
    </bean>


    <!--原始写法,不使用Bean的继承-->
    <!--<bean id="someBean1" class="com.sunny._04_bean_tag_inheritance.SomeBean1">
        <property name="name" value="Tom"/>
        <property name="age" value="23"/>
        <property name="weight" value="60.0"/>
    </bean>
    <bean id="someBean2" class="com.sunny._04_bean_tag_inheritance.SomeBean2">
        <property name="name" value="Tom"/>
        <property name="age" value="23"/>
        <property name="height" value="175.0"/>
    </bean>-->
</beans>
6、属性占位符
跳转到目录
举一个查询数据库的例子:
- 表结构
CREATE TABLE `student` (
  `id` bigint(20) NOT NULL,
  `name` varchar(40) NOT NULL,
  `age` int(11) NOT NULL,
  PRIMARY KEY (`id`)
) ENGINE=InnoDB DEFAULT CHARSET=utf8;
1、原始版本
- 查询数据库信息的测试方法
@RunWith(SpringJUnit4ClassRunner.class)
@ContextConfiguration("classpath:applicationContext.xml")
public class PropertyPlaceholderTest {
private DruidDataSource ds;
@Test
public void test() throws Exception{
ds = new DruidDataSource();
ds.setDriverClassName("com.mysql.jdbc.Driver");
ds.setUrl("jdbc:mysql://localhost:3306/spring");
ds.setUsername("root");
ds.setPassword("1111");
ds.setInitialSize(2);
@Cleanup
Connection conn = ds.getConnection();
String sql = "SELECT id, name, age FROM student";
@Cleanup
PreparedStatement ps = conn.prepareStatement(sql);
@Cleanup
ResultSet rs = ps.executeQuery();
while (rs.next()){
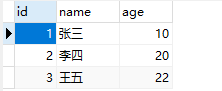
System.out.print(rs.getLong("id")+",");
System.out.print(rs.getString("name")+",");
System.out.println(rs.getInt("age"));
}
}
}
注意: @Cleanup是第三方框架lombok的注解,该注解的作用自动资源管理, 并处理一些异常.
成功查询到数据库中的信息

但是从上面代码可以发现, 我们可以将这一坨代码,交给Spring IoC容器来处理,
让IoC来构建我们的dataSource对象; 让DI来给这个对象注入属性值;
2、Spring IoC容器管理版本
- 测试类
@RunWith(SpringJUnit4ClassRunner.class)
@ContextConfiguration("classpath:applicationContext.xml")
public class PropertyPlaceholderTest {

    // @Autowired:表示从Spring IoC容器中根据类型找到对应的bean,并自动注入到某个字段上
    @Autowired
    private DruidDataSource ds;

    @Test
    public void test() throws Exception{
        @Cleanup
        Connection conn = ds.getConnection();
        String sql = "SELECT id, name, age FROM student";
        @Cleanup
        PreparedStatement ps = conn.prepareStatement(sql);
        @Cleanup
        ResultSet rs = ps.executeQuery();
        while (rs.next()){
            System.out.print(rs.getLong("id")+",");
            System.out.print(rs.getString("name")+",");
            System.out.println(rs.getInt("age"));
        }
    }
}
- db.properties
jdbc.driverClassName=com.mysql.jdbc.Driver
jdbc.url=jdbc:mysql://localhost:3306/spring
jdbc.username=root
jdbc.password=1111
jdbc.initialSize=2
- xml文件
<?xml version="1.0" encoding="UTF-8"?>
<beans xmlns="http://www.springframework.org/schema/beans"
       xmlns:xsi="http://www.w3.org/2001/XMLSchema-instance"
       xmlns:context="http://www.springframework.org/schema/context"
       xsi:schemaLocation="http://www.springframework.org/schema/beans
       http://www.springframework.org/schema/beans/spring-beans.xsd
       http://www.springframework.org/schema/context
       http://www.springframework.org/schema/context/spring-context.xsd">

    <!--从classpath的根路径去加载db.properties文件-->
    <!--<context:property-placeholder location="classpath:db.properties" system-properties-mode="NEVER"/>-->
    <context:property-placeholder location="classpath:db.properties"/>

    <!--配置一个druid的连接池-->
    <bean id="dataSource" class="com.alibaba.druid.pool.DruidDataSource"
          init-method="init" destroy-method="close">
        <property name="driverClassName" value="${jdbc.driverClassName}"/>
        <property name="url" value="${jdbc.url}"/>
        <property name="username" value="${jdbc.username}"/>
        <property name="password" value="${jdbc.password}"/>
        <property name="initialSize" value="${jdbc.initialSize}"/>
    </bean>

    <!-- 写死的情况 -->
    <!--<bean id="dataSource" class="com.alibaba.druid.pool.DruidDataSource"
        init-method="init" destroy-method="close">
        <property name="driverClassName" value="com.mysql.jdbc.Driver"/>
        <property name="url" value="jdbc:mysql://localhost:3306/spring"/>
        <property name="username" value="root"/>
        <property name="password" value="1111"/>
        <property name="initialSize" value="2"/>
    </bean>-->

</beans>
注意:
要在xml文件中增加context命名空间
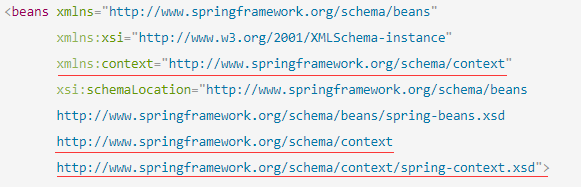
<!--从classpath的根路径去加载db.properties文件-->
<context:property-placeholder location="classpath:db.properties"/>
 XML轻松学习手册