一、基础知识准备
首先,opencv目前仅支持三种特征的训练检测, HAAR、LBP、HOG,选择哪个特征就去补充哪个吧。opencv的这个训练算法是基于adaboost而来的,所以需要先对adaboost进行基础知识补充啊,网上一大堆资料,同志们速度去查阅。我的资源里也有,大家去下载吧,这些我想都不是大家能直接拿来用的,我下面将直接手把手告诉大家训练怎么操作,以及要注意哪些细节。
二、关于正样本的准备
1、采集正样本图片
因为正样本最后需要大小归一化,所以我在采集样本的时候就直接把它从原图里抠出来了,方便后面缩放嘛,而不是只保存它的框个数和框位置信息(框个数、框位置信息看下一步解释),在裁剪的过程中尽量保持样本的长宽比例一致。比如我最后要归一化成20 X 20,在裁剪样本的时候,我都是20X20或者21X21、22X22等等,最大我也没有超过30X30(不超过跟我的自身用途有关,对于人脸检测这种要保证缩放不变性的样本,肯定就可以超过啦),我资源里也给出可以直接用的裁剪样本程序。
(这里我说错了,根据createsamples.cpp ,我们不需要提前进行缩放操作,它在第3步变成vec时就包含了缩放工作.如果我们是用objectMaker标记样本,程序同时生成的关于每一幅图的samplesInfo信息,直接给第三步用即可。当然,你提前缩放了也没关系,按照第2步操作即可)
2、获取正样本路径列表
在你的图片文件夹里,编写一个bat程序(get route.bat,bat是避免每次都需要去dos框输入,那里又不能复制又不能粘贴!),如下所示:
把这个dat文件中的所有非图片的路径都删掉,比如上图的头两行,再将bmp 替换成 bmp 1 0 0 20 20,如下:
(1代表个数,后四个分别对应 left top width height,如果我们之前不是把样本裁剪下来的,那么你的这个dat可能就长成这样1. bmp 3 1 3 24 24 26 28 25 25 60 80 26 26,1.bmp是完全的原图啊,你之前的样本就是从这张图上扣下来的)
这里,我们得利用opencv里的一个程序叫opencv_createsamples.exe,可以把它拷贝出来。针对它的命令输入也是写成bat文件啦,因为cascade训练的时候用的是vec。如下:
就此有关正样本的东西准备结束。
(vec中其实就是保存的每一个sample图,并且已经统一w、h大小了,如果你想看所有的sample,也可以通过调用opencv_createsamples.exe,使用操作,见附)
三、关于负样本的准备
这个特别简单,直接拿原始图,不需要裁剪抠图(不裁剪还能保证样本的多样性),也不需要保存框(网上说只要保证比正样本大小大哈,大家就保证吧),只要把路径保存下来。同正样本类似,步骤图如下:
至此有关负样本的也准备完成。
四、开始训练吧
这里我们用opencv_traincascade.exe(opencv_haartraining.exe的用法跟这个很相似,具体需要输入哪些参数去看opencv的源码吧,网上资料也有很多,主要是opencv_traincascade.exe比opencv_haartraining.exe包含更多的特征,功能齐全些啊),直接上图:
命令输入也直接用bat文件,请务必保证好大小写一致,不然不予识别参数。小白兔,跑起来~~~
这是程序识别到的参数,没有错把,如果你哪个字母打错了,你就会发现这些参数会跟你预设的不一样啊,所以大家一定要看清楚了~~~~
跑啊跑啊跑啊跑,如下:
这一级的强训练器达到你预设的比例以后就跑去训练下一级了,同志们那个HR比例不要设置太高,不然会需要好多样本,然后stagenum不要设置太小啊,不然到时候拿去检测速度会很慢。
其实这个训练可以中途停止的,因为下次开启时它会读取这些xml文件,接着进行上次未完成的训练。哈哈~~~~好人性化啊!
训练结束,我要到了我的cascade.xml文件,现在我要拿它去做检测了啊!呼呼~~~~
五、开始检测吧
opencv有个opencv_performance.exe程序用于检测,但是它只能用在用opencv_haartraining.exe来用的,所以我这里是针对一些列图片进行检测的,检测代码如下:
自己看看自己的检测结果咯。效果不好的改进样本,调整训练参数吧~~~嘎嘎
我觉得我写的够白痴,很方便大家直接拿来用。其中一些细节,大家自己琢磨吧~88
附:
1、opencv_createsamples.exe的参数
(createsamples.cpp)
以下1)~4)是按顺序判断,且有且仅有一个
1)提供imagename 和vecname时,调用以下操作与1)类似
3)提供 infoname和 vecname时,调用以下操作 (这里是我们训练需要的)
函数内容:读取当前图中所有标记的sample(x,y,w,h),并将其缩放到winwidth、winheight大小,故在这之前的人为缩放操作不需要
4)仅vecname时,可以将vec里面的所有缩放后的samples都显示出来
2、opencv_haartraining.exe的参数
(haartraining.cpp)
3、opencv_performance.exe参数
(performance.cpp)
4、opencv_traincascade.exe参数说明
——traincascade.cpp
其中cascadeParams.printDefaults();——cascadeclassifier.cpp如下
featureParams[fi]->printDefaults();——haarfeatures.cpp 如下
通用参数:
-data<cascade_dir_name>
目录名,如不存在训练程序会创建它,用于存放训练好的分类器
-vec<vec_file_name>
包含正样本的vec文件名(由opencv_createsamples程序生成)
-bg<background_file_name>
背景描述文件,也就是包含负样本文件名的那个描述文件
-numPos<number_of_positive_samples>
每级分类器训练时所用的正样本数目
-numNeg<number_of_negative_samples>
每级分类器训练时所用的负样本数目,可以大于-bg指定的图片数目
-numStages<number_of_stages>
训练的分类器的级数。
-precalcValBufSize<precalculated_vals_buffer_size_in_Mb>
缓存大小,用于存储预先计算的特征值(featurevalues),单位为MB
-precalcIdxBufSize<precalculated_idxs_buffer_size_in_Mb>
缓存大小,用于存储预先计算的特征索引(featureindices),单位为MB。内存越大,训练时间越短
-baseFormatSave
这个参数仅在使用Haar特征时有效。如果指定这个参数,那么级联分类器将以老的格式存储
级联参数:
-stageType<BOOST(default)>
级别(stage)参数。目前只支持将BOOST分类器作为级别的类型
-featureType<{HAAR(default),LBP}>
特征的类型:HAAR-类Haar特征;LBP-局部纹理模式特征
-w<sampleWidth>
-h<sampleHeight>
训练样本的尺寸(单位为像素)。必须跟训练样本创建(使用opencv_createsamples程序创建)时的尺寸保持一致
Boosted分类器参数:
-bt<{DAB,RAB,LB,GAB(default)}>
Boosted分类器的类型:DAB-DiscreteAdaBoost,RAB-RealAdaBoost,LB-LogitBoost,GAB-GentleAdaBoost
-minHitRate<min_hit_rate>
分类器的每一级希望得到的最小检测率(正样本被判成正样本的比例)。总的检测率大约为min_hit_rate^number_of_stages。可以设很高,如0.999
-maxFalseAlarmRate<max_false_alarm_rate>
分类器的每一级希望得到的最大误检率(负样本被判成正样本的比例)。总的误检率大约为max_false_alarm_rate^number_of_stages。可以设较低,如0.5
-weightTrimRate<weight_trim_rate>
Specifieswhethertrimmingshouldbeusedanditsweight.一个还不错的数值是0.95
-maxDepth<max_depth_of_weak_tree>
弱分类器树最大的深度。一个还不错的数值是1,是二叉树(stumps)
-maxWeakCount<max_weak_tree_count>
每一级中的弱分类器的最大数目。Theboostedclassifier(stage)willhavesomanyweaktrees(<=maxWeakCount),asneededtoachievethegiven-maxFalseAlarmRate
类Haar特征参数:
-mode<BASIC(default)|CORE|ALL>
选择训练过程中使用的Haar特征的类型。BASIC只使用右上特征,ALL使用所有右上特征和45度旋转特征
5、detectMultiScale函数参数说明
该函数会在输入图像的不同尺度中检测目标:
image -输入的灰度图像,
objects-被检测到的目标矩形框向量组,
scaleFactor-为每一个图像尺度中的尺度参数,默认值为1.1
minNeighbors-为每一个级联矩形应该保留的邻近个数,默认为3,表示至少有3次检测到目标,才认为是目标
flags-CV_HAAR_DO_CANNY_PRUNING,利用Canny边缘检测器来排除一些边缘很少或者很多的图像区域;
CV_HAAR_SCALE_IMAGE,按比例正常检测;
CV_HAAR_FIND_BIGGEST_OBJECT,只检测最大的物体;
CV_HAAR_DO_ROUGH_SEARCH,只做粗略检测。默认值是0
minSize和maxSize-用来限制得到的目标区域的范围(先找maxsize,再用1.1参数缩小,直到小于minSize终止检测)
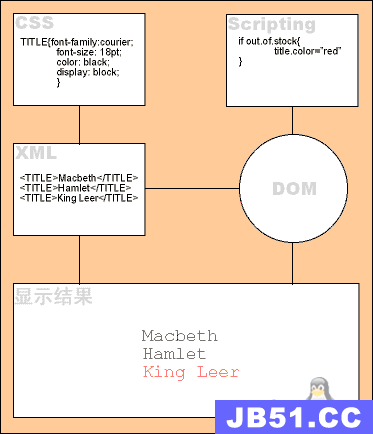
6、opencv关于Haar介绍
(haarfeatures.cpp ——opencv3.0)
Detailed Description
Haar Feature-based Cascade Classifier for Object Detection
The object detector described below has been initially proposed by Paul Viola[pdf]and improved by Rainer Lienhart[pdf].
First,a classifier (namely acascade of boosted classifiers working with haar-like features) is trained with a few hundred sample views of a particular object (i.e.,a face or a car),called positive examples,that are scaled to the same size (say,20x20),and negative examples - arbitrary images of the same size.
After a classifier is trained,it can be applied to a region of interest (of the same size as used during the training) in an input image. The classifier outputs a "1" if the region is likely to show the object (i.e.,face/car),and "0" otherwise. To search for the object in the whole image one can move the search window across the image and check every location using the classifier. The classifier is designed so that it can be easily "resized" in order to be able to find the objects of interest at different sizes,which is more efficient than resizing the image itself. So,to find an object of an unkNown size in the image the scan procedure should be done several times at different scales.
The word "cascade" in the classifier name means that the resultant classifier consists of several simpler classifiers (stages) that are applied subsequently to a region of interest until at some stage the candidate is rejected or all the stages are passed. The word "boosted" means that the classifiers at every stage of the cascade are complex themselves and they are built out of basic classifiers using one of four different boosting techniques (weighted voting). Currently discrete Adaboost,Real Adaboost,Gentle Adaboost and Logitboost are supported. The basic classifiers are decision-tree classifiers with at least 2 leaves. Haar-like features are the input to the basic classifiers,and are calculated as described below. The current algorithm uses the following Haar-like features:
The feature used in a particular classifier is specified by its shape (1a,2b etc.),position within the region of interest and the scale (this scale is not the same as the scale used at the detection stage,though these two scales are multiplied). For example,in the case of the third line feature (2c) the response is calculated as the difference between the sum of image pixels under the rectangle covering the whole feature (including the two white stripes and the black stripe in the middle) and the sum of the image pixels under the black stripe multiplied by 3 in order to compensate for the differences in the size of areas. The sums of pixel values over a rectangular regions are calculated rapidly using integral images (see below and the integral description).
To see the object detector at work,have a look at the facedetect demo:https://github.com/Itseez/opencv/tree/master/samples/cpp/dbt_face_detection.cpp
The following reference is for the detection part only. There is a separate application called opencv_traincascade that can train a cascade of boosted classifiers from a set of samples.
In the new C++ interface it is also possible to use LBP (local binary pattern) features in addition to Haar-like features. .. [Viola01] Paul Viola and Michael J. Jones. Rapid Object Detection using a Boosted Cascade of Simple Features. IEEE CVPR,2001. The paper is available online athttps://www.cs.cmu.edu/~efros/courses/LBMV07/Papers/viola-cvpr-01.pdf(上述有提到)
7、opencv关于boost
(boost.cpp——opencv3.0)
Boosting
A common machine learning task is supervised learning. In supervised learning,the goal is to learn the functional relationship
Boosting is a powerful learning concept that provides a solution to the supervised classification learning task. It combines the performance of many "weak" classifiers to produce a powerful committee[125]. A weak classifier is only required to be better than chance,and thus can be very simple and computationally inexpensive. However,many of them smartly combine results to a strong classifier that often outperforms most "monolithic" strong classifiers such as SVMs and Neural Networks.
Decision trees are the most popular weak classifiers used in boosting schemes. Often the simplest decision trees with only a single split node per tree (called stumps ) are sufficient.
The boosted model is based on
Different variants of boosting are kNown as discrete Adaboost,Real AdaBoost,LogitBoost,and Gentle AdaBoost[49]. All of them are very similar in their overall structure. Therefore,this chapter focuses only on the standard two-class discrete AdaBoost algorithm,outlined below. Initially the same weight is assigned to each sample (step 2). Then,a weak classifier
Two-class discrete AdaBoost Algorithm
- Set
N examples(xi,yi)1N withxi∈RK,yi∈−1,+1 . - Assign weights as
wi=1/N,i=1,...,N . - Repeat for
m=1,2,...,M : - Classify new samplesxusing the formula:
sign(Σm=1Mcmfm(x)) .
- Note
- Similar to the classical boosting methods,the current implementation supports two-class classifiers only. For M > 2 classes,there is the AdaBoost.MHalgorithm (described in [49]) that reduces the problem to the two-class problem,yet with a much larger training set.
To reduce computation time for boosted models without substantially losing accuracy,the influence trimming technique can be employed. As the training algorithm proceeds and the number of trees in the ensemble is increased,a larger number of the training samples are classified correctly and with increasing confidence,thereby those samples receive smaller weights on the subsequent iterations. Examples with a very low relative weight have a small impact on the weak classifier training. Thus,such examples may be excluded during the weak classifier training without having much effect on the induced classifier. This process is controlled with the weight_trim_rate parameter. Only examples with the summary fraction weight_trim_rate of the total weight mass are used in the weak classifier training. Note that the weights foralltraining examples are recomputed at each training iteration. Examples deleted at a particular iteration may be used again for learning some of the weak classifiers further[49]
- See also
- cv::ml::Boost
Prediction with Boost
StatModel::predict(samples,results,flags) should be used. Pass flags=StatModel::RAW_OUTPUT to get the raw sum from Boost classifier.
8、关于训练过程打印信息的解释
1)POS count : consumed n1 : n2
每次都调用updateTrainingSet( requiredLeafFarate,tempLeafFarate );函数