老规矩先看效果图
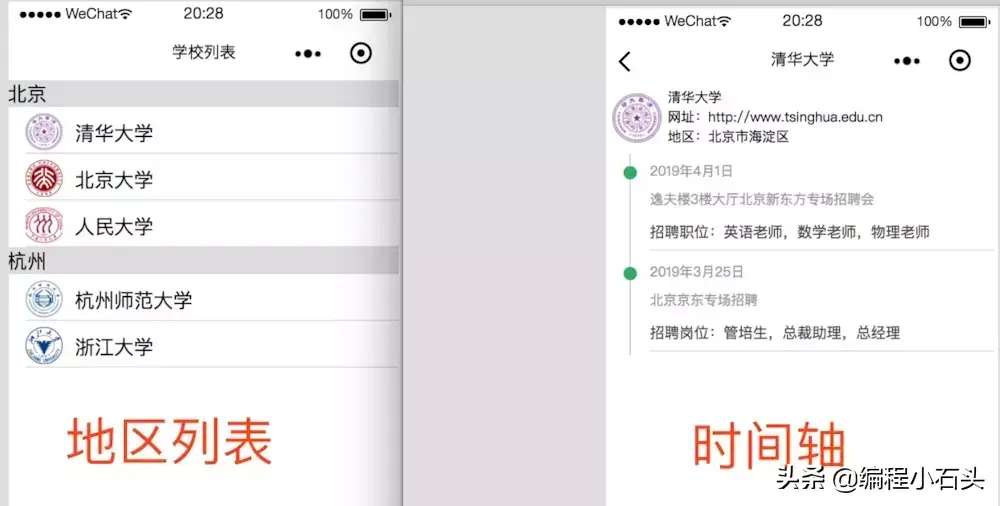
先来看左图的地区列表是如何实现的。
我们在解析数据之前,要先看下数据结构
[{
"_id": "XL28U3kPDdDCJ9m0",
"item": {
"diqu": "北京",
"list": [{
"id": "XL27oeSiwXKAQuFR",
"name": "清华大学",
"img": "https://ss0.baidu.com/6ONWsjip0QIZ8tyhnq/it/u=2693386884,1727296839u0026fm=58u0026bpow=1200u0026bpoh=1200"
}, {
"id": "XL27oeSiwXKAQuF1",
"name": "北京大学",
"img": "https://ss2.baidu.com/6ONYsjip0QIZ8tyhnq/it/u=2152123166,2178049351u0026fm=58u0026bpow=1080u0026bpoh=1080"
}, {
"id": "XL27oeSiwXKAQuF2",
"name": "人民大学",
"img": "https://ss1.baidu.com/6ONXsjip0QIZ8tyhnq/it/u=2642337058,1598432384u0026fm=58u0026w=121u0026h=140u0026img.PNG"
}]
}
}, {
"_id": "XL28U3kPDdDCJ9m1",
"item": {
"diqu": "杭州",
"list": [{
"id": "XL27oeSiwXKAQuF3",
"name": "杭州师范大学",
"img": "https://ss0.baidu.com/6ONWsjip0QIZ8tyhnq/it/u=2219745018,1861674512u0026fm=58u0026bpow=475u0026bpoh=475"
}, {
"id": "XL27oeSiwXKAQuF4",
"name": "浙江大学",
"img": "https://ss2.baidu.com/6ONYsjip0QIZ8tyhnq/it/u=3694367183,2414886214u0026fm=58u0026bpow=995u0026bpoh=995"
}]
}
}]
这里有两条数据,一个是北京地区的,一个是杭州地区的,正好对应我们图上的地区。然后每条json数据里面包含一个学校list,比如北京地区有清华大学,北京大学,人民大学。而每个大学对象里又包含学校id,学校名,学校校徽。
有了上面的源数据,接下来我们就看具体的实现
首先是wxml文件,其实很简单,就是一个大的列表用来显示地区,大列表里面又有一个小的列表用来显示学校。
<!--index.wxml-->
<!-- 列表 -->
<block wx:for="{{dataList}}" wx:key="item">
<view class='item-root'>
<text class='title'>{{item.item.diqu}}</text>
<block wx:for="{{item.item.list}}" wx:key="item">
<view class='img-root' bindtap='goDetail' data-item='{{item}}'>
<image class='img' src='{{item.img}}'></image>
<text class='xuexiao'>{{item.name}}</text>
</view>
</block>
</view>
</block>
然后是wxss文件
/* pages/myorder/myorder.wxss */
page {
background: #fff;
}
.item-root {
display: flex;
flex-direction: column;
}
.title {
width: 100%;
background: gainsboro;
}
.img-root {
display: flex;
margin-left: 15px;
margin-top: 5px;
border-bottom: solid 1px gainsboro;
}
.img {
width: 30px;
height: 30px;
}
.xuexiao {
margin: 5px 10px;
flex: 1;
}
至于如何把源数据json解析并显示到列表中,可以参考我之前写的解析本地json到列表。
《列表功能实现和本地json数据解析》:
https://www.kancloud.cn/java-qiushi/xiaochengxu/767304

解析本地json到列表
视频讲解:
https://edu.csdn.net/course/play/9531/202161

到这里我们的地区列表就轻松的实现了,再来看下时间轴列表的实现
小程序时间轴列表实现

还是先看数据源,我们拿清华大学为例
{
"_id": "XL27oeSiwXKAQuFR",
"name": "清华大学",
"desc": "清华大学始建与1900年,位于北京",
"img": "https://ss0.baidu.com/6ONWsjip0QIZ8tyhnq/it/u=2693386884,1727296839u0026fm=58u0026bpow=1200u0026bpoh=1200",
"wangzhi": "http://www.tsinghua.edu.cn",
"diqu": "北京市海淀区",
"newsList": [{
"time": "2019年4月1日",
"content": "招聘职位:英语老师,数学老师,物理老师",
"title": "逸夫楼3楼大厅北京新东方专场招聘会"
}, {
"time": "2019年3月25日",
"title": "北京京东专场招聘",
"content": "招聘岗位:管培生,总裁助理,总经理"
}]
}
可以看到我们是顶部的学校信息,和底部的newsList组成,newsList就是我们时间轴的具体数据源。下面我们就来看看实现代码。
wxml文件如下,注释里写的很清楚了
<view class='top-root'>
<view class='img-root'>
<image class='img' src='{{deatil.img}}'></image>
</view>
<view class='top-desc-root'>
<text class='xiangqing'>{{deatil.name}}</text>
<text class='xiangqing'>网址:{{deatil.wangzhi}}</text>
<text class='xiangqing'>地区:{{deatil.diqu}}</text>
</view>
</view>
<!-- 时间轴 -->
<view class="listview-container">
<block wx:for="{{newsList}}" wx:key="item">
<view class="playlog-item" bindtap="itemTapped">
<view class="dotline">
<!-- 竖线 -->
<view class="line"></view>
<!-- 圆点 -->
<view class="dot"></view>
<!-- 时间戳 -->
</view>
<view class="content">
<text class="course">{{item.time}}</text>
<text class="course">{{item.title}}</text>
<text class="chapter">{{item.content}}</text>
</view>
</view>
<ad unit-id="adunit-5abb45645905fc90" wx:if="{{index % 5 == 4}}"></ad>
</block>
</view>
wxss样式文件如下
page {
background: #fff;
}
.top-root {
display: flex;
flex-wrap: Nowrap;
flex-direction: row;
}
.img-root {
height: 40px;
width: 40px;
margin: 5px;
}
.img {
width: 100%;
height: 100%;
}
.top-desc-root {
flex: 1;
display: flex;
flex-direction: column;
}
.xiangqing {
font-size: 28rpx;
color: #000;
}
/*时间轴*/
/*外部容器*/
.listview-container {
margin: 10rpx 10rpx;
}
/*行样式*/
.playlog-item {
display: flex;
}
/*时间轴*/
.playlog-item .dotline {
width: 35px;
position: relative;
}
/*竖线*/
.playlog-item .dotline .line {
width: 1px;
height: 100%;
background: #ccc;
position: absolute;
top: 0;
left: 15px;
}
/*圆点*/
.playlog-item .dotline .dot {
width: 11px;
height: 11px;
background: #30ac63;
position: absolute;
top: 10px;
left: 10px;
border-radius: 50%;
}
/*时间戳*/
.playlog-item .dotline .time {
width: 100%;
position: absolute;
margin-top: 30px;
z-index: 99;
font-size: 12px;
color: #777;
text-align: center;
}
/*右侧主体内容*/
.playlog-item .content {
width: 100%;
display: flex;
flex-direction: column;
border-bottom: 1px solid #ddd;
margin: 3px 0;
}
/*章节部分*/
.playlog-item .content .chapter {
font-size: 30rpx;
line-height: 68rpx;
color: #444;
white-space: normal;
padding-right: 10px;
}
/*课程部分*/
.playlog-item .content .course {
font-size: 28rpx;
line-height: 56rpx;
color: #999;
}
到这里时间的样式就已经实现了,我们接下来要做的就是把数据源json数据解析到页面上。方式有如下三种
1,把json放本地2,把json导入到云开发数据3,把json放到我们自己的服务器后台下面我简单已放在云开发数据库并请求解析为例先看下我云开发后台数据库
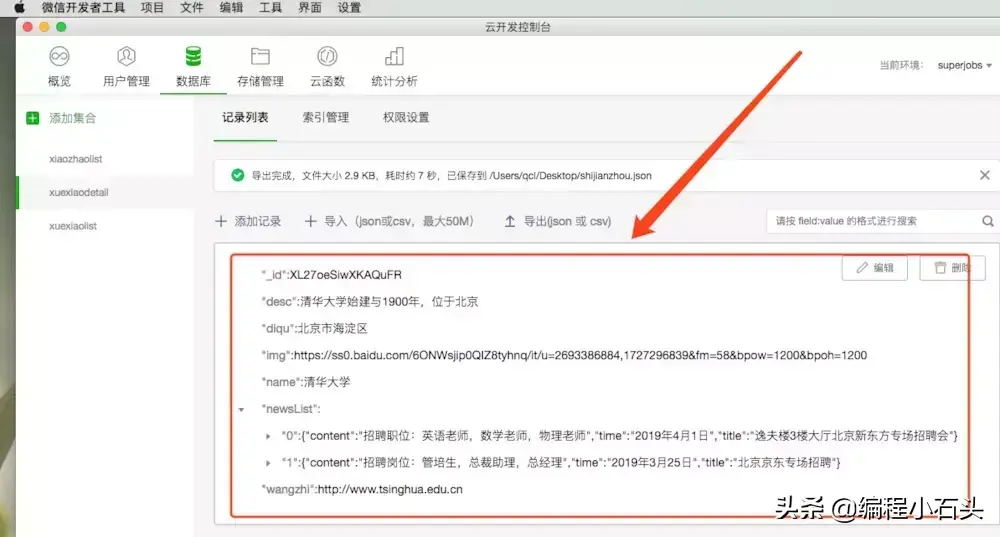
然后写个云函数去获取云开发数据库里的json数据源,就是上图红色框里的数据
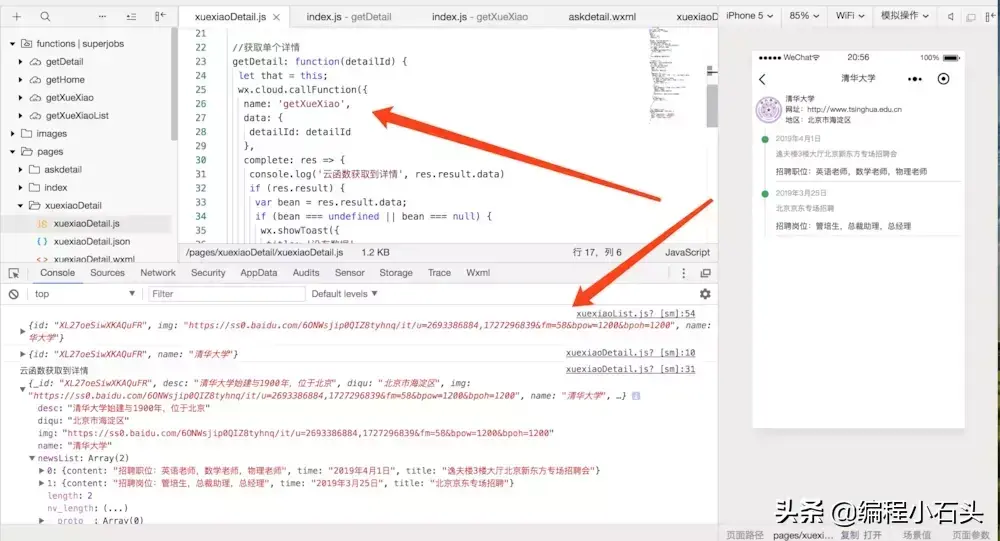
可以看到我们成功的请求到了云数据库里的数据到本地。并成功解析并渲染到页面上了。是不是很简单。
当然,实现这些你还需要有一定的云开发知识。
同样为大家提供了云开发视频讲解:https://edu.csdn.net/course/detail/9604

有任何关于编程的问题都可以私信我,我看到后会及时解答。
编程小石头,码农一枚,非著名全栈开发人员。分享自己的一些经验,学习心得,希望后来人少走弯路,少填坑。编程小石头,为分享干货而生!据说,每个年轻上进,颜值又高的互联网人都关注了编程小石头。