系列文章目录
文章目录
本文你将会学会如何使用canvas绘画优美的线条
如果您从还未使用过canvas,推荐看这篇文章帮助您快速度过新手村
Canvas–零开始绘画矩形
线条属性
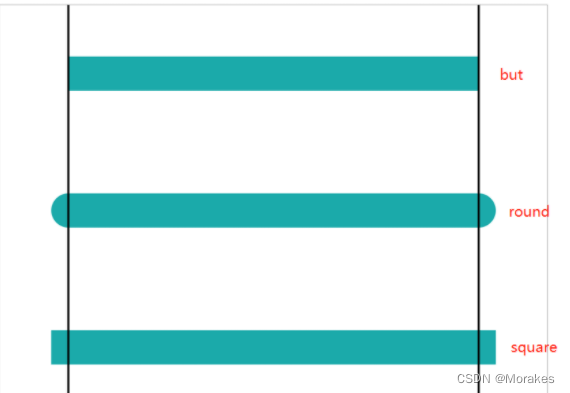
1、lineCap属性
lineCap 定义上下文中线的端点,可以有以下 3 个值。
- butt:默认值,端点是垂直于线段边缘的平直边缘。
- round:端点是在线段边缘处以线宽为直径的半圆。
- square:端点是在选段边缘处以线宽为长、以一半线宽为宽的矩形。
2、lineJoin属性
lineJoin 定义两条线相交产生的拐角,可将其称为连接。在连接处创建一个填充三角形,可以使用 lineJoin 设置它的基本属性。
3、线宽
linewidth 定义线的宽度(默认值为 1.0)。
4、笔触样式
strokeStyle 定义线和形状边框的颜色和样式。
后面两个前面已经说过了,这里我们着重来看看前两个属性。
lineCap
<!DOCTYPE html>
<html lang="en">
<head>
  <Meta charset="UTF-8">
  <Meta http-equiv="X-UA-Compatible" content="IE=edge">
  <Meta name="viewport" content="width=device-width, initial-scale=1.0">
  <title>Document</title>
</head>
<body>
  <canvas id="canvas" style="border: 1px solid #aaaaaa; margin: 50px auto;" width="800" height="600">
    你的浏览器居然不支持Canvas.
  </canvas>
  <script>
   window.onload = function(){
        var canvas = document.getElementById("canvas");
        canvas.width = 800;
        canvas.height = 600;
        var context = canvas.getContext("2d");

        context.linewidth = 50;
        context.strokeStyle = "#1BAAAA";

        context.beginPath();
        context.moveto(100,100);
        context.lineto(700,100);
        context.lineCap = "butt";
        context.stroke();

        context.beginPath();
        context.moveto(100,300);
        context.lineto(700,300);
        context.lineCap = "round";
        context.stroke();

        context.beginPath();
        context.moveto(100,500);
        context.lineto(700,500);
        context.lineCap = "square";
        context.stroke();

        //下面画两个基准线方便观察
        context.linewidth = 3;
        context.strokeStyle = "black";

        context.beginPath();
        context.moveto(100,0);
        context.lineto(100,600);
        context.moveto(700,0);
        context.lineto(700,600);
        context.stroke();
    }
  </script>
</body>
</html>
演示图:
线段的链接 lineJoin
<!DOCTYPE html>
<html lang="en">
<head>
  <Meta charset="UTF-8">
  <Meta http-equiv="X-UA-Compatible" content="IE=edge">
  <Meta name="viewport" content="width=device-width, initial-scale=1.0">
  <title>Document</title>
</head>
<body>
  <canvas id="canvas" style="border: 1px solid #aaaaaa; margin: 50px auto;" width="800" height="600">
    你的浏览器居然不支持Canvas.
  </canvas>
  <script>
   window.onload = function(){
        var canvas = document.getElementById("canvas");
        canvas.width = 800;
        canvas.height = 600;
        var context = canvas.getContext("2d");

        context.beginPath();
        context.moveto(100,100);
        context.lineto(300,300);
        context.lineto(100,500);
        context.lineJoin = "miter";
        context.linewidth = 20;
        context.strokeStyle = "red";
        context.stroke();

        context.beginPath();
        context.moveto(300,100);
        context.lineto(500,300);
        context.lineto(300,500);
        context.lineJoin = "bevel";
        context.linewidth = 20;
        context.strokeStyle = "blue";
        context.stroke();

        context.beginPath();
        context.moveto(500,100);
        context.lineto(700,300);
        context.lineto(500,500);
        context.lineJoin = "round";
        context.linewidth = 20;
        context.strokeStyle = "black";
        context.stroke();
    }

    function drawRect(ctx, x, y, width, height, fillColor, borderWidth, borderColor){
      ctx.beginPath();
        ctx.rect( x, y, width, height)
        ctx.linewidth = borderWidth;
        ctx.strokeStyle = borderColor;
        ctx.fillStyle = fillColor;

        ctx.fill();
        ctx.stroke();
    }
  </script>
</body>
</html>
演示图:

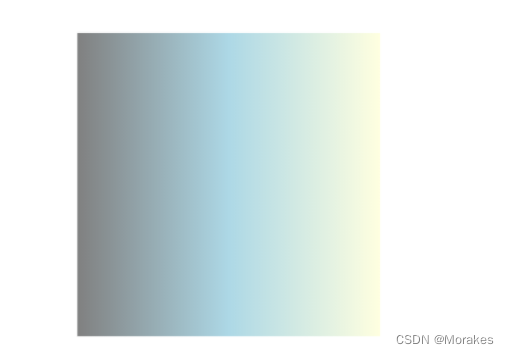
填充渐变形状
-
添加渐变线:
var Grd = context.createLinearGradient(xstart,ystart,xend,yend); -
为渐变线添加关键色(类似于颜色断点):
Grd.addColorStop(stop,color);
这里的stop传递的是 0 ~ 1 的浮点数,代表断点到(xstart,ystart)的距离占整个渐变色长度是比例。
eg:
<!DOCTYPE html>
<html lang="en">
<head>
<Meta charset="UTF-8">
<Meta http-equiv="X-UA-Compatible" content="IE=edge">
<Meta name="viewport" content="width=device-width, initial-scale=1.0">
<title>Document</title>
</head>
<body>
<canvas id="canvas" style="border: 1px solid #aaaaaa; margin: 50px auto;" width="800" height="600">
你的浏览器居然不支持Canvas.
</canvas>
<script>
window.onload = function(){
var canvas = document.getElementById("canvas");
canvas.width = 800;
canvas.height = 600;
var context = canvas.getContext("2d");
context.rect(200,100,400,400);
// 1.添加渐变线 (200, 300) ==> (600, 300)
var Grd = context.createLinearGradient(200, 300, 600, 300)
// 2.添加关键色
Grd.addColorStop(0, 'grey')
Grd.addColorStop(0.5, 'lightblue')
Grd.addColorStop(1, 'lightyellow')
// 3.应用渐变
context.fillStyle = Grd
context.fill()
}
function drawRect(ctx, x, y, width, height, fillColor, borderWidth, borderColor){
ctx.beginPath();
ctx.rect( x, y, width, height)
ctx.linewidth = borderWidth;
ctx.strokeStyle = borderColor;
ctx.fillStyle = fillColor;
ctx.fill();
ctx.stroke();
}
</script>
</body>
</html>
演示图:
<!DOCTYPE html>
<html lang="en">
<head>
<Meta charset="UTF-8">
<Meta http-equiv="X-UA-Compatible" content="IE=edge">
<Meta name="viewport" content="width=device-width, initial-scale=1.0">
<title>Document</title>
</head>
<body>
<canvas id="canvas" style="border: 1px solid #aaaaaa; margin: 50px auto;" width="800" height="600">
你的浏览器居然不支持Canvas.
</canvas>
<script>
window.onload = function(){
var canvas = document.getElementById("canvas");
canvas.width = 800;
canvas.height = 600;
var context = canvas.getContext("2d");
var Grd = context.createLinearGradient(100,300,700,300);
//添加颜色断点
Grd.addColorStop(0,"olive");
Grd.addColorStop(0.25,"maroon");
Grd.addColorStop(0.5,"aqua");
Grd.addColorStop(0.75,"fuchsia");
Grd.addColorStop(0.25,"black");
//应用渐变
context.fillStyle = Grd;
context.strokeStyle = Grd;
context.strokeRect(200,50,300,50);
context.strokeRect(200,100,150,50);
context.strokeRect(200,150,450,50);
context.fillRect(200,300,300,50);
context.fillRect(200,350,150,50);
context.fillRect(200,400,450,50);
context.fillRect(0,550,800,25);
}
</script>
</body>
</html>
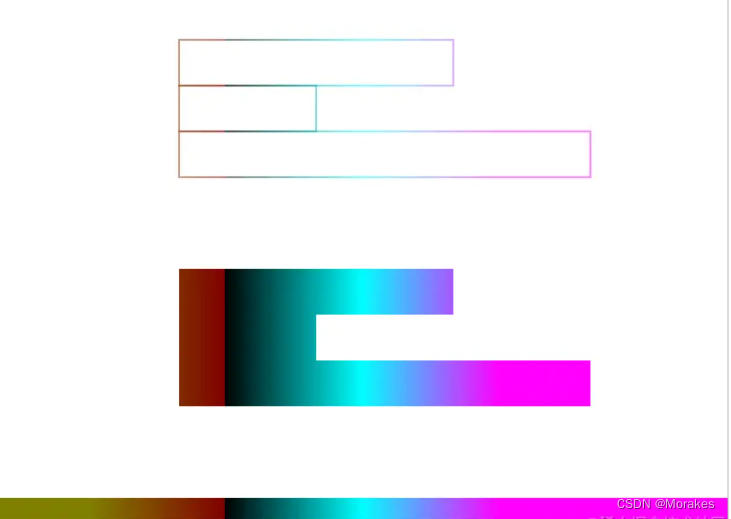
径向渐变
-
添加渐变圆:
var Grd = context.createradialGradient(x0,y0,r0,x1,y1,r1); -
为渐变线添加关键色(类似于颜色断点):
Grd.addColorStop(stop,color); -
应用渐变:
context.fillStyle = Grd;
context.strokeStyle = Grd;
<!DOCTYPE html>
<html lang="en">
<head>
  <Meta charset="UTF-8">
  <Meta http-equiv="X-UA-Compatible" content="IE=edge">
  <Meta name="viewport" content="width=device-width, initial-scale=1.0">
  <title>Document</title>
</head>
<body>
  <canvas id="canvas" style="border: 1px solid #aaaaaa; margin: 50px auto;" width="800" height="600">
    你的浏览器居然不支持Canvas.
  </canvas>
  <script>
   window.onload = function(){
        var canvas = document.getElementById("canvas");
        canvas.width = 800;
        canvas.height = 600;
        var context = canvas.getContext("2d");

       var Grd = context.createradialGradient(400,300,100,400,300,400);

        //添加颜色断点
        Grd.addColorStop(0,"olive");
        Grd.addColorStop(0.25,"maroon");
        Grd.addColorStop(0.5,"aqua");
        Grd.addColorStop(0.75,"fuchsia");
        Grd.addColorStop(1,"black");

        //应用渐变
        context.fillStyle = Grd;
        context.fillRect(100,100,600,400);

    }
  </script>
</body>
</html>
演示图:

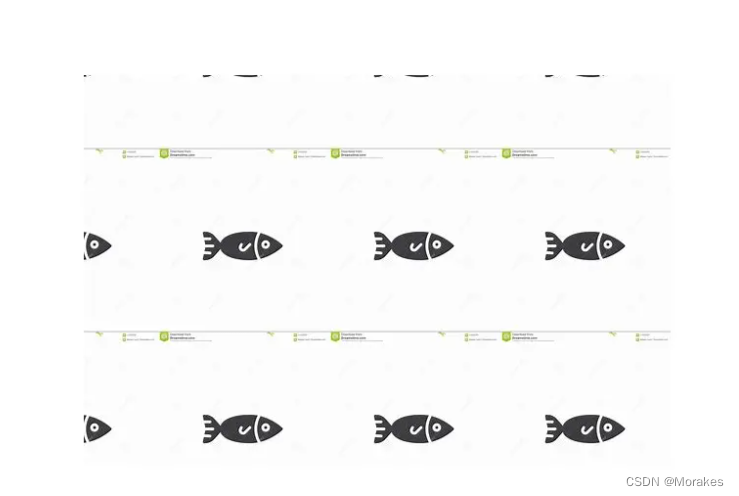
填充纹理
纹理其实就是图案的重复,填充图案通过createPattern()函数进行初始化。它需要传进两个参数createPattern(img,repeat-style),第一个是Image对象实例,第二个参数是String类型,表示在形状中如何显示repeat图案。可以使用这个函数加载图像或者整个画布作为形状的填充图案。
有以下4种图像填充类型:
- 平面上重复:repeat;
- x轴上重复:repeat-x;
- y轴上重复:repeat-y;
- 不使用重复:no-repeat;
创建并填充图案
<!DOCTYPE html>
<html lang="en">
<head>
  <Meta charset="UTF-8">
  <Meta http-equiv="X-UA-Compatible" content="IE=edge">
  <Meta name="viewport" content="width=device-width, initial-scale=1.0">
  <title>Document</title>
</head>
<body>
  <canvas id="canvas" style="border: 1px solid #aaaaaa; margin: 50px auto;" width="800" height="600">
    你的浏览器居然不支持Canvas.
  </canvas>
  <script>
   window.onload = function(){
        var canvas = document.getElementById("canvas");
        canvas.width = 800;
        canvas.height = 600;
        var context = canvas.getContext("2d");

        const img = new Image()
        img.src = 'https://tse2-mm.cn.bing.net/th/id/OIP-C.MFrj4rjM7ElBNf6yBZ85AwHaH6?w=175&h=187&c=7&r=0&o=5&pid=1.7'
        img.onload = function(){
          const pattern = context.createPattern(img, 'repeat')
          context.fillStyle = pattern
          context.fillRect(100, 100, 600, 400)

        }

    }
  </script>
</body>
</html>
演示图:
绘制标准圆弧
高级路径
我们要挑战路径的最难的部分了——高级路径,之前一直都是在学习绘制线条,接下来的我们详细看看绘制曲线(高级路径)的有关方法。
使用arc()绘制圆弧
arc()的使用方法如下:
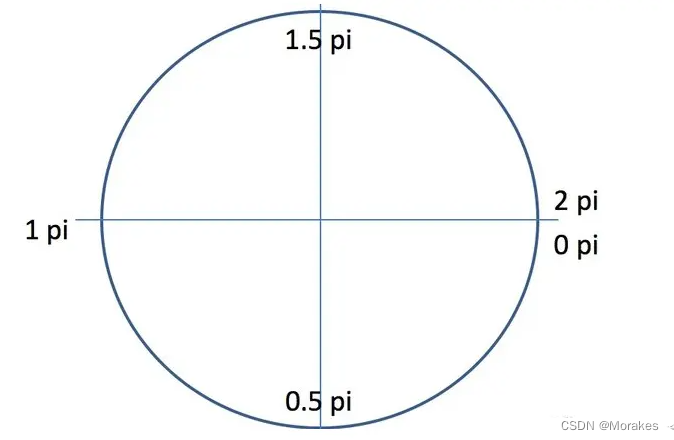
context.arc(x,y,radius,startAngle,endAngle,anticlockwise)
前面三个参数,分别是圆心坐标与圆半径。startAngle、endAngle使用的是弧度值,不是角度值。 弧度的规定是绝对的。anticlockwise表示绘制的方法,是顺时针还是逆时针绘制。它传入布尔值,true表示逆时针绘制,false表示顺时针绘制,缺省值为false。
<!DOCTYPE html>
<html lang="en">
<head>
<Meta charset="UTF-8">
<Meta http-equiv="X-UA-Compatible" content="IE=edge">
<Meta name="viewport" content="width=device-width, initial-scale=1.0">
<title>Document</title>
</head>
<body>
<canvas id="canvas" style="border: 1px solid #aaaaaa; margin: 50px auto;" width="800" height="600">
你的浏览器居然不支持Canvas.
</canvas>
<script>
window.onload = function(){
var canvas = document.getElementById("canvas");
canvas.width = 800;
canvas.height = 600;
var context = canvas.getContext("2d");
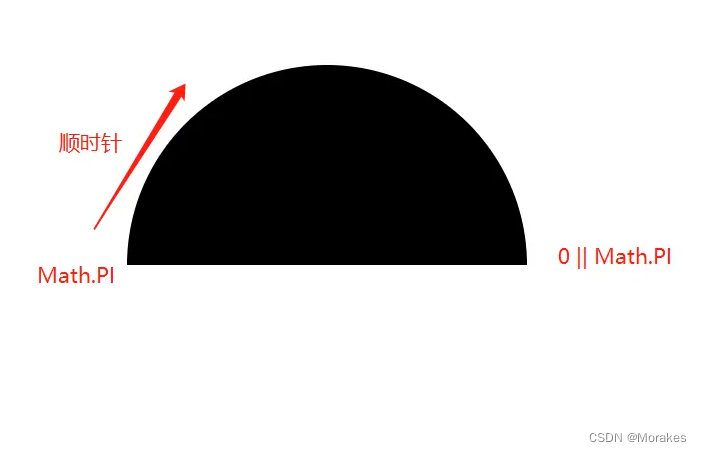
context.arc(400, 300, 200, Math.PI,2*Math.PI) //顺时针
context.fill()
}
</script>
</body>
</html>
演示图:
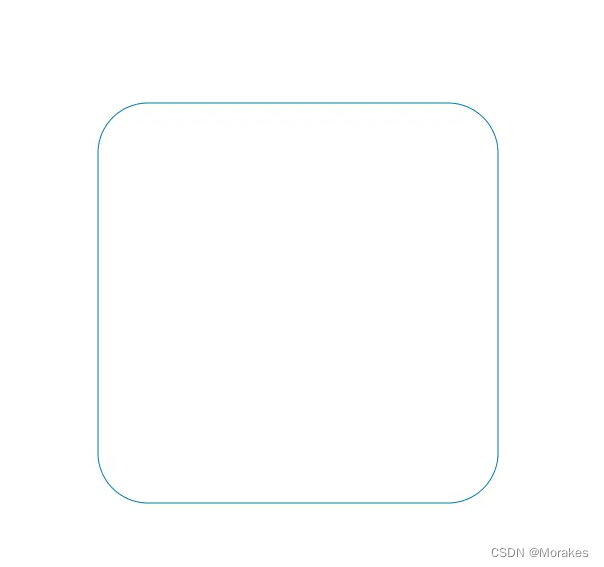
绘制圆角矩形
下面,我们结合基本路径和高级路径的知识,绘制一个圆角矩形。
圆角矩形是由四段线条和四个1/4圆弧组成,拆解如下。
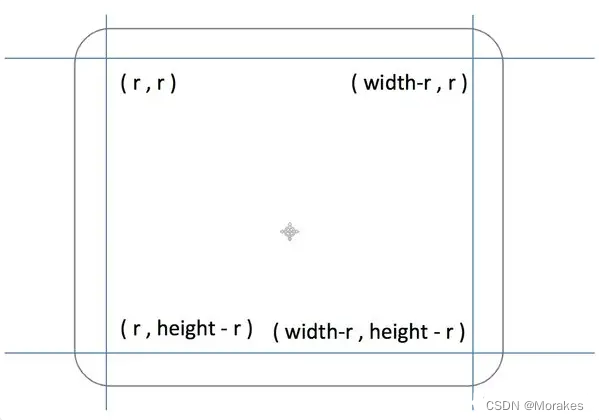
因为我们要写的是函数而不是一个固定的圆角矩形,所以这里列出的是函数需要的参数。分析好之后,直接敲出代码。
<!DOCTYPE html>
<html lang="en">
<head>
  <Meta charset="UTF-8">
  <Meta http-equiv="X-UA-Compatible" content="IE=edge">
  <Meta name="viewport" content="width=device-width, initial-scale=1.0">
  <title>Document</title>
</head>
<body>
  <canvas id="canvas" style="border: 1px solid #aaaaaa; margin: 50px auto;" width="800" height="800">
    你的浏览器居然不支持Canvas.
  </canvas>
  <script>
   window.onload = function(){
        var canvas = document.getElementById("canvas");
        canvas.width = 800;
        canvas.height = 800;
        var context = canvas.getContext("2d");
        context.fillStyle = "#FFF";
        context.fillRect(0,0,800,600);

        drawRoundRect(context, 200, 200, 400, 400, 50);
        context.strokeStyle = "#0078AA";
        context.stroke();
    }

    function drawRoundRect(cxt, x, y, width, height, radius){
        cxt.beginPath();
        cxt.arc(x + radius, y + radius, radius, Math.PI, Math.PI * 3 / 2);
        cxt.lineto(width - radius + x, y);
        cxt.arc(width - radius + x, radius + y, radius, Math.PI * 3 / 2, Math.PI * 2);
        cxt.lineto(width + x, height + y - radius);
        cxt.arc(width - radius + x, height - radius + y, radius, 0, Math.PI * 1 / 2);
        cxt.lineto(radius + x, height +y);
        cxt.arc(radius + x, height - radius + y, radius, Math.PI * 1 / 2, Math.PI);
        cxt.closePath();
    }
  </script>
</body>
</html>
演示图
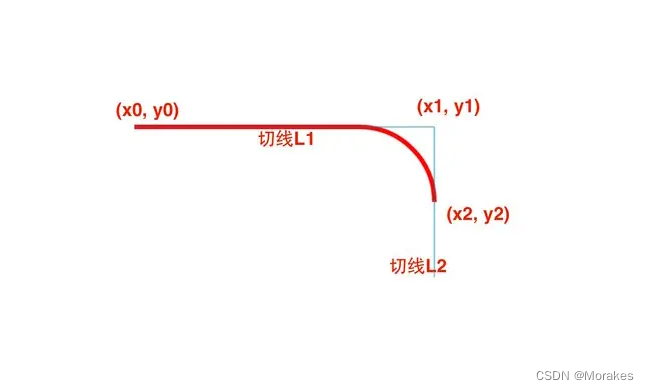
使用切点绘制圆弧
arcTo()方法接收5个参数,分别是两个切点的坐标和圆弧半径。这个方法是依据切线画弧线,即由两个切线确定一条弧线。 具体如下。
arcTo(x1,y1,x2,y2,radius)
这个函数以给定的半径绘制一条弧线,圆弧的起点与当前路径的位置到(x1, y1)点的直线相切,圆弧的终点与(x1, y1)点到(x2, y2)的直线相切。因此其通常配合moveto()或lineto()使用。其能力是可以被更为简单的arc()替代的,其复杂就复杂在绘制方法上使用了切点。
<!DOCTYPE html>
<html lang="en">
<head>
  <Meta charset="UTF-8">
  <Meta http-equiv="X-UA-Compatible" content="IE=edge">
  <Meta name="viewport" content="width=device-width, initial-scale=1.0">
  <title>Document</title>
</head>
<body>
  <canvas id="canvas" style="border: 1px solid #aaaaaa; margin: 50px auto;" width="800" height="800">
    你的浏览器居然不支持Canvas.
  </canvas>
  <script>
      window.onload = function(){
        var canvas = document.getElementById("canvas");
        canvas.width = 800;
        canvas.height = 600;
        var context = canvas.getContext("2d");
        context.fillStyle = "#FFF";
        context.fillRect(0,0,800,600);

        drawArcTo(context, 200, 200, 600, 200, 600, 400, 100);
    };

    function drawArcTo(cxt, x0, y0, x1, y1, x2, y2, r){
        cxt.beginPath();
        cxt.moveto(x0, y0);
        cxt.arcTo(x1, y1, x2, y2, r);

        cxt.linewidth = 6;
        cxt.strokeStyle = "red";
        cxt.stroke();

        cxt.beginPath();
        cxt.moveto(x0, y0);
        cxt.lineto(x1, y1);
        cxt.lineto(x2, y2);

        cxt.linewidth = 1;
        cxt.strokeStyle = "#0088AA";
        cxt.stroke();

    }
  </script>
</body>
</html>
演示图