问题描述
1.介绍
VueX是适用于在Vue项目开发时使用的状态管理工具。试想一下,如果在一个项目开发中频繁的使用组件传参的方式来同步data中的值,一旦项目变得很庞大,管理和维护这些值将是相当棘手的工作。为此,Vue为这些被多个组件频繁使用的值提供了一个统一管理的工具——VueX。在具有VueX的Vue项目中,我们只需要把这些值定义在VueX中,即可在整个Vue项目的组件中使用。
2.安装
npm i vuex -s
3.使用
注:在Vue3中已经自动配置好Vuex,无需手动配置,如果你使用的vue2,那么以下是配置方式:
(1) 在项目的根目录下新增一个store文件夹,在该文件夹内创建index.js
此时你的项目的src文件夹应当是这样的:
│  App.vue
│  main.js
│
├─assets
│      logo.png
│
├─components
│      HelloWorld.vue
│
├─router
│      index.js
│
└─store
       index.js
(2) 初始化store下index.js中的内容
import Vue from 'vue'
import Vuex from 'vuex'

//挂载Vuex
Vue.use(Vuex)

//创建VueX对象
const store = new Vuex.Store({
    state:{
        //存放的键值对就是所要管理的状态
        name:'helloVueX'
    }
})

export default store
(3) 将store挂载到当前项目的Vue实例当中去
打开main.js
import Vue from 'vue'
import App from './App'
import router from './router'
import store from './store'

Vue.config.productionTip = false

/* eslint-disable no-new */
new Vue({
  el: '#app',
  router,
  store,  //store:store 和router一样,将我们创建的Vuex实例挂载到这个vue实例中
  render: h => h(App)
})
(4) 在组件中使用Vuex
例如在App.vue中,我们要将state中定义的name拿来在h1标签中显示
<template>
    <div id='app'>
        name:
        <h1>{{ $store.state.name }}</h1>
    </div>
</template>
或者要在组件方法中使用
...,
methods:{
    add(){
      console.log(this.$store.state.name)
    }
},
...
注意,请不要在此处更改state中的状态的值
4.Vuex和EventBus的区别
vuex 的底层实现原理其实就是 event-bus,那么它和普通的 event-bus 有什么不同呢?我们通过简单的源码一步步实现来搞懂这个问题。
- EventBus
首先一个普通的 event-bus 是这样的:
// main.js
Vue.prototype.$bus = new Vue();

// 组件中
this.$bus.$on('console', (text) => {
    console.log(text);
});

// 组件中
this.$bus.$emit('console', 'hello world');
它是通过 Vue 的$on和$emit api 来传递消息的。
- vuex 的响应式数据
而 vuex 的数据是响应式的,那么我们首先实现这种响应式数据:
class store {
    constructor(options) {
        this.vm = new Vue({
            data: {
                state: options.state
            },
        });
    }
    get state() {
        return this.vm.state;
    }
}
注意,上面的data不是一个函数,因为这里我们只会实例化一次。然后我们通过添加一个 state 的 getter 方法来暴露内部的 event-bus 的 state 属性。
那怎么实现响应式的呢?因为在实例化 vm 的时候,Vue 会自己使用 defineReactive 把 data 变为响应式数据,从而会收集有关它的依赖,然后在自己变动的时候,通知依赖更新。
- 加上 getters
vuex支持加上 getters,怎么加呢?直接初始化一个 getters 属性即可:
class store {
    constructor(options) {
        this.vm = new Vue({
            data: {
                state: options.state
            },
        });
        const getters = options.getter || {};
        this.getters = {};
        Object.keys(getters).forEach((key) => {
            Object.defineProperty(this.getters, key, () => {
                get: () => getters[key](this.state)
            })
        });
    }

    get state() {
        return this.vm.state;
    }
}
原理就是添加一个 getters 属性,然后遍历 getters 并绑定到它的各个属性的 getter 上面去即可。
- 加上 mutations
类似的,我们可以添加一个 mutations 属性来保存 mutations,然后实现一个 commit 方法,在调用 commit 方法的时候去 mutations 里面找,然后调用相应函数即可:
class store {
    constructor(options) {
        this.vm = new Vue({
            data: {
                state: options.state
            },
        });
        const getters = options.getters || {};
        this.getters = {};
        Object.keys(getters).forEach((key) => {
            Object.defineProperty(this.getters, key, () => {
                get: () => getters[key](this.state)
            })
        });
        const mutations = options.mutations || {};
        this.mutations = {};
        Object.keys(getters).forEach((key) => {
            this.mutations[key] = (args) => mutations[key](state, args);
        });
    }
    get state() {
        return this.vm.state;
    }

    commit(name, args) {
        this.mutations[name](args);
    }
}
- 加上 actions
类似的,我们可以添加一个 actions 属性来保存 actions,然后实现一个 dispatch 方法,在调用 dispatch 方法的时候去 actions 里面找,然后调用相应函数即可。不过稍有不同的是,actions 里面的方法和 mutations 里面的方法的第一个参数不同,它要传整个 store 进去,因为不仅要获得 state,还需要在里面调用 commit 方法:
class store {
    constructor(options) {
        this.vm = new Vue({
            data: {
                state: options.state
            },
        });

        const getters = options.getters || {};
        this.getters = {};
        Object.keys(getters).forEach((key) => {
            Object.defineProperty(this.getters, key, () => {
                get: () => getters[key](this.state)
            })
        });

        const mutations = options.mutations || {};
        this.mutations = {};
        Object.keys(mutations).forEach((key) => {
            this.mutations[key] = (args) => mutations[key](state, args);
        });

        const actions = options.actions || {};
        this.actions = {};
        Object.keys(actions).forEach((key) => {
            this.actions[key] = (args) => actions[key](this, args);
        });
    }

    get state() {
        return this.vm.state;
    }

    commit(name, args) {
        this.mutations[name](args);
    }

    dispatch(name, args) {
        this.actions[name](args);
    }
}
综上:可以看到,vuex 和传统的 event-bus 的不同点除了 vuex 实现了更加友好的响应式状态之外,还禁止了 vuex 里面数据的直接修改,大大增强了信任度(有点像promise的status),通过增加 mutations 和 actions 这种“中间层”,它能更好的控制中间的变化,比如实现时间旅行、状态回退和状态保存的功能。在大型应用方面,vuex确实是一个比EventBus更好的解决方案;vuex更加易于调试与管理
另外,需要说明的是,mutation 和 action 的不同点不仅在于 mutation 里面只能写同步代码,action 里面只能写异步代码,还在于 mutation 里面的方法的第一个参数是state(因为只需要修改 state 就可以了),而 action 里面的方法的第一个参数是store(因为还需要调用 commit 方法)
5.VueX中的核心内容
在VueX对象中,其实不止有state,还有用来操作state中数据的方法集,以及当我们需要对state中的数据需要加工的方法集等等成员。
成员列表:
- state 存放状态
- mutations state成员操作
- getters 加工state成员给外界
- actions 异步操作
- modules 模块化状态管理
6.VueX的工作流程

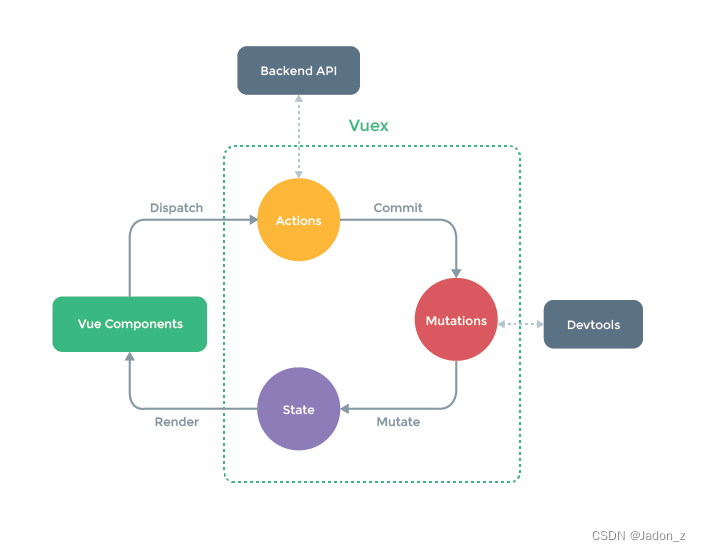
首先,Vue组件如果调用某个VueX的方法过程中需要向后端请求时或者说出现异步操作时,需要dispatch VueX中actions的方法,以保证数据的同步。可以说,action的存在就是为了让mutations中的方法能在异步操作中起作用。
如果没有异步操作,那么我们就可以直接在组件内提交状态中的Mutations中自己编写的方法来达成对state成员的操作。注意,1.3.3节中有提到,不建议在组件中直接对state中的成员进行操作,这是因为直接修改(例如:this.$store.state.name = 'hello')的话不能被VueDevtools所监控到。
最后被修改后的state成员会被渲染到组件的原位置当中去。
7.Mutations
mutations是操作state数据的方法的集合,比如对该数据的修改、增加、删除等等。
7.1 Mutations使用方法
mutations方法都有默认的形参:([state] [,payload])
-
state是当前VueX对象中的state -
payload是该方法在被调用时传递参数使用的
例如,我们编写一个方法,当被执行时,能把下例中的name值修改为"jack",我们只需要这样做
index.js
import Vue from 'vue'
import Vuex from 'vuex'

Vue.use(Vuex)

const store = new Vuex.store({
    state:{
        name:'helloVueX'
    },
    mutations:{
        //es6语法,等同edit:funcion(){...}
        edit(state){
            state.name = 'jack'
        }
    }
})

export default store
而在组件中,我们需要这样去调用这个mutation——例如在App.vue的某个method中:
this.$store.commit('edit')
7.2 Mutation传值
在实际生产过程中,会遇到需要在提交某个mutation时需要携带一些参数给方法使用。
单个值提交时:
this.$store.commit('edit',15)
当需要多参提交时,推荐把他们放在一个对象中来提交:
this.$store.commit('edit',{age:15,sex:'男'})
接收挂载的参数:
edit(state,payload){
    state.name = 'jack'
    console.log(payload) // 15或{age:15,sex:'男'}
}
另一种提交方式
this.$store.commit({
    type:'edit',
    payload:{
        age:15,
        sex:'男'
    }
})
7.3 增删state中的成员
为了配合Vue的响应式数据,我们在Mutations的方法中,应当使用Vue提供的方法来进行操作。如果使用delete或者xx.xx = xx的形式去删或增,则Vue不能对数据进行实时响应。
-
Vue.set 为某个对象设置成员的值,若不存在则新增
例如对state对象中添加一个age成员
-
Vue.delete() 删除成员
将刚刚添加的age成员删除
Vue.delete(state,'age')
8.Getters
功能:可以对state中的成员加工后传递给外界
Getters中的方法有两个默认参数
- state 当前VueX对象中的状态对象
- getters 当前getters对象,用于将getters下的其他getter拿来用
例如
getters:{
    nameInfo(state){
        return "姓名:"+state.name
    },
    fullInfo(state,getters){
        return getters.nameInfo+'年龄:'+state.age
    }
}
组件中调用
this.$store.getters.fullInfo
9.Actions
由于直接在mutation方法中进行异步操作,将会引起数据失效。所以提供了Actions来专门进行异步操作,最终提交mutation方法。
Actions中的方法有两个默认参数
-
context上下文(相当于箭头函数中的this)对象 -
payload挂载参数
例如,我们在两秒中后执行7.1节中的edit方法
由于setTimeout是异步操作,所以需要使用actions
actions:{
    aEdit(context,payload){
        setTimeout(()=>{
            context.commit('edit',payload)
        },2000)
    }
}
在组件中调用:
this.$store.dispatch('aEdit',{age:15})
改进:
由于是异步操作,所以我们可以为我们的异步操作封装为一个Promise对象
aEdit(context,payload){
    return new Promise((resolve,reject)=>{
        setTimeout(()=>{
            context.commit('edit',payload)
            resolve()
        },2000)
    })
}
10.modules
当项目庞大,状态非常多时,可以采用模块化管理模式。Vuex 允许我们将 store 分割成模块(module)。每个模块拥有自己的 state、mutation、action、getter、甚至是嵌套子模块——从上至下进行同样方式的分割。
modules:{
    a:{
        state:{},
        getters:{},
        ....
    }
}
组件内调用模块a的状态:
this.$store.state.a
而提交或者dispatch某个方法和以前一样,会自动执行所有模块内的对应type的方法:
this.$store.commit('editKey')
this.$store.dispatch('aEditKey')
10.1 模块的细节
-
模块中
mutations和getters中的方法接受的第一个参数是自身局部模块内部的statemodules:{ a:{ state:{key:5}, mutations:{ editKey(state){ state.key = 9 } }, .... } } -
getters中方法的第三个参数是根节点状态modules:{ a:{ state:{key:5}, getters:{ getKeyCount(state,getter,rootState){ return rootState.key + state.key } }, .... } } -
actions中方法获取局部模块状态是context.state,根节点状态是context.rootStatemodules:{ a:{ state:{key:5}, actions:{ aEidtKey(context){ if(context.state.key === context.rootState.key){ context.commit('editKey') } } }, .... } }
11. 规范目录结构
如果把整个store都放在index.js中是不合理的,所以需要拆分。比较合适的目录格式如下:
store:.
│  actions.js
│  getters.js
│  index.js
│  mutations.js
│  mutations_type.js   ##该项为存放mutaions方法常量的文件,按需要可加入
│
└─modules
        Astore.js
对应的内容存放在对应的文件中,和以前一样,在index.js中存放并导出store。state中的数据尽量放在index.js中。而modules中的Astore局部模块状态如果多的话也可以进行细分。
解决方法
暂无找到可以解决该程序问题的有效方法,小编努力寻找整理中!
如果你已经找到好的解决方法,欢迎将解决方案带上本链接一起发送给小编。
小编邮箱:dio#foxmail.com (将#修改为@)
