C++MysqL8.0数据库跨平台编程实战(上)
- 第一章 环境准备
- 第二章 MYSQL API 开发
- 第三章 MYSQL事务特性和用法介绍
第一章 环境准备
1、MysqL客户端安装、配置和使用示例
安装mysql-8.0.13-winx64.msi
cmd进入C:\Program Files\MysqL\MysqL Server 8.0\bin
MysqLd --initialize --console
MysqLd install MysqL8.0
net start MysqL8.0
MysqL -u root -p
show databases;
ALTER USER “root”@“localhost” IDENTIFIED BY “123456”;
show databases;
±-------------------+
| Database |
±-------------------+
| information_schema |
| MysqL |
| performance_schema |
| sys |
±-------------------+
4 rows in set (0.00 sec)
更改用户权限使之可以访问所有ip地址
另外一台电脑上(虚拟机)安装MysqL8.0,并输入下面命令连接我们本机的数据库:
MysqL -u root -p123456 -h 192.168.0.201
这种连接方式不安全,因为密码会明文显示出来,日志中的密码也是明文。
提示连接超时(连接不上),是因为我们没有权限,回到本机。
(如果提示语法错误,请quit退出,重新登录后再试试)
使用4个数据库中的MysqL,因为我们用户的数据库都会建在这个数据库里面:
use MysqL
select * from user;
select user,host from user;
±-----------------±----------+
| user | host |
±-----------------±----------+
| MysqL.infoschema | localhost |
| MysqL.session | localhost |
| MysqL.sys | localhost |
| root | localhost |
±-----------------±----------+
4 rows in set (0.00 sec)
我们可以看到这个root只能本地访问,我们试着把它的权限从localhost改成所有ip地址都可以访问:
update user set host=“%” where user=“root”;
%这个百分号表示所有的ip地址都可以访问(本地也能访问、远程也能访问),当然这是很不安全的,我们这里是内部测试,只是为了方便。
由于不是立即生效的,所以要么重启数据库,要么输入命令刷新权限:
flush privileges;
如果出现错误
ERROR 1062 (23000): Duplicate entry ‘%-root’ for key ‘PRIMARY’
不用理会,执行flush privileges;
执行quit命令退出数据库后重新连接,执行select user,host from user;
可以发现,已经修改成功了。
MysqL -u root -p123456 -h 192.168.0.1
提示我们远程连接上了本机这台数据库了。
如果使用阿里云,记得还要把MysqL的3306端口号和33060端口号都开放出来,这样在外网才可以连接。
安装配置MysqL图形化客户端MysqL Workbench
Workbench的依赖环境是vs2015的运行环境Visual C++ Redistributable for Visual Studio 2015和.net4.5;
如果你安装好了vs2015、vs2017的话,依赖环境就已经安装好了。
由于Workbench 8.0的官方安装程序,在有的机器上会安装失败,所以最简洁的方法就是使用免安装版本就可以直接使用了。
创建数据库的时候,字符集Charset我们一般使用utf8,排列顺序Collation我们使用utf8_bin即可。
查询MysqL中某数据库中的表有多少
执行“USE 数据库名;”命令来切换到指定数据库;
执行“show tables;”或“SHOW FULL TABLES;”命令,会以表格形式列出MysqL数据库中的所有表
2、环境准备过程中的注意事项
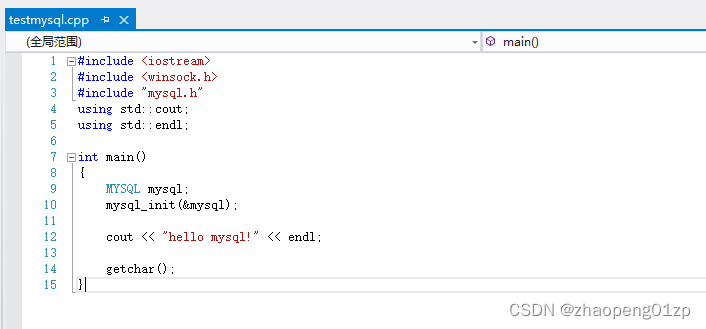
测试vs项目发现的错误如下所示(上述截图代码是在win32平台,所用MysqL也是win32版本)。
2.1 如果出现错误:MysqL_com.h(470): error C2065: “SOCKET”: 未声明的标识符
解决:
添加头文件#include <winsock.h>。
注意:这个winsock.h头文件要放在MysqL.h的前面,毕竟是MysqL.h里面要以弄SOCKET的。
2.2 如果出现错误:LIBCMT.lib(invarg.obj) : error LNK2005: __invoke_watson 已经在 MSVCRT.lib(MSVCR110.dll) 中定义
解决:
链接器->输入->忽略特定库默认库:libcmt.lib
2.3 如果出现错误:“Unable to connect to any of the specified MysqL hosts”
vs2012连接MysqL,出错“Unable to connect to any of the specified MysqL hosts”的话,是因为添加连接那里的设置有问题,服务器名字不能用已经启动的MysqL服务名(例如MysqL5.5),而要用服务器IP地址或者本地的测试IP(localhost或者127.0.0.1)方能成功!
2.4 设置工作目录和输出目录出现的问题
2.4.1 执行后报错,提示找不到dll
这是由于dll是在当前目录下找(即vcxproj项目文件所在目录),然后是系统目录下;
为了将dll和exe统一放在外层的一个目录下,我们修改工作目录:
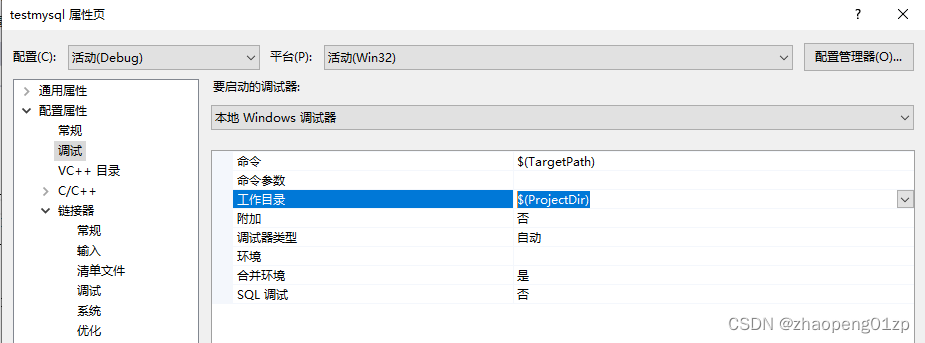
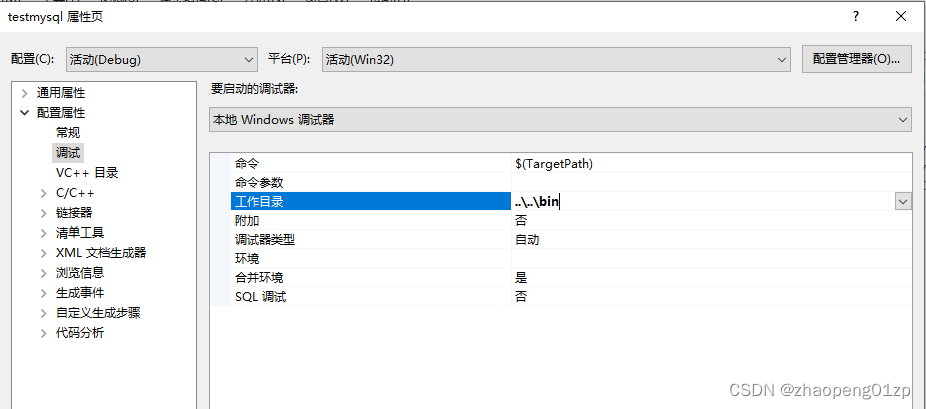
我们把它改成外层的bin目录下面,这样就可以编译通过了;
但是我们会发现这个bin目录下面没有exe生成,所以还得修改输出目录:

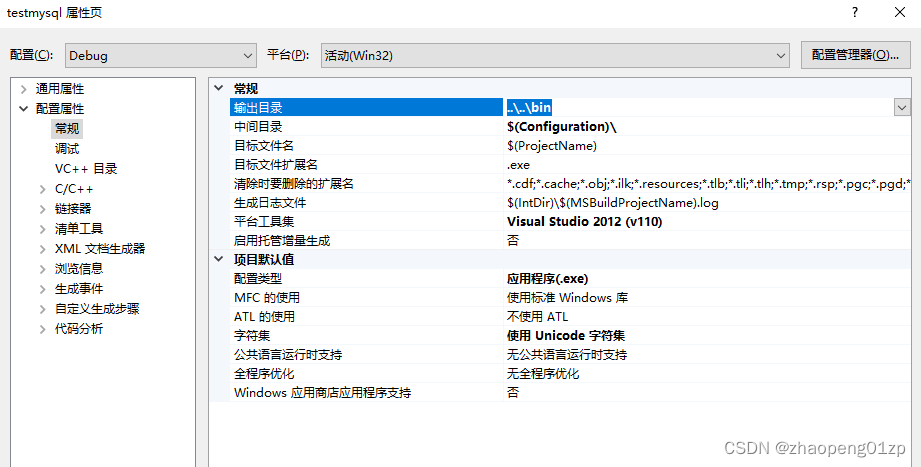
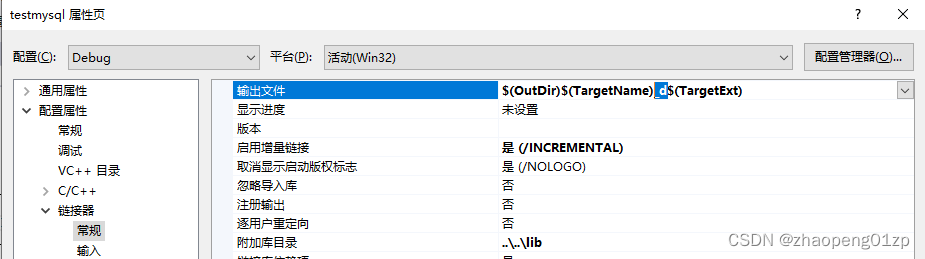
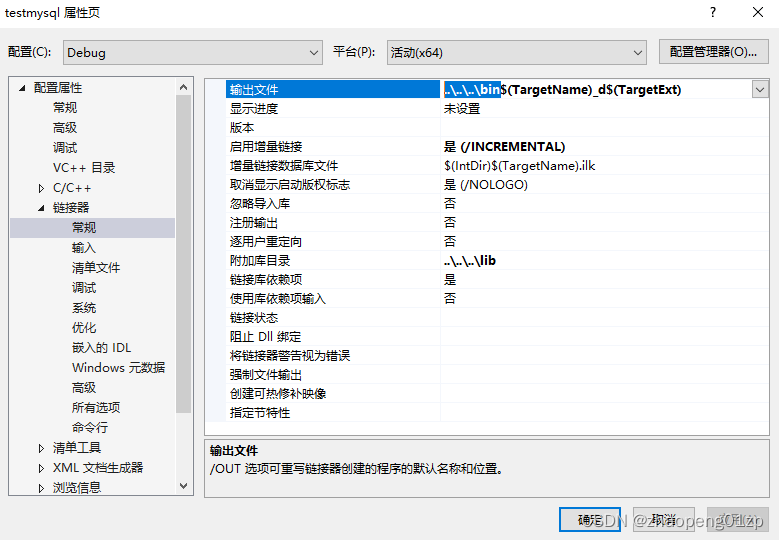
我们把release和Debug的输出目录都设置成…\bin,但是为了避免两个版本的输出exe文件名一样,可以把Debug版本的输出exe改个名字:
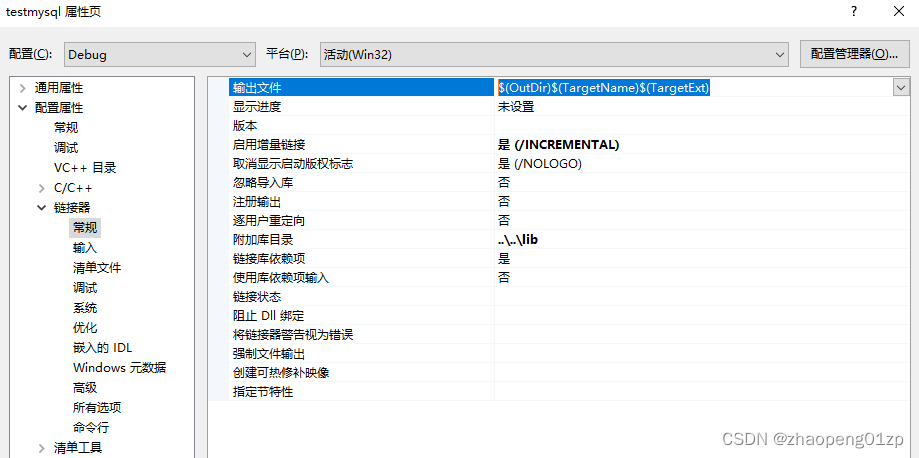
在上图输出文件的$(TargetName)后面添加_d即可:
2.4.2 VS“无法查找或打开PDB文件”
修改输出目录后,如果调试运行后提示:无法找到调试信息,或者调试信息不匹配。无法查找或打开PDB文件。
解决:请打开工具、选项、调试,修改如下:
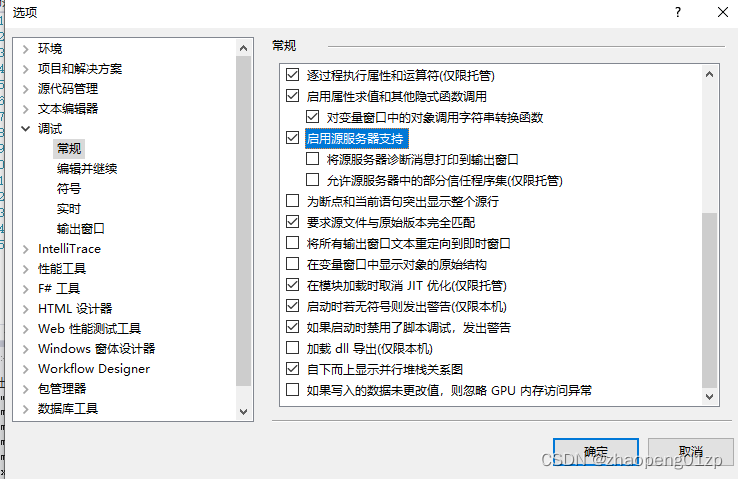
启用源服务器支持,并打开符号,勾选上Microsoft符号服务器选项:

点击本地 Windows调试器的时候,第一次会比较慢,因为它要下载几个模块的调试信息,之后清理解决方案,重新生成解决方案即可。
2.4.3 MysqL 无法定位序数3283于动态链接库 libMysqL.dll
解决:将MysqL安装目录下bin目录里面的libeay32.dll和ssleay32.dll拷贝到前面我们设置的工作目录中:
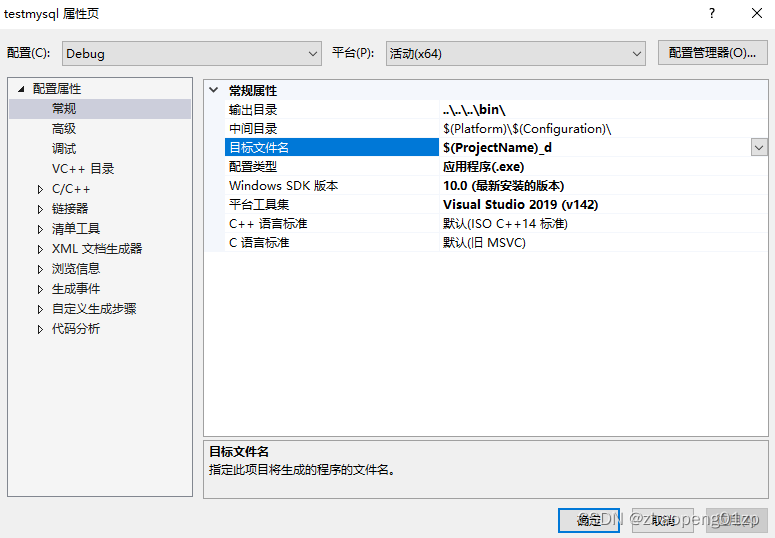
2.4.4 在前面设置了工作目录和输出目录后,调试的时候可能出现“无法找到程序 系统找不到指定的文件”这种问题。
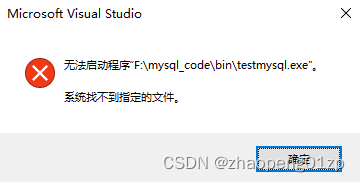
提示:不想看下面出错过程的,只需要修改下图目标文件名为$(ProjectName)_d即可,并把输出文件恢复原样为$(OutDir)$(TargetName)_d$(TargetExt)即可。
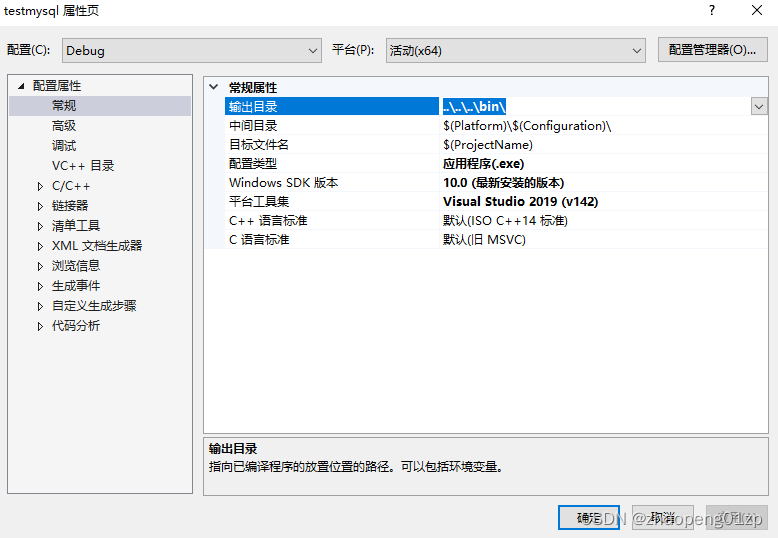

将上图中的$(OutDir)修改为下图所示的输出目录的内容:
按照网上这种方法修改后,我们发现仍然出错,系统找不到指定的文件,vs还是找testMysqL.exe这个文件,但是我们命名在上图修改了输出文件名为$(TargetName)_d$(TargetExt)了,应该去找testMysqL_d.exe文件,而这个文件我们F7编译后已经生成在bin目录里面了,但是vs就是不找已经生成好的testMysqL_d.exe这个文件;
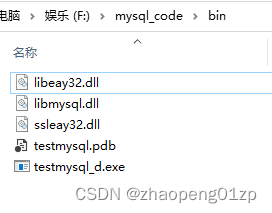
而且我们看到bin目录下,生成的exe是testMysqL_d.exe,但是调试符号文件却还是testMysqL这个项目名称。
(这个调试服务文件的问题可以通过链接器、调试,修改生成程序数据库文件为$(OutDir)$(TargetName)_d.pdb即可解决)
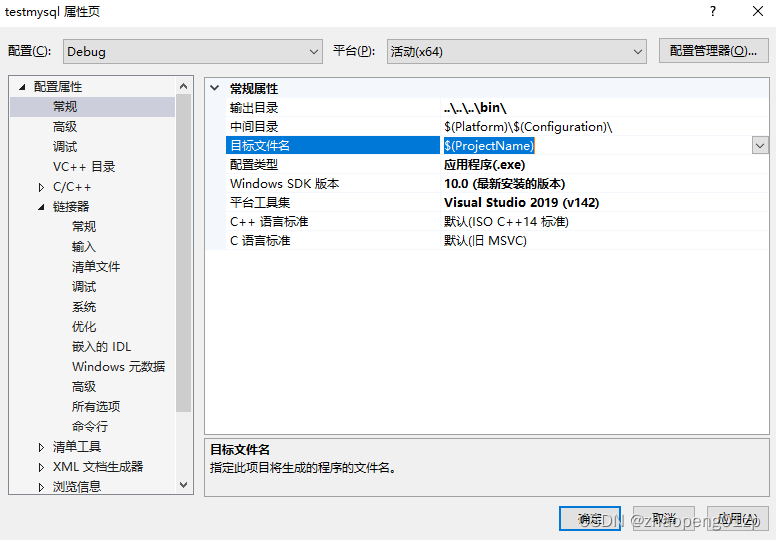
经过分析配置属性,我们发现上图所选部分的目标文件名,仍然是项目testMysqL这个名称,所以我们修改它为$(TargetName)试试:
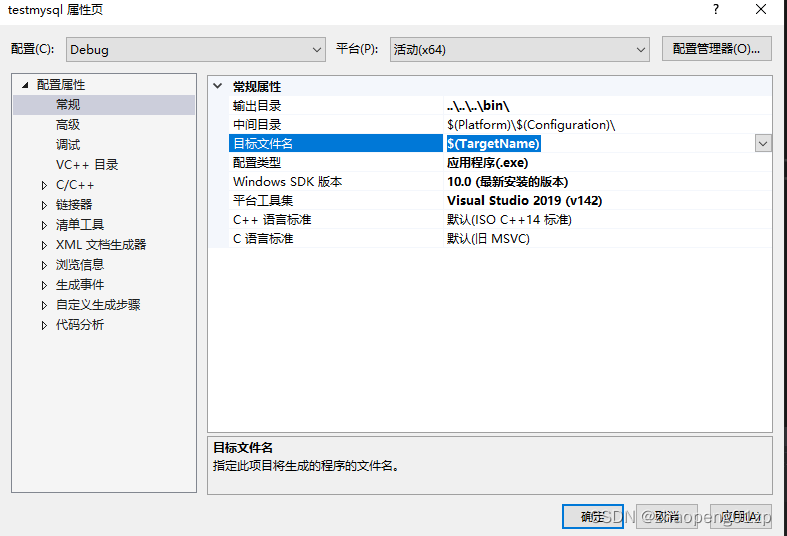
还是报错,在给这个名字后面添加个_d试试:
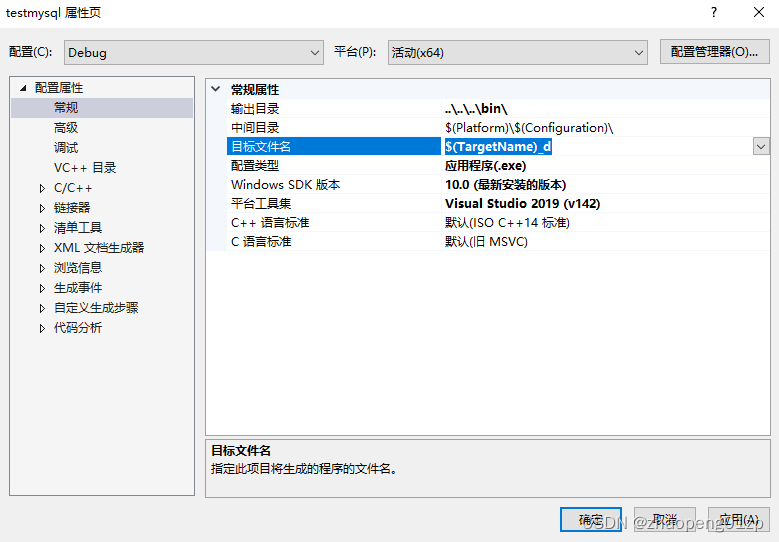
调试运行仍然失败,折腾了一圈,尝试了各种名称,最后才发现,如果为了不和Release输出的文件名称相同,想修改Debug输出的文件名的话,只修改一处地方即可:
还原链接器、常规中的输出文件为$(OutDir)$(TargetName)$(TargetExt),如下图所示:
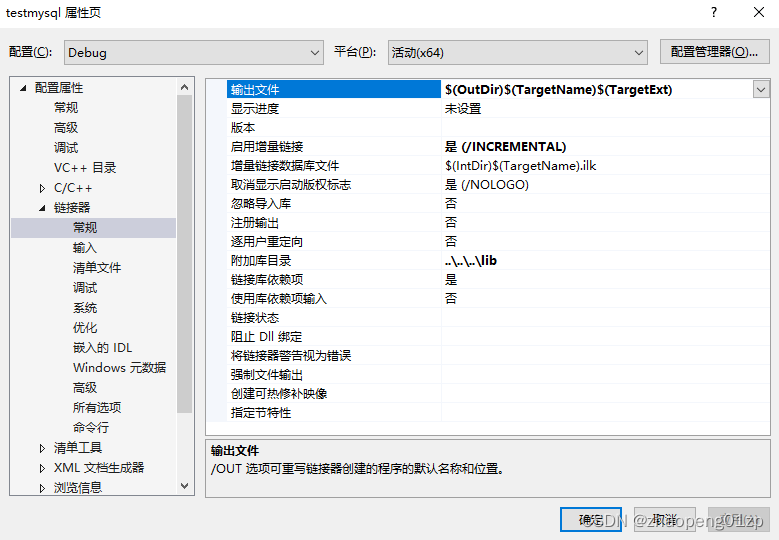
如上图所示,只需要修改这一处地方就可以了!
参考链接:
https://blog.csdn.net/dengguawei0519/article/details/101315765
https://blog.csdn.net/daijingxin/article/details/108944780
https://blog.csdn.net/newworldis/article/details/118603965
https://www.cnblogs.com/steve-jokes/p/3883801.html
初次使用VS2010基于C++开发项目碰到的问题及解决方法
https://dandelioncloud.cn/article/details/1507754882374377473
第二章 MysqL API 开发
1、 连接数据库、设置超时时间和自动重连
MysqL的默认端口号是3306,而有些系统可能要MysqL5.7的,所以这个时候就可以把MysqL8.0的端口号给它改成3307,
// testMysqL.cpp : 此代码为x64平台,MysqL为64位版本。

#include <iostream>
#include "MysqL.h"
#include <thread>

int main()
{
	MysqL MysqL;
	int ret = -1;

	MysqL_library_init(0, 0, 0);

	// 初始化MysqL上下文
	if (!MysqL_init(&MysqL))
	{
		std::cout << "MysqL init Failed " << MysqL_error(&MysqL) << std::endl;
		return ret;
	}

	// 这里只是为了演示所以用了明文,实际开发中应写入加密的ini文件中
	const char *host = "127.0.0.1";
	//const char* host = "192.168.0.222";
	const char *user = "root";
	const char *passwd = "123456";
	const char* db = "MysqL";	// 数据库名称

	// 设定超时3秒
	const u_int timeout = 3;
	if (MysqL_options(&MysqL, MysqL_OPT_CONNECT_TIMEOUT, &timeout))
	{
		std::cout << "MysqL_options CONNECT_TIMEOUT Failed! " << MysqL_error(&MysqL) << std::endl;

		MysqL_close(&MysqL);
		return ret;
	}

	// 自动重连
	const u_int reconect = 1;
	if (MysqL_options(&MysqL, MysqL_OPT_RECONNECT, &reconect))
	{
		std::cout << "MysqL_options RECONNECT Failed! " << MysqL_error(&MysqL) << std::endl;

		MysqL_close(&MysqL);
		return ret;
	}

	// 连接登录数据库
	if (!MysqL_real_connect(&MysqL, host, user, passwd, db, 3306, nullptr, 0))
	{
		std::cout << "MysqL connect Failed! " << MysqL_error(&MysqL) << std::endl;

		MysqL_close(&MysqL);
		return ret;
	}

	std::cout << "MysqL connect " << host << " success!" << std::endl;

	for (int i = 0; i < 1000; i++)
	{
		if (MysqL_ping(&MysqL))
		{
			std::cout << "MysqL_ping " << host << " Failed! " << MysqL_error(&MysqL) << std::endl;
		}
		else
		{
			std::cout << "MysqL_ping " << host << " success!" << std::endl;
			std::this_thread::sleep_for(std::chrono::seconds(1));
		}
	}

	MysqL_close(&MysqL);
	MysqL_library_end();

	ret = 0;

	std::cout << "Hello World!" << std::endl;

    getchar();
}
测试过程中出现的错误
错误 C2672 “std::this_thread::sleep_for”: 未找到匹配的重载函数
虽然在代码开头我们包含了头文件:
#include
但是这种错误是说我们调用该函数传的参数不对,没有匹配的重载函数:

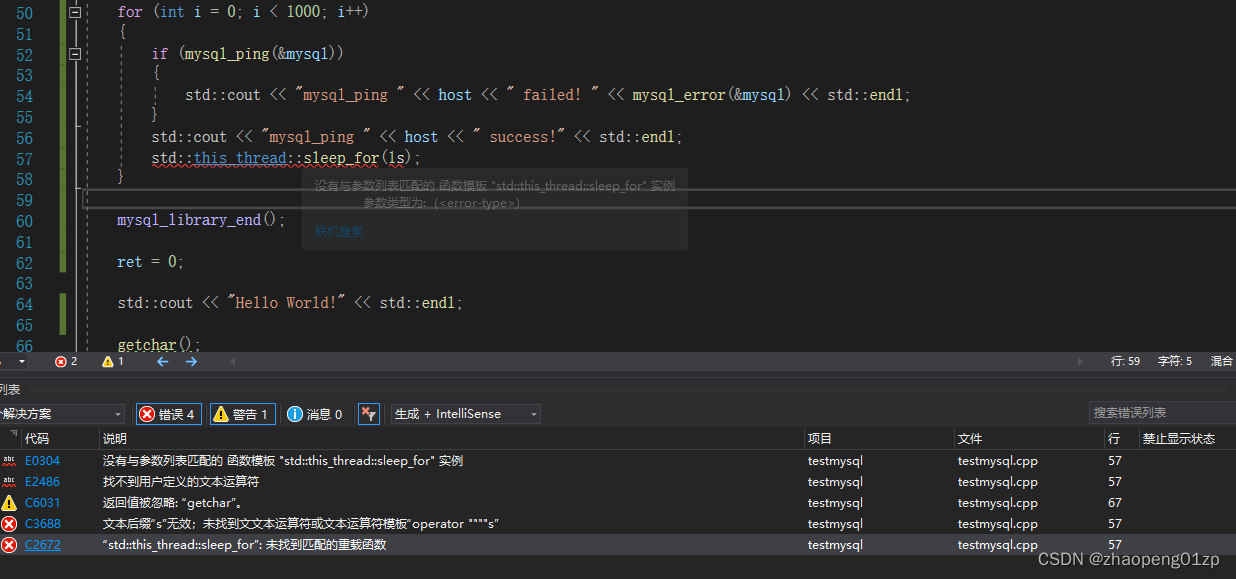
应修改为:
std::this_thread::sleep_for(std::chrono::seconds(1));

参考:
https://blog.csdn.net/Dontla/article/details/125132538
https://blog.csdn.net/xiaojinger_123/article/details/124047634
3、数据查询接口、获取并遍历显示结果集

3.1 MysqL数据查询接口分析
// testMysqL.cpp : 此代码为x64平台,MysqL为64位版本。
//
#include <iostream>
#include "MysqL.h"
#include <thread>
int main()
{
int ret = -1;
// 初始化MysqL上下文
MysqL MysqL;
MysqL_library_init(0, 0, 0);
if (!MysqL_init(&MysqL))
{
std::cout << "MysqL init Failed " << MysqL_error(&MysqL) << std::endl;
return ret;
}
// 这里只是为了演示所以用了明文,实际开发中应写入加密的ini文件中
const char *host = "127.0.0.1";
//const char* host = "192.168.0.222";
const char *user = "root";
const char *passwd = "123456";
const char* db = "MysqL"; // 数据库名称
// 连接登录数据库
if (!MysqL_real_connect(&MysqL, host, user, passwd, db, 3306, nullptr, 0))
{
std::cout << "MysqL connect Failed! " << MysqL_error(&MysqL) << std::endl;
MysqL_close(&MysqL);
return ret;
}
else
{
std::cout << "MysqL connect " << host << " success!" << std::endl;
}
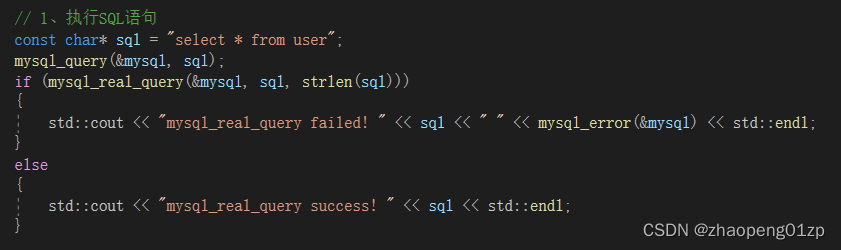
// 1、执行sql语句
const char* sql = "select * from user";
//MysqL_query(&MysqL, sql);
if (MysqL_real_query(&MysqL, sql, strlen(sql)))
{
std::cout << "MysqL_real_query Failed! " << sql << " " << MysqL_error(&MysqL) << std::endl;
}
else
{
std::cout << "MysqL_real_query success! " << sql << std::endl;
}
MysqL_close(&MysqL);
MysqL_library_end();
ret = 0;
std::cout << "Hello World!" << std::endl;
getchar();
}
如果在用MysqL API的MysqL_real_query做查询的时候,如果出现错误“Commands out of sync;you can’t run this command Now”,的话,也就是说我们只要执行了MysqL_real_query,你就必须调用获取结果集,然后清理结果集,之后才能再次执行sql命令;
你可以不遍历,你可以直接对结果集进行清理。
假如我们执行两遍SQL查询命令的话,就会出现错误“Commands out of sync;you can’t run this command Now”:

因为你没有把上一次的命令缓存给它做一个清理;所以,执行sql语句后,必须获取结果集并且清理结果集。
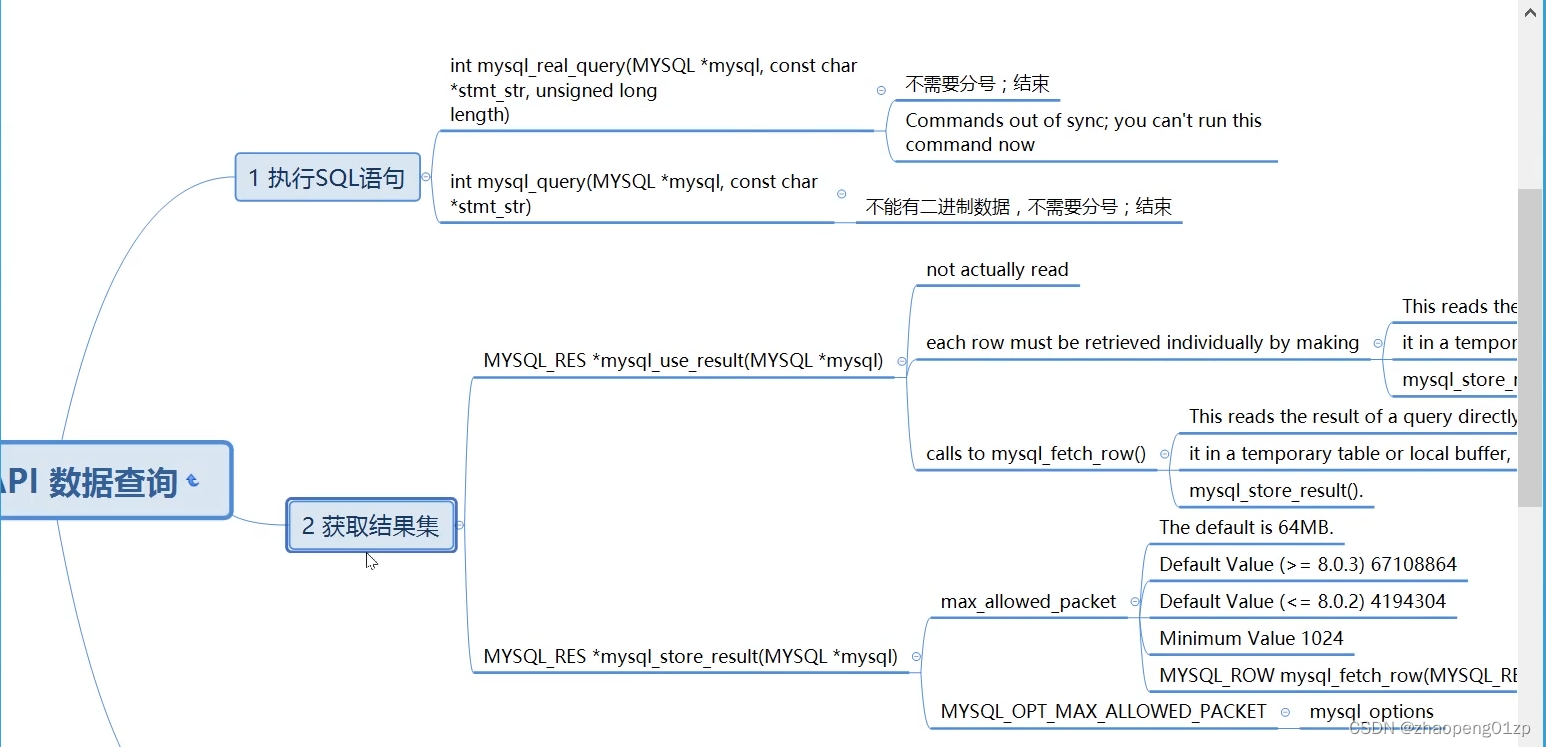
3.2 获取结果集MysqL_store_result
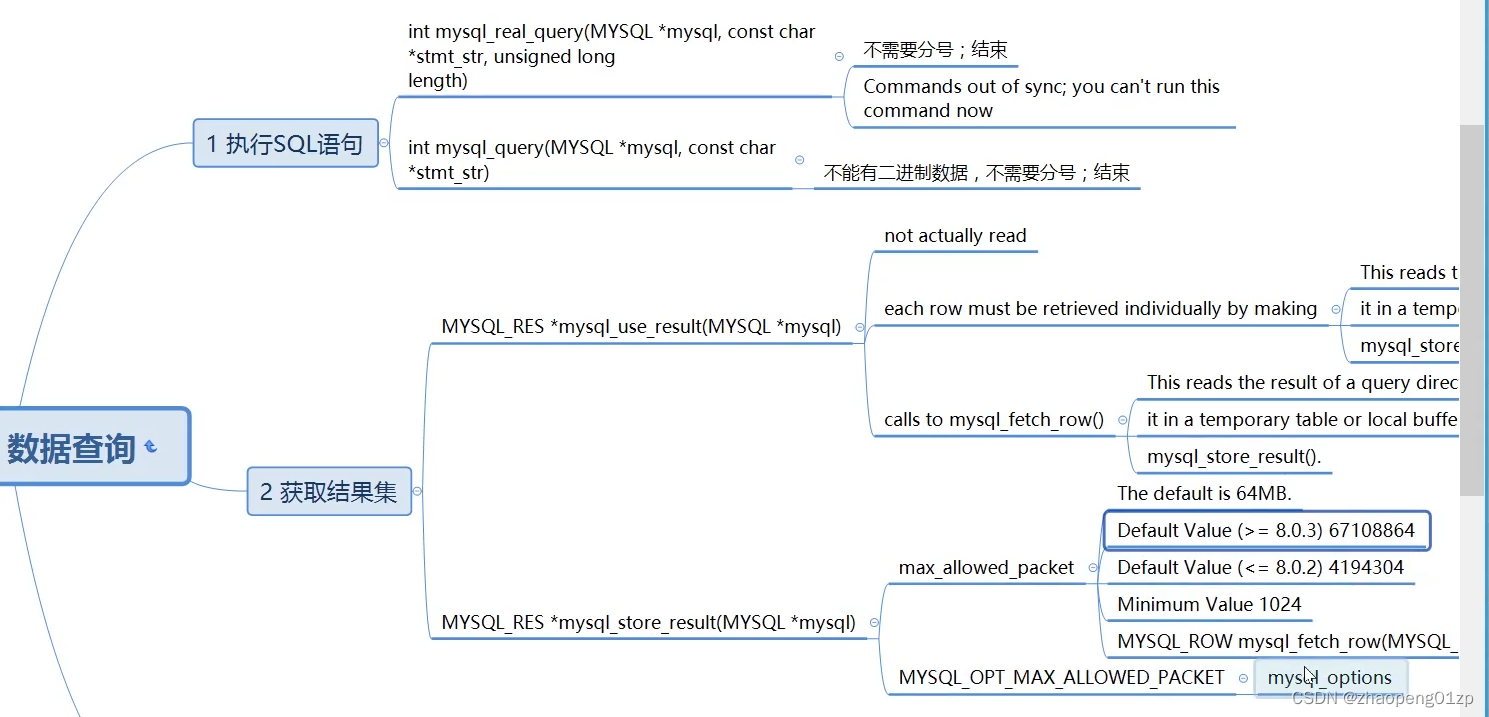
这两个接口的区别:
MysqL_use_result,仅仅是告诉服务器我要取这个结果了,但是实际上并没有接收这个结果,所以执行速度非常快;那么它的结果集数据在什么时候取呢,在第3步遍历结果集的时候,才去取这个结果集。
MysqL_store_result,不仅告诉服务器我要取这个结果,而且把这个结果集按照设定的包大小给取回来,所以执行速度没上一个命令快。
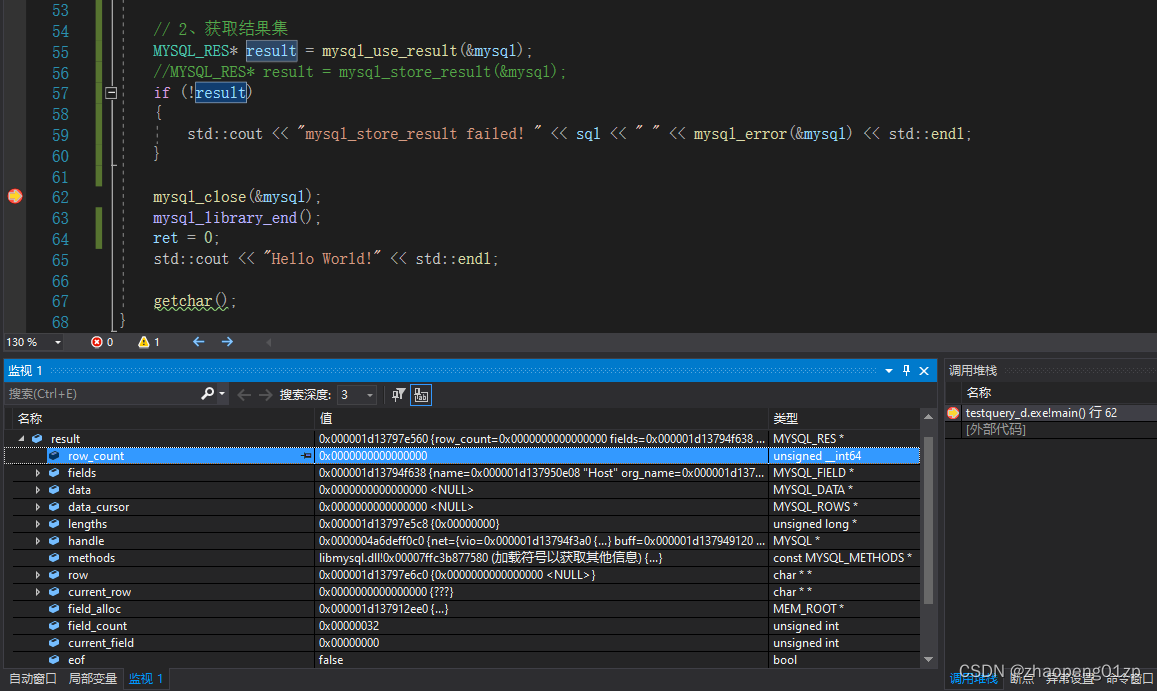
我们可以看到,MysqL_use_result接口返回的结果中row_count的值为0,也就是说这时候是没有数据的,但是实际上是有数据的,这个接口就像之前说的,只是通知服务器一声我要取结果集了;
我们再来看看MysqL_store_result接口:
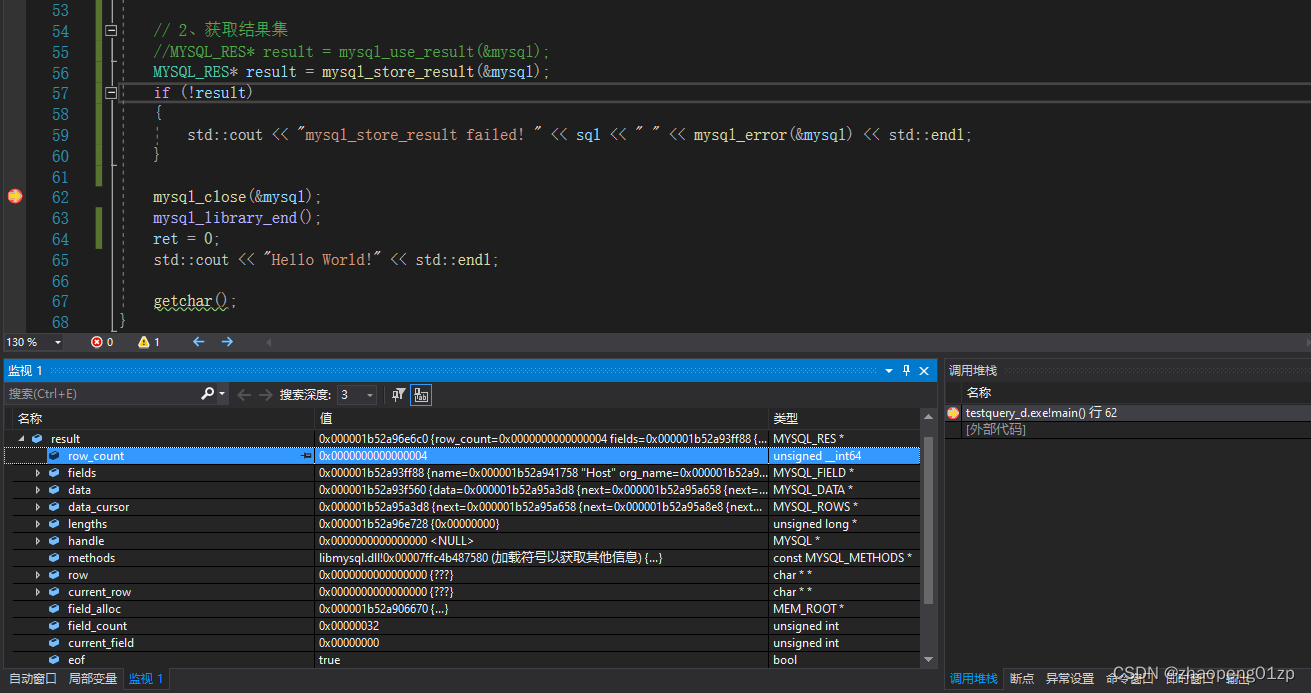
也就是说这一步读取了数据。
MysqL_use_result 不实际读取数据,在后面遍历的时候再去读取;
MysqL_store_result 读取所有数据,注意缓存大小 默认64M 最大可以设置为MysqL_OPT_MAX_ALLOWED_PACKET。
这就是这两种的读取方法。
// testMysqL.cpp : 此代码为x64平台,MysqL为64位版本。
//

#include <iostream>
#include "MysqL.h"
#include <thread>

int main()
{
	int ret = -1;

	// 初始化MysqL上下文
	MysqL MysqL;
	MysqL_library_init(0, 0, 0);
	if (!MysqL_init(&MysqL))
	{
		std::cout << "MysqL init Failed " << MysqL_error(&MysqL) << std::endl;
		return ret;
	}

	// 这里只是为了演示所以用了明文,实际开发中应写入加密的ini文件中
	const char* host = "127.0.0.1";
	//const char* host = "192.168.0.222";
	const char* user = "root";
	const char* passwd = "123456";
	const char* db = "MysqL";	// 数据库名称

	// 连接登录数据库
	if (!MysqL_real_connect(&MysqL, host, user, passwd, db, 3306, nullptr, 0))
	{
		std::cout << "MysqL connect Failed! " << MysqL_error(&MysqL) << std::endl;

		MysqL_close(&MysqL);
		return ret;
	}
	else
	{
		std::cout << "MysqL connect " << host << " success!" << std::endl;

	}

	// 1、执行sql语句
	const char* sql = "select * from user";
	//MysqL_query(&MysqL, sql);
	if (MysqL_real_query(&MysqL, sql, strlen(sql)))
	{
		std::cout << "MysqL_real_query Failed! " << sql << " " << MysqL_error(&MysqL) << std::endl;
	}
	else
	{
		std::cout << "MysqL_real_query success! " << sql << std::endl;
	}

	// 2、获取结果集
	//MysqL_RES* result = MysqL_use_result(&MysqL);
	MysqL_RES* result = MysqL_store_result(&MysqL);
	if (!result)
	{
		std::cout << "MysqL_store_result Failed! " << sql << " " << MysqL_error(&MysqL) << std::endl;
	}

	MysqL_close(&MysqL);
	MysqL_library_end();
	ret = 0;
	std::cout << "Hello World!" << std::endl;

    getchar();
}
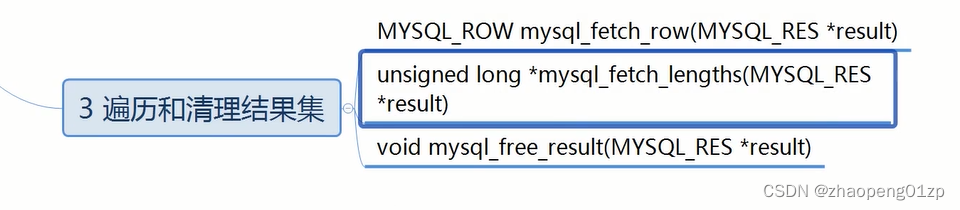
3.3 遍历并显示结果集MysqL_fetch_row
// testMysqL.cpp : 此代码为为win32平台,MysqL为32位版本。

#include <iostream>
#include <winsock.h>
#include "MysqL.h"
#include <thread>

using std::cout;
using std::endl;

int main()
{
	int ret = -1;

	// 初始化MysqL上下文
	MysqL MysqL;
	MysqL_library_init(0, 0, 0);
	if (!MysqL_init(&MysqL))
	{
		cout << "MysqL init Failed " << MysqL_error(&MysqL) << endl;
		return ret;
	}

	// 这里只是为了演示所以用了明文,实际开发中应写入加密的ini文件中
	const char* host = "127.0.0.1";
	//const char* host = "192.168.0.222";
	const char* user = "root";
	const char* passwd = "123456";
	const char* db = "MysqL";	// 数据库名称

	// 连接登录数据库
	if (!MysqL_real_connect(&MysqL, host, user, passwd, db, 3306, nullptr, 0))
	{
		cout << "MysqL connect Failed! " << MysqL_error(&MysqL) << endl;

		MysqL_close(&MysqL);
		return ret;
	}
	else
	{
		cout << "MysqL connect " << host << " success!" << endl;

	}

	// 1、执行sql语句
	const char* sql = "select * from user";
	//MysqL_query(&MysqL, sql);
	if (MysqL_real_query(&MysqL, sql, strlen(sql)))
	{
		cout << "MysqL_real_query Failed! " << sql << " " << MysqL_error(&MysqL) << endl;
	}
	else
	{
		cout << "MysqL_real_query success! " << sql << endl;
	}

	// 2、获取结果集
	//MysqL_RES* result = MysqL_use_result(&MysqL);
	MysqL_RES* result = MysqL_store_result(&MysqL);
	if (!result)
	{
		cout << "MysqL_store_result Failed! " << sql << " " << MysqL_error(&MysqL) << endl;
	}

	// 3、遍历结果集
	MysqL_ROW row;
	int i = 0;
	while(row = MysqL_fetch_row(result))
	{
		unsigned long* len = MysqL_fetch_lengths(result);
		cout << "len[" << i << "] = " << len[i] << " ------ " <<  "[" << row[i] << "," << row[i + 1] << "]" << endl;
		i++;
	}

	// 清理结果集
	MysqL_free_result(result);

	MysqL_close(&MysqL);
	MysqL_library_end();
	ret = 0;
	cout << "Hello World!" << endl;

    getchar();
}
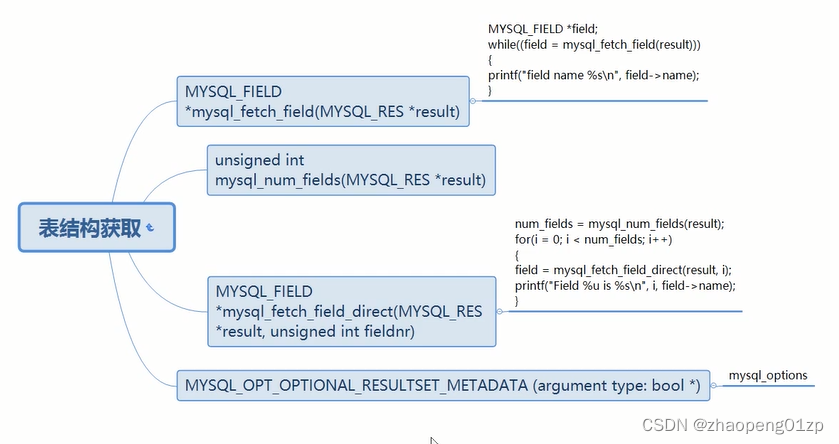
3.4 获取表字段信息并打印全字段数据
// testMysqL.cpp : 此代码为为win32平台,MysqL为32位版本。

#include <iostream>
#include <winsock.h>
#include "MysqL.h"
#include <thread>

using std::cout;
using std::endl;

int main()
{
	int ret = -1;

	// 初始化MysqL上下文
	MysqL MysqL;
	MysqL_library_init(0, 0, 0);
	if (!MysqL_init(&MysqL))
	{
		cout << "MysqL init Failed " << MysqL_error(&MysqL) << endl;
		return ret;
	}

	// 这里只是为了演示所以用了明文,实际开发中应写入加密的ini文件中
	const char* host = "127.0.0.1";
	//const char* host = "192.168.0.222";
	const char* user = "root";
	const char* passwd = "123456";
	const char* db = "MysqL";	// 数据库名称

	// 连接登录数据库
	if (!MysqL_real_connect(&MysqL, host, user, passwd, db, 3306, nullptr, 0))
	{
		cout << "MysqL connect Failed! " << MysqL_error(&MysqL) << endl;

		MysqL_close(&MysqL);
		return ret;
	}
	else
	{
		cout << "MysqL connect " << host << " success!" << endl;

	}

	// 1、执行sql语句
	const char* sql = "select * from user";
	//MysqL_query(&MysqL, sql);
	if (MysqL_real_query(&MysqL, sql, strlen(sql)))
	{
		cout << "MysqL_real_query Failed! " << sql << " " << MysqL_error(&MysqL) << endl;
	}
	else
	{
		cout << "MysqL_real_query success! " << sql << endl;
	}

	// 2、获取结果集
	//MysqL_RES* result = MysqL_use_result(&MysqL);
	MysqL_RES* result = MysqL_store_result(&MysqL);
	if (!result)
	{
		cout << "MysqL_store_result Failed! " << sql << " " << MysqL_error(&MysqL) << endl;
	}

	// 获取表字段
	MysqL_FIELD* field = nullptr;
	while(field = MysqL_fetch_field(result))
	{
		cout << "key: " << field->name << endl;
	}

	// 获取表字段数量
	int fnum = MysqL_num_fields(result);
	cout << "\nfields's num = " << fnum << endl;
	cout << "\n===================================================\n" << endl;

	// 3、遍历结果集
	MysqL_ROW row;
	while(row = MysqL_fetch_row(result))
	{
		/*unsigned long* len = MysqL_fetch_lengths(result);
		cout << "len[" << i << "] = " << len[i] << " ------ " <<  "[" << row[i] << "," << row[i + 1] << "]" << endl;
		i++;*/
		for(int i = 0; i < fnum; i++)
		{
			cout << MysqL_fetch_field_direct(result, i)->name << ":";
			if(row[i])
				cout << row[i];
			else
				cout << "NULL";
			cout << ", ";
		}
		cout << "\n===================================================\n" << endl;
	}


	// 清理结果集
	MysqL_free_result(result);

	MysqL_close(&MysqL);
	MysqL_library_end();
	ret = 0;
	cout << "Hello World!" << endl;

    getchar();
}
4、使用MysqL API 自动创建表、INSERT、UPDATE、DELETE和truncate的使用
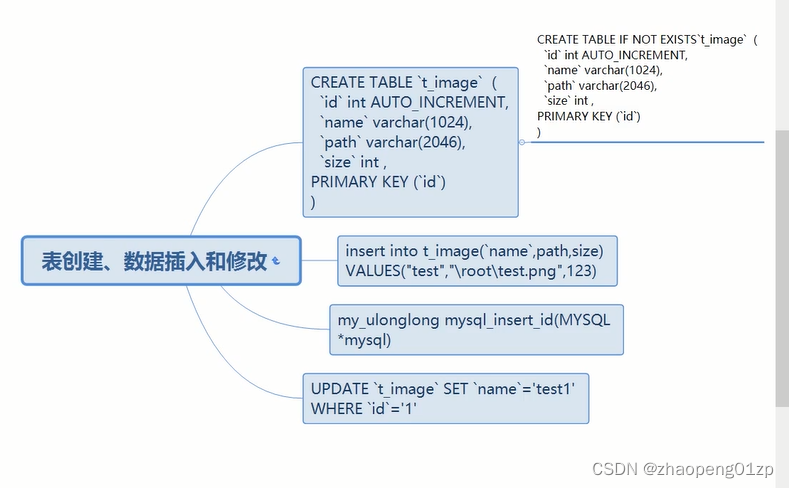
使用MysqLAPI自动创建表
上图的 CREATE TABLE IF NOT EXISTS ‘t_image’ 的意思是说,如果这个表不存在我们才创建,这个比较方便的,这样的话我们的代码就不用手动去判断这个表是否存在了,我们每次都这样执行一遍:CREATE TABLE IF NOT EXISTS ‘t_image’ ,表不存在我们就创建,然后开始插入数据。
注意,上图中的表名、字段名两边的不是单引号,是ESC键下边的那个键,也是数字1前面那个符号`;我们不管什么样的情况都给字段名两边加上这个符号,这样就能保证不会跟MysqL系统中的关键字出现冲突,导致程序出现问题。
// testMysqL.cpp : 此代码为为win32平台,MysqL为32位版本。

#include <iostream>
#include <winsock.h>
#include "MysqL.h"
#include <thread>
#include <string>

using std::cout;
using std::endl;
using std::string;

int main()
{
	int ret = -1;

	// 初始化MysqL上下文
	MysqL MysqL;
	MysqL_library_init(0, 0, 0);
	if (!MysqL_init(&MysqL))
	{
		cout << "MysqL init Failed " << MysqL_error(&MysqL) << endl;
		return ret;
	}

	// 这里只是为了演示所以用了明文,实际开发中应写入加密的ini文件中
	const char* host = "127.0.0.1";
	//const char* host = "192.168.0.222";
	const char* user = "root";
	const char* passwd = "123456";
	const char* db = "MysqL";	// 数据库名称

	// 连接登录数据库
	if (!MysqL_real_connect(&MysqL, host, user, passwd, db, 3306, nullptr, 0))
	{
		cout << "MysqL connect Failed! " << MysqL_error(&MysqL) << endl;

		MysqL_close(&MysqL);
		return ret;
	}
	else
	{
		cout << "MysqL connect " << host << " success!" << endl;

	}

	string sql = "";

	// 创建数据库
	sql = "CREATE DATABASE `zpdatabase` DEFAULT CHaraCTER SET utf8 COLLATE utf8_bin";
	//sql = "CREATE DATABASE `zpdatabase11` charset utf8";
	//MysqL_query(&MysqL, sql.c_str());
	if (MysqL_real_query(&MysqL, sql.c_str(), strlen(sql.c_str())))
	{
		cout << "MysqL_real_query Failed! " << sql << " " << MysqL_error(&MysqL) << endl;
	}
	else
	{
		cout << "MysqL_real_query success! " << sql << endl;
	}

	// 1 创建表
	sql = "CREATE TABLE IF NOT EXISTS `zpdatabase`.`t_image` ( \
		  `id` int AUTO_INCREMENT, \
		  `name` varchar(1024), \
		  `path` varchar(2046), \
		  `size` int, \
		  PRIMARY KEY(`id`) \
		  )";
	//MysqL_query(&MysqL, sql.c_str());
	if (MysqL_real_query(&MysqL, sql.c_str(), strlen(sql.c_str())))
	{
		cout << "MysqL_real_query Failed! " << sql << " " << MysqL_error(&MysqL) << endl;
	}
	else
	{
		cout << "MysqL_real_query success! " << sql << endl;
	}

	// 2 插入数据

	// 3 修改数据

	// 4 删除数据

	MysqL_close(&MysqL);
	MysqL_library_end();
	ret = 0;
	cout << "MysqL 5.5.40" << endl;

    getchar();
}
创建表、插入数据、删除数据的时候不需要清理结果集,因为它没有结果集返回,我们只需要判断它成功还是失败。
注意:代码中的数据库名称 const char* db = “MysqL”; 记得改为所创建的数据库名称zpdatabase,这样创建表、插入数据的sql语句中就不需要在表名前添加数据库名称了。
查看表的结构
MysqL> desc t_image;
±------±--------------±-----±----±--------±---------------+
| Field | Type | Null | Key | Default | Extra |
±------±--------------±-----±----±--------±---------------+
| id | int(11) | NO | PRI | NULL | auto_increment |
| name | varchar(1024) | YES | | NULL | |
| path | varchar(2046) | YES | | NULL | |
| size | int(11) | YES | | NULL | |
±------±--------------±-----±----±--------±---------------+
4 rows in set (0.01 sec)
使用MysqLAPI通过INSERT插入一千条数据

插入一条数据
// 2 插入数据
	sql = "insert into `t_image`(`name`, `path`, size) values('test1.jpg','d:/img/test1.jpg', 10240)";
	//MysqL_query(&MysqL, sql.c_str());
	if (MysqL_real_query(&MysqL, sql.c_str(), strlen(sql.c_str())))
	{
		cout << "insert Failed! " << MysqL_error(&MysqL) << endl;
	}
	else
	{
		cout << "insert success! " << endl;

		// MysqL_affected_rows(&MysqL); 这个接口的意思是说,上一句的sql语句影响了多少行的数据
		my_ulonglong count = MysqL_affected_rows(&MysqL);
		cout << "MysqL_affected_rows " << count << endl;

	}
select查找的话你还要获取结果集,而insert插入之操作我们不需要获取结果集,我们只需要通过MysqL_affected_rows(&MysqL);知道插入语句影响的行数就可以了。
MysqL> select * from t_image;
±—±----------±-----------------±------+
| id | name | path | size |
±—±----------±-----------------±------+
| 1 | test1.jpg | d:img est1.jpg | 10240 |
| 2 | test1.jpg | d:img est1.jpg | 10240 |
| 3 | test1.jpg | d:img est1.jpg | 10240 |
| 4 | test1.jpg | d:/img/test1.jpg | 10240 |
| 5 | test1.jpg | d:/img/test1.jpg | 10240 |
±—±----------±-----------------±------+
5 rows in set (0.00 sec)
单独一个反斜杠在C++字符串中会被当成转义,如果我们多加几个反斜杠的话,在sql语句里仍然被当成了转义,所以我们统一用斜杠来作为路径分隔符吧,这样就不会造成转义。
插入1000条数据
为了改变所插入的名字,我们使用sstream库里面的拼接字符串功能,因为C++本身它不能支持把整型数字给加进字符串里面,所以我们用这个字符串流来处理。
为了使用stringstream ,记得在开头添加头文件,以及 using std::stringstream;
// sstream版本的插入1000条数据
	for(int i = 0; i < 1000; i++)
	{
		//sql = "insert into `t_image`(`id`, `name`, `path`, size) values('test1.jpg','d:/img/test1.jpg', 10240)";
		stringstream ss;
		ss << "insert into `t_image` (`name`, `path`, size) values('test";
		ss << i << ".jpg','d:/img/test";
		ss << i << ".jpg', 10240)";
		sql = ss.str();
		if (MysqL_real_query(&MysqL, sql.c_str(), strlen(sql.c_str())))
		{
			cout << "insert into Failed! " << MysqL_error(&MysqL) << endl;
		}
		else
		{
			cout << "insert into success! " << endl;
			// MysqL_affected_rows(&MysqL); 这个接口的意思是说,上一句的sql语句影响了多少行的数据
			my_ulonglong count = MysqL_affected_rows(&MysqL);
			// MysqL_insert_id(&MysqL); 这个接口可以把id号取出来
			cout << "MysqL_affected_rows " << count  << " id = " << MysqL_insert_id(&MysqL) << endl;
		}
	}
sprintf_s版本的插入100条数据
// sprintf_s版本的插入数据
	char csql[1024] = { 0 };
	for(int i = 0; i < 50; i++)
	{
		//sql = "insert into `t_image`(`id`, `name`, `path`, size) values('test1.jpg','d:/img/test1.jpg', 10240)";
		sprintf_s(csql, "insert into `t_image` (`name`, `path`, `size`) values('my_image_%d.jpg', 'd:/img/my_image%d.jpg', '5000%d')",  i, i, i);
		if (MysqL_real_query(&MysqL, csql, strlen(csql)))
		{
			cout << "sprintf_s insert into Failed! " << MysqL_error(&MysqL) << endl;
		}
		else
		{
			cout << "sprintf_s insert into success! " << endl;
			// MysqL_affected_rows(&MysqL); 这个接口的意思是说,上一句的sql语句影响了多少行的数据
			my_ulonglong count = MysqL_affected_rows(&MysqL);
			// MysqL_insert_id(&MysqL); 这个接口可以把id号取出来
			cout << "insert MysqL_affected_rows " << count  << " id = " << MysqL_insert_id(&MysqL) << endl;
		}
	}
MysqL> select count(*) from zpdatabase.t_image;
±---------+
| count(*) |
±---------+
| 319 |
±---------+
1 row in set (0.00 sec)
上面这条sql语句可以用来统计表中有多少行数据。
UPDATE修改数据并根据std的map变量自动生成
// 3 修改数据
	// update t_image set `name`="image.png", size=2000 where id=1
	sql = "update `t_image` set `name` = 'image11.png', `path` = 'd:/img/image11.png', `size` = 50000 where `id` = 2" ;
	//MysqL_query(&MysqL, sql.c_str());
	if (MysqL_real_query(&MysqL, sql.c_str(), strlen(sql.c_str())))
	{
		cout << "update Failed! " << MysqL_error(&MysqL) << endl;
	}
	else
	{
		cout << "update success! " << endl;

		// MysqL_affected_rows(&MysqL); 这个接口的意思是说,上一句的sql语句影响了多少行的数据
		my_ulonglong count = MysqL_affected_rows(&MysqL);
		cout << "update MysqL_affected_rows " << count << endl;

	}
我们经过测试发现可以给size这个整型值传入字符串,这样sql语句就可以统一值的形式,方便用户传一个map进来,map里面是map<string, string>。
为了使用map和maike_pair,记得在开头添加头文件
// 通过传入的map<string, string>来实现sql语句
	// update t_image set `name`="image.png", size=2000 where id=1
	map<string, string> kv;
	kv.insert(make_pair("name", "image_update001.png"));
	kv.insert(make_pair("path", "d:/img/image_update001.png"));
	kv.insert(make_pair("size", "5000"));
	string where = "where id = 3";
	// 遍历map
	// map<string, string>::iterator
	string tmp;
	for(auto ptr = kv.begin(); ptr != kv.end(); ptr++)
	{
		tmp.clear();
		tmp += "`";
		tmp += ptr->first;
		tmp += "`='";
		tmp += ptr->second;
		tmp += "', ";

		//为了解决上面tmp最后结尾处多的一个逗号,比如说我们在结尾处加一个固定的不变的值:
		tmp += " id=id " ;

		sql = "update `t_image` set ";
		sql += tmp;
		sql += where;

		if (MysqL_real_query(&MysqL, sql.c_str(), strlen(sql.c_str())))
		{
			cout << "map<string, string> update Failed! " << MysqL_error(&MysqL) << endl;
		}
		else
		{
			cout << "map<string, string> update success! " << endl;

			// MysqL_affected_rows(&MysqL); 这个接口的意思是说,上一句的sql语句影响了多少行的数据
			my_ulonglong count = MysqL_affected_rows(&MysqL);
			cout << "update MysqL_affected_rows " << count << endl;
		}
	}
由于这里拼接的字符串里面没有整型数据,所以我们就用一个临时的string来拼接字符串就行。
这样我们就可以根据map自动生成update的sql语句了。
MysqL> select * from t_image where id < 10;
±—±--------------------±---------------------------±------+
| id | name | path | size |
±—±--------------------±---------------------------±------+
| 1 | test1.jpg | d:img est1.jpg | 10240 |
| 2 | image11.png | d:/img/image11.png | 50000 |
| 3 | image_update001.png | d:/img/image_update001.png | 5000 |
| 4 | test1.jpg | d:/img/test1.jpg | 10240 |
| 5 | test1.jpg | d:/img/test1.jpg | 10240 |
| 6 | test1.jpg | d:/img/test1.jpg | 10240 |
| 7 | test1.jpg | d:/img/test1.jpg | 10240 |
| 8 | test1.jpg | d:/img/test1.jpg | 10240 |
| 9 | test1.jpg | d:/img/test1.jpg | 10240 |
±—±--------------------±---------------------------±------+
9 rows in set (0.00 sec)
DELETE和truncate清理数据
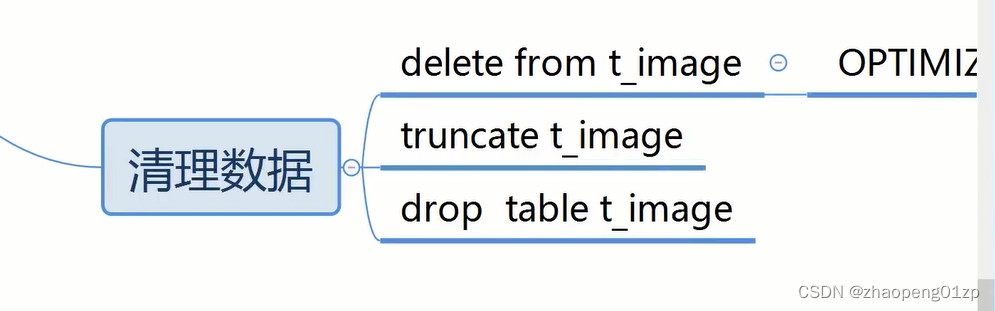

delete from t_image + 条件,例如delete from t_image where id >0,会把整个表中的数据都删掉,这种用的比较多;
它并不是真正把数据给删掉,如果你把它放在事务里面去做的话,事务是可以回滚的,这条语句只是给它做个标识,说它被删掉了,删除一条数据的话比较慢;你的自增索引并没有清除,你再插入数据的话这个索引会接续增加;
如果delete from t_image要真正的清理掉空间的话,要用OPTIMIZE TABLE t_image去优化下这张表,才会把t_image对应的空间真正清理掉,这种工作可以定期来做(因为优化的时候会锁住这张表,所以一般在夜里没什么操作这张表的时候来做);
truncate t_image,会把整个表都删掉,并且使自增索引重新从0开始;它会真正的清理掉空间;
drop table t_image,把整个表都删掉,包括数据以及表结构,这种不怎么用。
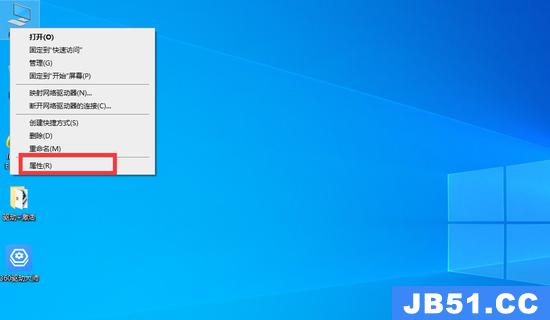
下图是我们要操作的数据库的存储位置:
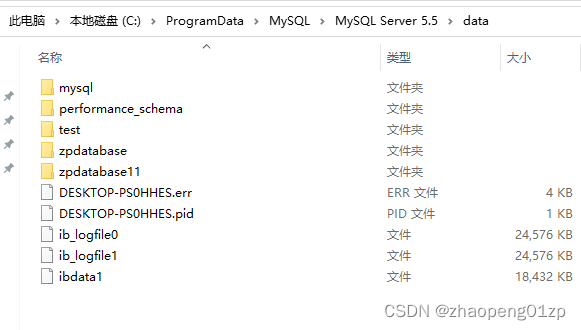
我们待会可以从这个存储位置这里看到数据删除之后的变化,可以看到数据删除的开销和文件的大小变化。
// testMysqL.cpp : 此代码为为win32平台,MysqL为32位版本。

#include <iostream>
#include <winsock.h>
#include "MysqL.h"
#include <thread>
#include <string>
#include <sstream>
#include <stdio.h>
#include <map>

using std::cout;
using std::endl;
using std::string;
using std::stringstream;
using std::map;
using std::make_pair;

int main()
{
	int ret = -1;

	// 初始化MysqL上下文
	MysqL MysqL;
	MysqL_library_init(0, 0, 0);
	if (!MysqL_init(&MysqL))
	{
		cout << "MysqL init Failed " << MysqL_error(&MysqL) << endl;
		return ret;
	}

	// 这里只是为了演示所以用了明文,实际开发中应写入加密的ini文件中
	const char* host = "127.0.0.1";
	//const char* host = "192.168.0.222";
	const char* user = "root";
	const char* passwd = "123456";
	const char* db = "zpdatabase";	// 数据库名称

	// 连接登录数据库
	if (!MysqL_real_connect(&MysqL, host, user, passwd, db, 3306, nullptr, 0))
	{
		cout << "MysqL connect Failed! " << MysqL_error(&MysqL) << endl;

		MysqL_close(&MysqL);
		return ret;
	}
	else
	{
		cout << "MysqL connect " << host << " success!" << endl;

	}

	string sql = "";

	 创建数据库
	//sql = "CREATE DATABASE `zpdatabase` DEFAULT CHaraCTER SET utf8 COLLATE utf8_bin";
	sql = "CREATE DATABASE `zpdatabase11` charset utf8";
	MysqL_query(&MysqL, sql.c_str());
	//if (MysqL_real_query(&MysqL, sql.c_str(), strlen(sql.c_str())))
	//{
	//	cout << "MysqL_real_query Failed! " << MysqL_error(&MysqL) << endl;
	//}
	//else
	//{
	//	cout << "MysqL_real_query success! " << endl;
	//}

	// 1 创建表
	sql = "CREATE TABLE IF NOT EXISTS `t_image`( \
		  `id` int auto_increment, \
		  `name` varchar(1024), \
		  `path` varchar(2046), \
		  `size` int, \
		  primary KEY(`id`) \
		  )";
	//MysqL_query(&MysqL, sql.c_str());
	if (MysqL_real_query(&MysqL, sql.c_str(), strlen(sql.c_str())))
	{
		cout << "CREATE TABLE Failed! " << MysqL_error(&MysqL) << endl;
	}
	else
	{
		cout << "CREATE TABLE success! " << endl;
	}

	// 清空数据,并恢复自增id从1开始
	sql = "truncate t_image";
	if (MysqL_real_query(&MysqL, sql.c_str(), strlen(sql.c_str())))
	{
		cout << "delete Failed! " << MysqL_error(&MysqL) << endl;
	}
	else
	{
		cout << "delete success! " << endl;

		// MysqL_affected_rows(&MysqL); 这个接口的意思是说,上一句的sql语句影响了多少行的数据
		my_ulonglong count = MysqL_affected_rows(&MysqL);
		cout << "delete MysqL_affected_rows " << count << endl;

	}

	// 2 插入数据
	// 插入100条数据
	for(int i = 0; i < 100; i++)
	{
		//sql = "insert into `t_image`(`id`, `name`, `path`, size) values('test1.jpg','d:/img/test1.jpg', 10240)";
		stringstream ss;
		ss << "insert into `t_image` (`name`, `path`, size) values('test";
		ss << i << ".jpg','d:/img/test";
		ss << i << ".jpg', 10240)";
		sql = ss.str();
		if (MysqL_real_query(&MysqL, sql.c_str(), strlen(sql.c_str())))
		{
			cout << "insert into Failed! " << MysqL_error(&MysqL) << endl;
		}
		else
		{
			cout << "insert into success! " << endl;
			// MysqL_affected_rows(&MysqL); 这个接口的意思是说,上一句的sql语句影响了多少行的数据
			my_ulonglong count = MysqL_affected_rows(&MysqL);
			// MysqL_insert_id(&MysqL); 这个接口可以把id号取出来
			cout << "insert MysqL_affected_rows " << count  << " id = " << MysqL_insert_id(&MysqL) << endl;
		}
	}

	// 3 修改数据
	// update t_image set `name`="image.png", size=2000 where id=1
	sql = "update `t_image` set `name` = 'image11.png', `path` = 'd:/img/image11.png', `size` = 50000 where `id` = 2" ;
	//MysqL_query(&MysqL, sql.c_str());
	if (MysqL_real_query(&MysqL, sql.c_str(), strlen(sql.c_str())))
	{
		cout << "update Failed! " << MysqL_error(&MysqL) << endl;
	}
	else
	{
		cout << "update success! " << endl;

		// MysqL_affected_rows(&MysqL); 这个接口的意思是说,上一句的sql语句影响了多少行的数据
		my_ulonglong count = MysqL_affected_rows(&MysqL);
		cout << "update MysqL_affected_rows " << count << endl;

	}

	// 通过传入的map<string, string>来实现sql语句
	// update t_image set `name`="image.png", size=2000 where id=1
	//sql = "insert into `t_image`(`id`, `name`, `path`, size) values('test1.jpg','d:/img/test1.jpg', 10240)";
	map<string, string> kv;
	kv.insert(make_pair("name", "image_update001.png"));
	kv.insert(make_pair("path", "d:/img/image_update001.png"));
	kv.insert(make_pair("size", "5000"));
	string where = "where id = 3";
	// 遍历map
	// map<string, string>::iterator
	string tmp;
	for(auto ptr = kv.begin(); ptr != kv.end(); ptr++)
	{
		tmp.clear();
		tmp += "`";
		tmp += ptr->first;
		tmp += "`='";
		tmp += ptr->second;
		tmp += "', ";

		//为了解决上面tmp最后结尾处多的一个逗号,比如说我们在结尾处加一个固定的不变的值:
		tmp += " id=id " ;

		sql = "update `t_image` set ";
		sql += tmp;
		sql += where;

		if (MysqL_real_query(&MysqL, sql.c_str(), strlen(sql.c_str())))
		{
			cout << "map<string, string> update Failed! " << MysqL_error(&MysqL) << endl;
		}
		else
		{
			cout << "map<string, string> update success! " << endl;

			// MysqL_affected_rows(&MysqL); 这个接口的意思是说,上一句的sql语句影响了多少行的数据
			my_ulonglong count = MysqL_affected_rows(&MysqL);
			cout << "update MysqL_affected_rows " << count << endl;
		}
	}

	// 4 删除数据
	// delete from t_image where id=1
	// truncate t_image
	// drop table t_image
	// sql = "truncate `t_image`" ;

	// delete 不会实际删除空间,只是做了标识
	sql = "delete from t_image where id = 1";
	//sql = "truncate t_image";
	if (MysqL_real_query(&MysqL, sql.c_str(), strlen(sql.c_str())))
	{
		cout << "delete Failed! " << MysqL_error(&MysqL) << endl;
	}
	else
	{
		cout << "delete success! " << endl;

		// MysqL_affected_rows(&MysqL); 这个接口的意思是说,上一句的sql语句影响了多少行的数据
		my_ulonglong count = MysqL_affected_rows(&MysqL);
		cout << "delete MysqL_affected_rows " << count << endl;

	}

	// 要想真正删除空间,还有优化一下
	// 实际清理了空间
	sql = "OPTIMIZE TABLE t_image";
	if (MysqL_real_query(&MysqL, sql.c_str(), strlen(sql.c_str())))
	{
		cout << "delete Failed! " << MysqL_error(&MysqL) << endl;
	}
	else
	{
		cout << "delete success! " << endl;

		// MysqL_affected_rows(&MysqL); 这个接口的意思是说,上一句的sql语句影响了多少行的数据
		my_ulonglong count = MysqL_affected_rows(&MysqL);
		cout << "delete MysqL_affected_rows " << count << endl;

	}

	MysqL_close(&MysqL);
	MysqL_library_end();
	ret = 0;
	cout << "MysqL 5.5.40" << endl;

    getchar();
}
一次执行多条sql语句并遍历获取结果集MysqL_next_result
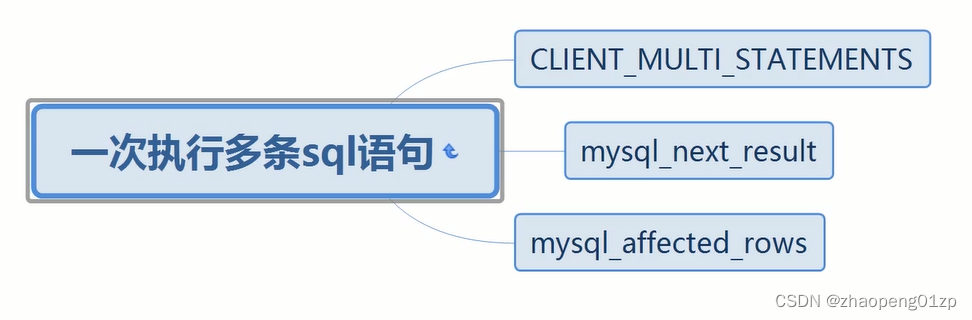
我们是一次执行发过去的,这种语句里面有不同的操作,比方说有插入、有删除、也有update,也有select查找等,有多种语句的时候那你怎么返回结果呢,要通过MysqL_next_result来遍历结果;
这个MysqL_next_result,并不是返回结果集,它只是确认有没有下一个结果,如果有下一个结果它就移到这个结果的位置,然后你再通过store_result或者query_result来获取这个结果集,有的情况下是由结果集的,有的情况下是没有结果集的,有的是有结果但是没有结果集(比方说insert),所以说你在处理多条sql语句的时候,你要做判断。
我们接下来要在一条sql语句中完成这几个动作:建表、清表、插入100条数据、显示(即查询)。
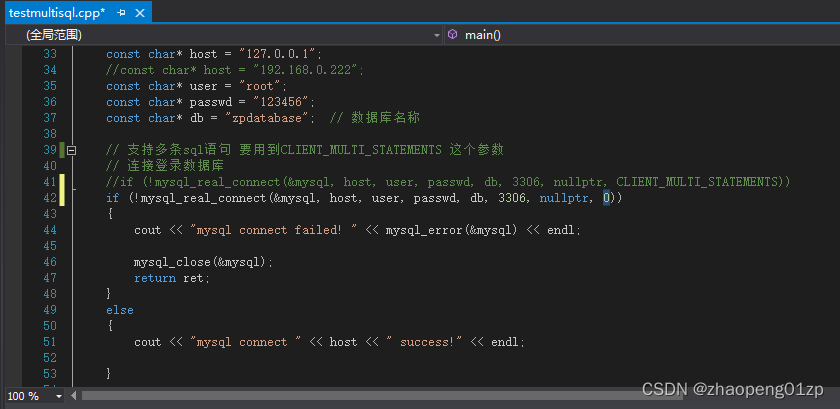
我们先不用CLIENT_MULTI_STATEMENTS这个参数,用以前的语句执行看看:
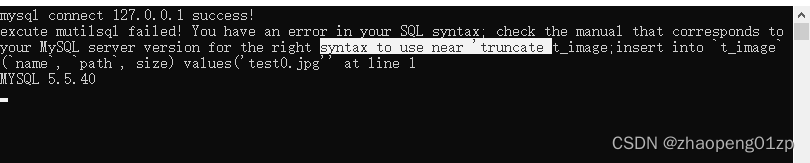
可以看到执行第2条sql语句的时候就出错了。
添加CLIENT_MULTI_STATEMENTS参数的话,让它支持一次执行多条sql语句:

// testMysqL.cpp : 此代码为为win32平台,MysqL为32位版本。
#include <iostream>
#include <winsock.h>
#include "MysqL.h"
#include <thread>
#include <string>
#include <sstream>
#include <stdio.h>
#include <map>
using std::cout;
using std::endl;
using std::string;
using std::stringstream;
using std::map;
using std::make_pair;
int main()
{
int ret = -1;
// 初始化MysqL上下文
MysqL MysqL;
MysqL_library_init(0, 0, 0);
if (!MysqL_init(&MysqL))
{
cout << "MysqL init Failed " << MysqL_error(&MysqL) << endl;
return ret;
}
// 这里只是为了演示所以用了明文,实际开发中应写入加密的ini文件中
const char* host = "127.0.0.1";
//const char* host = "192.168.0.222";
const char* user = "root";
const char* passwd = "123456";
const char* db = "zpdatabase"; // 数据库名称
// 支持多条sql语句 要用到CLIENT_MULTI_STATEMENTS 这个参数
// 连接登录数据库
if (!MysqL_real_connect(&MysqL, host, user, passwd, db, 3306, nullptr, CLIENT_MULTI_STATEMENTS))
{
cout << "MysqL connect Failed! " << MysqL_error(&MysqL) << endl;
MysqL_close(&MysqL);
return ret;
}
else
{
cout << "MysqL connect " << host << " success!" << endl;
}
string sql = "";
// 1 创建表
sql = "CREATE TABLE IF NOT EXISTS `t_image`( \
`id` int auto_increment, \
`name` varchar(1024), \
`path` varchar(2046), \
`size` int, \
primary KEY(`id`) \
);";
// 清空数据,并恢复自增id从1开始
sql += "truncate t_image;";
// 2 插入数据
// 插入100条数据
for(int i = 0; i < 100; i++)
{
//sql = "insert into `t_image`(`id`, `name`, `path`, size) values('test1.jpg','d:/img/test1.jpg', 10240)";
stringstream ss;
ss << "insert into `t_image` (`name`, `path`, size) values('test";
ss << i << ".jpg','d:/img/test";
ss << i << ".jpg', 10240);";
sql += ss.str();
}
// 3 修改数据
// update t_image set `name`="image.png", size=2000 where id=1
sql += "update `t_image` set `name` = 'image11.png', `path` = 'd:/img/image11.png', \
`size` = 50000 where `id` = 2;";
// 通过传入的map<string, string>来实现sql语句
// update t_image set `name`="image.png", size=2000 where id=1
//sql = "insert into `t_image`(`id`, `name`, `path`, size) values('test1.jpg','d:/img/test1.jpg', 10240)";
map<string, string> kv;
kv.insert(make_pair("name", "image_update001.png"));
kv.insert(make_pair("path", "d:/img/image_update001.png"));
kv.insert(make_pair("size", "5000"));
string where = "where id = 3;";
// 遍历map
// map<string, string>::iterator
string tmp;
for(auto ptr = kv.begin(); ptr != kv.end(); ptr++)
{
tmp.clear();
tmp += "`";
tmp += ptr->first;
tmp += "`='";
tmp += ptr->second;
tmp += "', ";
//为了解决上面tmp最后结尾处多的一个逗号,比如说我们在结尾处加一个固定的不变的值:
tmp += " id=id " ;
sql += "update `t_image` set ";
sql += tmp;
sql += where;
}
// 4 删除数据
// delete from t_image where id=1
// truncate t_image
// drop table t_image
// sql = "truncate `t_image`" ;
// delete 不会实际删除空间,只是做了标识
sql += "delete from t_image where id = 1;";
// 在进行查找
sql += "select * from t_image;";
// 执行sql语句会立刻返回,但是语句并没有全部执行好,需要获取结果,不然会出现问题
// 它是把sql语句整个发送给MysqL server,MysqL server一条条执行,一条条返回结果
// 一次执行完返回一个统一的结果,这种可以通过存储过程或者用事务来做
// 以前那种单条语句并不会出现这种问题
if (MysqL_real_query(&MysqL, sql.c_str(), strlen(sql.c_str())))
{
cout << "excute mutilsql Failed! " << MysqL_error(&MysqL) << endl;
}
else
{
cout << "excute multisql success! " << endl;
// 有多个返回结果,所以要用MysqL_next_result(&MysqL);
// 取下一条结果,而当前已经有一条返回结果了,所以我们用do...while()来做
do{
MysqL_RES* result = MysqL_store_result(&MysqL);
if(result) // 如果有结果集,有可能是SELECT语句执行的结果
{
// 因为有多种sql语句的执行结果,所以这里我们只把SELECT语句执行的结果的总行号打印出来
// 如果有结果集,我们就可以把它释放
MysqL_free_result(result);
}
else // 如果没有结果集,那有可能是INSERT、UPDATE、DELETE、CREATE、TruncATE、DROP
{
// 也有可能MysqL_store_result执行失败,所以要先判断下
// 如果有字段、但没有结果集,那就是SELECT出错
if(MysqL_field_count(&MysqL) > 0)
{
cout << "Not retrieve result!" << MysqL_error(&MysqL) << endl;
}
else // INSERT、UPDATE、DELETE、CREATE、TruncATE、DROP
{
// 打印一下影响的行数
// 等待服务器的处理结果
cout << MysqL_affected_rows(&MysqL) << " rows affected!" << endl;
}
}
}while(MysqL_next_result(&MysqL) == 0); // 0表示有结果
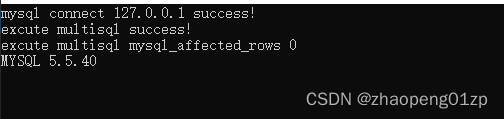
// MysqL_affected_rows(&MysqL); 这个接口的意思是说,上一句的sql语句影响了多少行的数据
int count = MysqL_affected_rows(&MysqL);
cout << "excute multisql MysqL_affected_rows " << count << endl;
}
MysqL_close(&MysqL);
MysqL_library_end();
ret = 0;
cout << "MysqL 5.5.40" << endl;
getchar();
}
如果MysqL_affected_rows(&MysqL); 的返回值是18446744073709551615,而该值是2^64-1 (18446744073709551615),这个数字超过了 my_ulonglong 的最大范围;
我们看 MysqL 源码,MysqL_affected_rows() 返回类型是my_ulonglong,源码中其实是这么定义的:
typedef unsigned long long my_ulonglong;
也就是说,在 C 代码中,这个数字最大就是2^64-1 (18446744073709551615),由于接口MysqL_affected_rows的返回值是无符号类型的,所以-1就变成18446744073709551615了。
所以,将count的类型改为int即可:

第三章 MysqL事务特性和用法介绍
1、MysqL事务特性和用法
MysqL事务特性
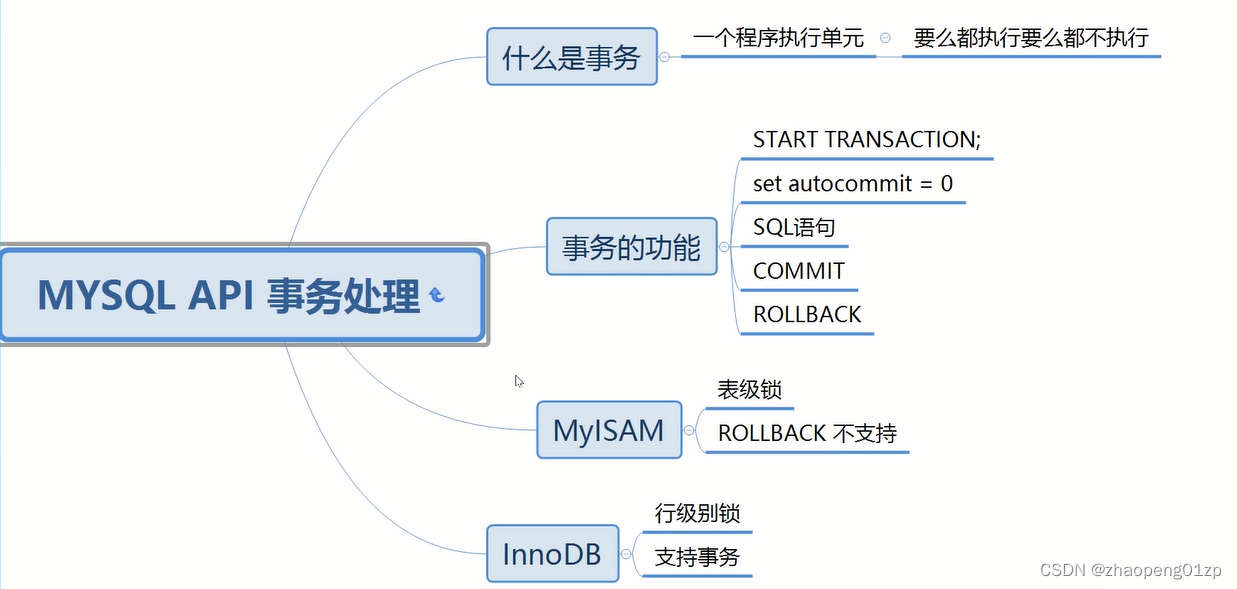
事务可以进行回滚;
autocommit自动提交设成0,就是不自动提交,我们手动提交。
MysqL有两种存储引擎:MyISAM和InnoDB,涉及到事务的话,我们一般用InnoDB。
我们接下来做一下事务功能的演示,我们先插3条数据,然后回滚,再插入1000条数据;并比较不用事务和用事务插入数据的性能。
MysqL事务API代码演示
// test_transaction.cpp : 此代码为为win32平台,MysqL为32位版本。

#include <iostream>
#include <winsock.h>
#include "MysqL.h"
#include <thread>
#include <string>
#include <sstream>
#include <stdio.h>
#include <map>

using std::cout;
using std::endl;
using std::string;
using std::stringstream;
using std::map;
using std::make_pair;

int main()
{
	int ret = -1;

	// 初始化MysqL上下文
	MysqL MysqL;
	MysqL_library_init(0, 0, 0);
	if (!MysqL_init(&MysqL))
	{
		cout << "MysqL init Failed " << MysqL_error(&MysqL) << endl;
		return ret;
	}

	// 这里只是为了演示所以用了明文,实际开发中应写入加密的ini文件中
	const char* host = "127.0.0.1";
	//const char* host = "192.168.0.222";
	const char* user = "root";
	const char* passwd = "123456";
	const char* db = "zpdatabase";	// 数据库名称

	// 连接登录数据库
	if (!MysqL_real_connect(&MysqL, host, user, passwd, db, 3306, nullptr, 0))
	{
		cout << "MysqL connect Failed! " << MysqL_error(&MysqL) << endl;

		MysqL_close(&MysqL);
		return ret;
	}
	else
	{
		cout << "MysqL connect " << host << " success!" << endl;

	}

	string sql = "";

	// 1 创建表
	sql = "CREATE TABLE IF NOT EXISTS `t_video`( \
		  `id` int auto_increment, \
		  `name` varchar(1024), \
		  `path` varchar(2046), \
		  `size` int, \
		  primary KEY(`id`) \
		  ) ENGINE = InnoDB";	// 设置支持事务回滚的InnoDB引擎

	int result = MysqL_query(&MysqL, sql.c_str());
	if(result != 0)
	{
		cout << "CREATE TABLE Failed" << MysqL_error(&MysqL) << endl;
	}

	// 清理表中的数据
	sql = "truncate `t_video`";
	result = MysqL_query(&MysqL, sql.c_str());
	if(result != 0)
	{
		cout << "truncate Failed" << MysqL_error(&MysqL) << endl;
	}

	// 事务
	// 1 开始事务
	// START TRANSACTION
	sql = "START TRANSACTION";
	result = MysqL_query(&MysqL, sql.c_str());
	if(result != 0)
	{
		cout << "START TRANSACTION Failed" << MysqL_error(&MysqL) << endl;
	}

	// 2 设置为手动提交事务
	// set autocommit = 0
	sql = "set autocommit = 0";
	result = MysqL_query(&MysqL, sql.c_str());
	if(result != 0)
	{
		cout << "set autocommit Failed" << MysqL_error(&MysqL) << endl;
	}

	// 3 sql语句
	// 插入3条数据,然后回滚
	for(int i = 0; i < 3; i++)
	{
		sql = "insert into t_video (`name`) values('值:";
		sql += std::to_string(i);
		sql += "')";
		result = MysqL_query(&MysqL, sql.c_str());
		if(result != 0)
		{
			cout << "insert Failed " << MysqL_error(&MysqL) << endl;
		}
	}

	// 4 回滚 ROLLBACK
	sql = "ROLLBACK";
	result = MysqL_query(&MysqL, sql.c_str());
	if(result != 0)
	{
		cout << "ROLLBACK Failed " << MysqL_error(&MysqL) << endl;
	}

	// 如果把表改成MyISAM引擎的话,就不支持回滚了
	//sql = "ALTER TABLE `t_video` ENGINE = MyISAM";

	for(int i = 0; i < 100; i++)
	{
		sql = "insert into t_video (`name`) values('值:";
		sql += std::to_string(i);
		sql += "')";
		result = MysqL_query(&MysqL, sql.c_str());
		if(result != 0)
		{
			cout << "insert Failed " << MysqL_error(&MysqL) << endl;
		}
	}

	// 5 提交 COMMIT
	sql = "COMMIT";
	result = MysqL_query(&MysqL, sql.c_str());
	if(result != 0)
	{
		cout << "COMMIT Failed " << MysqL_error(&MysqL) << endl;
	}

	// 6 恢复自动提交
	// set autocommit = 1
	sql = "set autocommit = 1";
	result = MysqL_query(&MysqL, sql.c_str());
	if(result != 0)
	{
		cout << "set autocommit Failed " << MysqL_error(&MysqL) << endl;
	}

	// 为了避免以后插入1万条数据后,通过*来查询开销太大,所以这里就用count看一下有多少行数据
	sql = "select count(*) from t_video";
	result = MysqL_query(&MysqL, sql.c_str());
	if(result != 0)
	{
		cout << "MysqL_query Failed" << MysqL_error(&MysqL) << endl;
	}

	// 把查询的结果集存下来
	MysqL_RES* res = MysqL_store_result(&MysqL);
	if(res)
	{
		// 这里只取第一行数据
		MysqL_ROW row = MysqL_fetch_row(res);
		if(row)
		{
			// 查看第一个和第二个字段
			cout << "t_video count(*) = " << row[0] << endl;
		}
	}

	MysqL_close(&MysqL);
	MysqL_library_end();
	ret = 0;
	cout << "MysqL 5.5.40" << endl;

    getchar();
}
接下来我们用单条sql语句、多条sql语句,以及用事务这个功能来测插入十万条数据的性能差异。
三种方式测试插入1万条数据的性能差异
为了测时,需要用到C++自带的时间库chrono来计时:
#include <chrono>
using namespace std::chrono;
单条语句插入1千条数据
// test_transaction.cpp : 此代码为win32平台,MysqL为32位版本。

#include <iostream>
#include <winsock.h>
#include "MysqL.h"
#include <thread>
#include <string>
#include <sstream>
#include <stdio.h>
#include <map>
#include <chrono>

using std::cout;
using std::endl;
using std::string;
using std::stringstream;
using std::map;
using std::make_pair;
using namespace std::chrono;

int main()
{
	int ret = -1;

	// 初始化MysqL上下文
	MysqL MysqL;
	MysqL_library_init(0, 0, 0);
	if (!MysqL_init(&MysqL))
	{
		cout << "MysqL init Failed " << MysqL_error(&MysqL) << endl;
		return ret;
	}

	// 这里只是为了演示所以用了明文,实际开发中应写入加密的ini文件中
	const char* host = "127.0.0.1";
	//const char* host = "192.168.0.222";
	const char* user = "root";
	const char* passwd = "123456";
	const char* db = "zpdatabase";	// 数据库名称

	// 连接登录数据库
	if (!MysqL_real_connect(&MysqL, host, user, passwd, db, 3306, nullptr, 0))
	{
		cout << "MysqL connect Failed! " << MysqL_error(&MysqL) << endl;

		MysqL_close(&MysqL);
		return ret;
	}
	else
	{
		cout << "MysqL connect " << host << " success!" << endl;

	}

	string sql = "";

	// 1 创建表
	sql = "CREATE TABLE IF NOT EXISTS `t_video`( \
		  `id` int auto_increment, \
		  `name` varchar(1024), \
		  `path` varchar(2046), \
		  `size` int, \
		  primary KEY(`id`) \
		  ) ENGINE = InnoDB";	// 设置支持事务回滚的InnoDB引擎

	int result = MysqL_query(&MysqL, sql.c_str());
	if(result != 0)
	{
		cout << "CREATE TABLE Failed" << MysqL_error(&MysqL) << endl;
	}

	// 清理表中的数据
	sql = "truncate `t_video`";
	result = MysqL_query(&MysqL, sql.c_str());
	if(result != 0)
	{
		cout << "truncate Failed" << MysqL_error(&MysqL) << endl;
	}

	// 事务
	// 1 开始事务
	// START TRANSACTION
	sql = "START TRANSACTION";
	result = MysqL_query(&MysqL, sql.c_str());
	if(result != 0)
	{
		cout << "START TRANSACTION Failed" << MysqL_error(&MysqL) << endl;
	}

	// 2 设置为手动提交事务
	// set autocommit = 0
	sql = "set autocommit = 0";
	result = MysqL_query(&MysqL, sql.c_str());
	if(result != 0)
	{
		cout << "set autocommit Failed" << MysqL_error(&MysqL) << endl;
	}

	// 3 sql语句
	// 插入3条数据,然后回滚
	for(int i = 0; i < 3; i++)
	{
		sql = "insert into t_video (`name`) values('值:";
		sql += std::to_string(i);
		sql += "')";
		result = MysqL_query(&MysqL, sql.c_str());
		if(result != 0)
		{
			cout << "insert Failed " << MysqL_error(&MysqL) << endl;
		}
	}

	// 4 回滚 ROLLBACK
	sql = "ROLLBACK";
	result = MysqL_query(&MysqL, sql.c_str());
	if(result != 0)
	{
		cout << "ROLLBACK Failed " << MysqL_error(&MysqL) << endl;
	}

	// 如果把表改成MyISAM引擎的话,就不支持回滚了
	//sql = "ALTER TABLE `t_video` ENGINE = MyISAM";

	// 5 提交 COMMIT
	sql = "COMMIT";
	result = MysqL_query(&MysqL, sql.c_str());
	if(result != 0)
	{
		cout << "COMMIT Failed " << MysqL_error(&MysqL) << endl;
	}

	// 6 恢复自动提交
	// set autocommit = 1
	sql = "set autocommit = 1";
	result = MysqL_query(&MysqL, sql.c_str());
	if(result != 0)
	{
		cout << "set autocommit Failed " << MysqL_error(&MysqL) << endl;
	}

	// 为了避免以后插入1万条数据后,通过*来查询开销太大,所以这里就用count看一下有多少行数据
	sql = "select count(*) from t_video";
	result = MysqL_query(&MysqL, sql.c_str());
	if(result != 0)
	{
		cout << "MysqL_query Failed" << MysqL_error(&MysqL) << endl;
	}

	// 把查询的结果集存下来
	MysqL_RES* res = MysqL_store_result(&MysqL);
	if(res)
	{
		// 这里只取第一行数据
		MysqL_ROW row = MysqL_fetch_row(res);
		if(row)
		{
			// 查看第一个和第二个字段
			cout << "t_video count(*) = " << row[0] << endl;
		}
	}

	auto start = system_clock::Now();
	// 单条sql语句插入1千条数据
	for(int i = 0; i < 1000; i++)
	{
		sql = "insert into t_video (`name`, `path`) values('single', '0123456789012345678901234567890123456789012345678901234567890123456789012345678901234567890123456789')";
		result = MysqL_query(&MysqL, sql.c_str());
		if(result != 0)
		{
			cout << "insert Failed " << MysqL_error(&MysqL) << endl;
		}
	}
	auto end = system_clock::Now();
	// 转换为毫秒 1000毫秒是1秒
	auto dur = duration_cast<milliseconds>(end - start);
	//duration<double> diff = end - start;	// 单位为s,可精确到小数点后七位
	cout << "单条sql语句插入1千条数据 " << dur.count() / 1000. << "秒" << endl;
	// milliseconds timeInterval = duration_cast<milliseconds>(endTime - beginTime);	// 单位为ms


	// 多条sql语句插入1千条数据


	// 事务插入1千条数据


	MysqL_close(&MysqL);
	MysqL_library_end();
	ret = 0;
	cout << "MysqL 5.5.40" << endl;

    getchar();
}
多条语句插入1千条数据
// 连接登录数据库
	if (!MysqL_real_connect(&MysqL, host, user, passwd, db, 3306, nullptr, CLIENT_MULTI_STATEMENTS))
	{
		cout << "MysqL connect Failed! " << MysqL_error(&MysqL) << endl;

		MysqL_close(&MysqL);
		return ret;
	}
	else
	{
		cout << "MysqL connect " << host << " success!" << endl;

	}
// 多条sql语句插入1千条数据
	{
		sql = "";
		auto start = system_clock::Now();
		for(int i = 0; i < 100; i++)
		{
			sql += "insert into t_video (`name`, `path`) values('single', '0123456789012345678901234567890123456789012345678901234567890123456789012345678901234567890123456789');";
		}
		result = MysqL_query(&MysqL, sql.c_str());
		if(result != 0)
		{
			cout << "insert Failed " << MysqL_error(&MysqL) << endl;
		}
		auto end = system_clock::Now();
		// 转换为毫秒 1000毫秒是1秒
		auto dur = duration_cast<milliseconds>(end - start);
		cout << "多条sql语句插入1千条数据 " << dur.count() / 1000. << "秒" << endl;
	}
我们插入了1千条数据,然后我们要获取结果集,不然这个测出来的时间是没有意义的,你这时候测是非常快的,是因为我们没有获取它的结果集,说白了只是把sql指令发给server,server并没有执行完;
因为我们知道sql语句全部都是insert语句,所以在获取结果集这边我们直接处理:
// 多条sql语句插入1千条数据
	{
		sql = "";
		auto start = system_clock::Now();
		for(int i = 0; i < 100; i++)
		{
			sql += "insert into t_video (`name`, `path`) values('single', '0123456789012345678901234567890123456789012345678901234567890123456789012345678901234567890123456789');";
		}
		result = MysqL_query(&MysqL, sql.c_str());
		if(result != 0)
		{
			cout << "insert Failed " << MysqL_error(&MysqL) << endl;
		}

		do
		{
			// 在这里可以直接获取到它的结果
			cout << MysqL_affected_rows(&MysqL) << std::flush;
		} while(MysqL_next_result(&MysqL) == 0);

		auto end = system_clock::Now();
		// 转换为毫秒 1000毫秒是1秒
		auto dur = duration_cast<milliseconds>(end - start);
		cout << "多条sql语句插入1千条数据 " << dur.count() / 1000. << "秒" << endl;
	}
经测试我们发现,单条sql插入1千条数据和多条sql语句一次执行插入1千条数据,两者的执行速度相差不大。
事务插入1万条数据
// test_transaction.cpp : 此代码为win32平台,MysqL为32位版本。

#include <iostream>
#include <winsock.h>
#include "MysqL.h"
#include <thread>
#include <string>
#include <sstream>
#include <stdio.h>
#include <map>
#include <chrono>

using std::cout;
using std::endl;
using std::string;
using std::stringstream;
using std::map;
using std::make_pair;
using namespace std::chrono;

int main()
{
	int ret = -1;

	// 初始化MysqL上下文
	MysqL MysqL;
	MysqL_library_init(0, 0, 0);
	if (!MysqL_init(&MysqL))
	{
		cout << "MysqL init Failed " << MysqL_error(&MysqL) << endl;
		return ret;
	}

	// 这里只是为了演示所以用了明文,实际开发中应写入加密的ini文件中
	const char* host = "127.0.0.1";
	//const char* host = "192.168.0.222";
	const char* user = "root";
	const char* passwd = "123456";
	const char* db = "zpdatabase";	// 数据库名称

	// 连接登录数据库
	if (!MysqL_real_connect(&MysqL, host, user, passwd, db, 3306, nullptr, CLIENT_MULTI_STATEMENTS))
	{
		cout << "MysqL connect Failed! " << MysqL_error(&MysqL) << endl;

		MysqL_close(&MysqL);
		return ret;
	}
	else
	{
		cout << "MysqL connect " << host << " success!" << endl;

	}

	string sql = "";

	// 1 创建表
	sql = "CREATE TABLE IF NOT EXISTS `t_video`( \
		  `id` int auto_increment, \
		  `name` varchar(1024), \
		  `path` varchar(2046), \
		  `size` int, \
		  primary KEY(`id`) \
		  ) ENGINE = InnoDB";	// 设置支持事务回滚的InnoDB引擎

	int result = MysqL_query(&MysqL, sql.c_str());
	if(result != 0)
	{
		cout << "CREATE TABLE Failed" << MysqL_error(&MysqL) << endl;
	}

	// 清理表中的数据
	sql = "truncate `t_video`";
	result = MysqL_query(&MysqL, sql.c_str());
	if(result != 0)
	{
		cout << "truncate Failed" << MysqL_error(&MysqL) << endl;
	}

	// 三种方式测试插入1000条数据的性能差异

	auto start = system_clock::Now();
	// 单条sql语句插入1千条数据
	for(int i = 0; i < 1000; i++)
	{
		sql = "insert into t_video (`name`, `path`) values('single', '0123456789012345678901234567890123456789012345678901234567890123456789012345678901234567890123456789')";
		result = MysqL_query(&MysqL, sql.c_str());
		if(result != 0)
		{
			cout << "insert Failed " << MysqL_error(&MysqL) << endl;
		}
	}
	auto end = system_clock::Now();
	// 转换为毫秒 1000毫秒是1秒
	auto dur = duration_cast<milliseconds>(end - start);
	//duration<double> diff = end - start;	// 单位为s,可精确到小数点后七位
	cout << "\n1 单条sql语句插入1千条数据 " << dur.count() / 1000. << "秒" << endl;
	// milliseconds timeInterval = duration_cast<milliseconds>(endTime - beginTime);	// 单位为ms


	// 多条sql语句插入1千条数据
	{
		sql = "";
		auto start = system_clock::Now();
		for(int i = 0; i < 1000; i++)
		{
			sql += "insert into t_video (`name`, `path`) values('single', '0123456789012345678901234567890123456789012345678901234567890123456789012345678901234567890123456789');";
		}
		result = MysqL_query(&MysqL, sql.c_str());
		if(result != 0)
		{
			cout << "insert Failed " << MysqL_error(&MysqL) << endl;
		}

		do
		{
			// 在这里可以直接获取到它的结果
			cout << MysqL_affected_rows(&MysqL) << std::flush;
		} while(MysqL_next_result(&MysqL) == 0);

		auto end = system_clock::Now();
		// 转换为毫秒 1000毫秒是1秒
		auto dur = duration_cast<milliseconds>(end - start);
		cout << "\n2 多条sql语句插入1千条数据 " << dur.count() / 1000. << "秒" << endl;
	}

	// 事务插入1千条数据
	{
		// 1 开始事务
		// START TRANSACTION
		sql = "START TRANSACTION";
		result = MysqL_query(&MysqL, sql.c_str());
		if(result != 0)
		{
			cout << "START TRANSACTION Failed" << MysqL_error(&MysqL) << endl;
		}

		// 2 设置为手动提交事务
		// set autocommit = 0
		sql = "set autocommit = 0";
		result = MysqL_query(&MysqL, sql.c_str());
		if(result != 0)
		{
			cout << "set autocommit Failed" << MysqL_error(&MysqL) << endl;
		}

		auto start = system_clock::Now();
		// 单条sql语句插入1千条数据
		for(int i = 0; i < 1000; i++)
		{
			sql = "insert into t_video (`name`, `path`) values('single', '0123456789012345678901234567890123456789012345678901234567890123456789012345678901234567890123456789')";
			result = MysqL_query(&MysqL, sql.c_str());
			if(result != 0)
			{
				cout << "insert Failed " << MysqL_error(&MysqL) << endl;
			}
			else
				cout << MysqL_affected_rows(&MysqL) << std::flush;
		}
		auto end = system_clock::Now();
		// 转换为毫秒 1000毫秒是1秒
		auto dur = duration_cast<milliseconds>(end - start);
		//duration<double> diff = end - start;	// 单位为s,可精确到小数点后七位
		cout << "\n3 事务插入1千条数据 " << dur.count() / 1000. << "秒" << endl;

		sql = "COMMIT";
		result = MysqL_query(&MysqL, sql.c_str());
		if(result != 0)
		{
			cout << "set autocommit Failed" << MysqL_error(&MysqL) << endl;
		}

		// 在结尾处还要把提交设置回来
		sql = "set autocommit = 1";
		result = MysqL_query(&MysqL, sql.c_str());
		if(result != 0)
		{
			cout << "set autocommit Failed" << MysqL_error(&MysqL) << endl;
		}
	}

	MysqL_close(&MysqL);
	MysqL_library_end();
	ret = 0;
	cout << "MysqL 5.5.40" << endl;

    getchar();
}
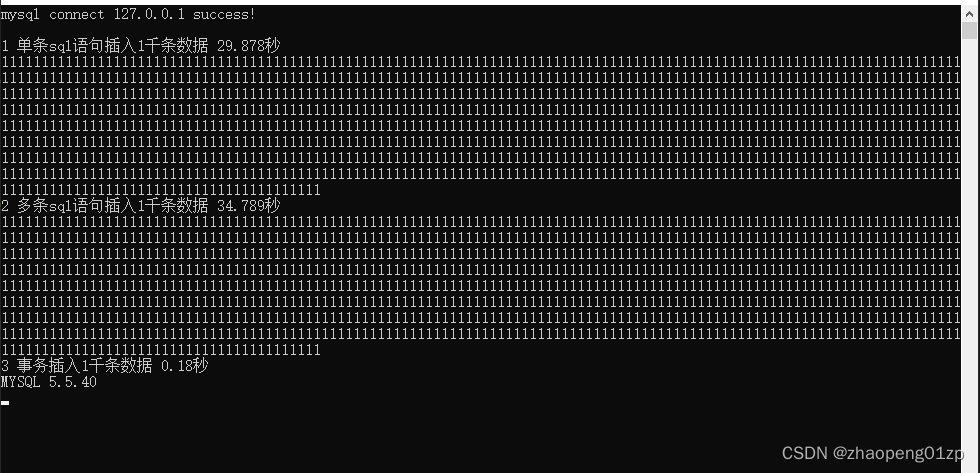
因为事务减少了反复编译sql语句来确认的环节,因为这个的开销是相当大的,事务在插入这块的效率是非常高的,所以在后面我们做导入这种批量工作的时候就可以用事务来做。
2、二进制数据的插入和读取
MysqL_stmt_init插入二进制数据接口分析


我们回到代码当中实现这样的功能:
准备好一个图片,我们把这个图片插入到数据库当中,插入完之后我们再把这个图片读出来,再保存到本地另外一个文件,看一下这个图片是否跟原来的一致。
完成二进制图片的读取和blob插入MysqL_stmt_execute
我们要做的是,往MysqL数据库当中插入图片文件这类二进制的内容,并且我们读取并把它存下来。
我们之前讲过,二进制的内容我们不好放在sql语句当中,虽然sql语句里面也支持二进制,支持\0这类,但是二进制文件里面肯定会包含sql里面所有的语句,这肯定是不安全的,在这个角度上我们就是通过MysqL提供的一整套预处理、预编译sql语句的接口,所有的操作都基于stmt这类接口来进行操作;

如上图中的insert into 语句中values内容中的问号相当于占位符,你在后面的sql语句中再把这些问号所代表的字段内容给填进去,这样做的最大好处就是注入攻击是不可行了,因为是会认为这是一个字段,而不再会认为它是一条语句,所以说用这种方式基本上杜绝了注入攻击。
MysqL_STMT这种类型相当于存的是一条sql语句,对于MysqL来说就相当于我们给它做了一条语法,让它去编译,在这条sql语句中除了我们字符串内容之外,还要加入我们二进制的内容。
首先我们初始化好、准备好MysqL_STMT这样一个用来存储sql语句的空间,因为这里面涉及到内存空间的申请了,在C语言的API它的空间是不会自动释放的,所以我们在结束的时候,初始化的stmt_init对应的就是stmt_close,我们通过stmt_close接口把它关掉并且释放stmt指针对应的空间。
下面通过stmt_prepare接口把sql语句加进来,这时候就相当于我们的sql语句预处理好了,但是这时候VALUES里面只是问号啊,它对应的值并没有加进去;
我们再通过stmt_bind_param接口把参数给绑进去;MysqL_BIND是一个结构体数组,因为我们绑定的话不止一个字段,我们要绑定多个字段,这个结构体里面有多个成员,我们目前关注的是MysqL_TYPE_*,就是选择这个字段的类型;
执行就通过stmt_execute接口,执行完我们就可以获取结果;
select查找的话你还要获取结果集,而insert插入的话我们不需要获取结果集,我们只需要知道插入语句影响的行数就可以了。
// test_transaction.cpp : 此代码为win32平台,MysqL为32位版本。

#include <iostream>
#include <winsock.h>
#include "MysqL.h"
#include <thread>
#include <string>
#include <sstream>
#include <stdio.h>
#include <map>
#include <chrono>
#include <fstream>

using std::cout;
using std::endl;
using std::string;
using std::cerr;
using std::fstream;
using std::ios;

int main()
{
	int ret = -1;

	// 初始化MysqL上下文
	MysqL MysqL;
	MysqL_library_init(0, 0, 0);
	if (!MysqL_init(&MysqL))
	{
		cout << "MysqL init Failed " << MysqL_error(&MysqL) << endl;
		return ret;
	}

	// 这里只是为了演示所以用了明文,实际开发中应写入加密的ini文件中
	const char* host = "127.0.0.1";
	//const char* host = "192.168.0.222";
	const char* user = "root";
	const char* passwd = "123456";
	const char* db = "zpdatabase";	// 数据库名称

	// 连接登录数据库
	if (!MysqL_real_connect(&MysqL, host, user, passwd, db, 3306, nullptr, 0))
	{
		cout << "MysqL connect Failed! " << MysqL_error(&MysqL) << endl;

		MysqL_close(&MysqL);
		return ret;
	}
	else
	{
		cout << "MysqL connect " << host << " success!" << endl;

	}

	string sql = "";

	// 1 创建好存放二进制数据的表 t_data
	sql = "CREATE TABLE IF NOT EXISTS `t_data`( \
		  `id` int auto_increment, \
		  `name` varchar(1024), \
		  `data` blob, \
		  `size` int, \
		  primary KEY(`id`) \
		  )";

	int result = MysqL_query(&MysqL, sql.c_str());
	if(result != 0)
	{
		cout << "CREATE TABLE Failed" << MysqL_error(&MysqL) << endl;
	}

	// 2 清空表 truncate t_data
	sql = "truncate t_data";

	result = MysqL_query(&MysqL, sql.c_str());
	if(result != 0)
	{
		cerr << "truncate Failed" << MysqL_error(&MysqL) << endl;
	}

	// 3 初始化stmt MysqL_stmt_init
	MysqL_STMT* stmt = MysqL_stmt_init(&MysqL);
	if(!stmt)
	{
		cerr << "MysqL_stmt_init Failed!" << MysqL_stmt_error(stmt) << endl;
	}

	// 4 预处理sql语句
	sql = "insert into `t_data` (`name`, `data`, `size`) values(?, ?, ?)";
	if(MysqL_stmt_prepare(stmt, sql.c_str(), sql.size()))
	{
		cerr << "MysqL_stmt_prepare Failed!" << MysqL_stmt_error(stmt) << endl;
	}

	// 5 打开并读取文件
	string filename = "20200816104741.jpg";
	// 读取文件有多种方式,我们写代码原则都是要跨平台的,我们要用C++的方式来做这个文件的读取,我们要用到fstream这个库

	// 得到文件大小和文件二进制地址(这个二进制地址涉及到空间的动态的分配和释放)
	// 读取二进制文件
	fstream in(filename, ios::in | ios::binary);
	if(!in.is_open())
	{
		cerr << "file " << filename << "open Failed!" << endl;
	}
	// 为了得到文件大小,可以移动文件指针到文件结尾处,通过位置你就知道文件大小了
	// 也就是说从结尾的位置往前移,移多少呢,移动到开始位置,
	in.seekg(0, ios::end);
	int filesize = in.tellg();
	// 因为一会还要读文件,所以需要把文件指针移到文件开头
	// 回到开头
	in.seekg(0, ios::beg);

	// 分配空间大小
	char* data = new char[filesize];
	// 因为你不能保证read读文件能一次读完,所以保险起见我们通过循环来读
	int readedSize = 0;	// 已经读了多少
	while(!in.eof())
	{
		// 因为我们一直在往data里面读,所以指针得移位,读了多少就移多少;每次读的字节数量也应减少已读取的字节数量
		in.read(data + readedSize, filesize - readedSize);

		if((filesize - readedSize) <= 0)
		{
			cout << "读取文件完毕" << endl;
			break;
		}

		// 如果第一次没读完,我们得知道上一次读了多少
		// 读取了多少字节
		if(in.gcount() <= 0)
		{
			cerr << "file " << filename << " in.read Failed!" << endl;
			break;	// 假如出错我们就直接跳出while循环
		}

		readedSize += in.gcount();
	}
	in.close();
	//delete data;

	// 6 绑定字段 要绑定3个字段:name data size
	// 第一个字段是我们的文件名
	MysqL_BIND bind[3] = {0};
	bind[0].buffer_type = MysqL_TYPE_STRING;	// name 文件名 这是我们的第一个字段
	bind[0].buffer = (char*)filename.c_str();
	bind[0].buffer_length = filename.size();

	// 第二个字段是我们的二进制文件
	bind[1].buffer_type = MysqL_TYPE_BLOB;	// data 文件的二进制内容
	bind[1].buffer = data;	// 二进制文件
	bind[1].buffer_length = filesize;

	// 有时候我们不需要从数据库里把二进制文件读出来,我们只需要显示一下文件列表:文件名和文件大小,所以需要第三个字段来存文件大小
	// 文件大小 整型的话它的长度是固定的4字节大小,所以不需要写buffer_length
	bind[2].buffer_type = MysqL_TYPE_LONG;
	bind[2].buffer = &filesize;

	// 绑定 该函数返回0是成功
	if(MysqL_stmt_bind_param(stmt, bind) != 0)
	{
		cerr << "MysqL_stmt_bind_param Failed!" << MysqL_stmt_error(stmt) << endl;
	}

	// 7 执行stmt sql
	if(MysqL_stmt_execute(stmt) != 0)
	{
		cerr << "MysqL_stmt_execute Failed!" << MysqL_stmt_error(stmt) << endl;
	}

	// 原则:空间是尽晚申请,尽早释放,尽量减少对资源的占用时间
	delete data;
	MysqL_stmt_close(stmt);	// 释放stmt 清理掉预处理的sql语句

	MysqL_close(&MysqL);
	MysqL_library_end();
	ret = 0;
	cout << "MysqL 5.5.40" << endl;

    getchar();
}
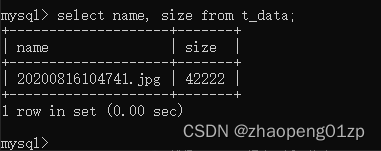
如上图所示,经测试,二进制数据图片插入成功。
完成数据库中二进制数据图片的读取并存储为文件MysqL_TYPE_BLOB
下面我们来读取文件,并把它写到本地。
// test_transaction.cpp : 此代码为win32平台,MysqL为32位版本。

#include <iostream>
#include <winsock.h>
#include "MysqL.h"
#include <thread>
#include <string>
#include <sstream>
#include <stdio.h>
#include <map>
#include <chrono>
#include <fstream>

using std::cout;
using std::endl;
using std::string;
using std::cerr;
using std::fstream;
using std::ios;

int main()
{
	int ret = -1;

	// 初始化MysqL上下文
	MysqL MysqL;
	MysqL_library_init(0, 0, 0);
	if (!MysqL_init(&MysqL))
	{
		cout << "MysqL init Failed " << MysqL_error(&MysqL) << endl;
		return ret;
	}

	// 这里只是为了演示所以用了明文,实际开发中应写入加密的ini文件中
	const char* host = "127.0.0.1";
	//const char* host = "192.168.0.222";
	const char* user = "root";
	const char* passwd = "123456";
	const char* db = "zpdatabase";	// 数据库名称

	// 连接登录数据库
	if (!MysqL_real_connect(&MysqL, host, user, passwd, db, 3306, nullptr, 0))
	{
		cout << "MysqL connect Failed! " << MysqL_error(&MysqL) << endl;

		MysqL_close(&MysqL);
		return ret;
	}
	else
	{
		cout << "MysqL connect " << host << " success!" << endl;

	}

	string sql = "";

	// 1 创建好存放二进制数据的表 t_data
	sql = "CREATE TABLE IF NOT EXISTS `t_data`( \
		  `id` int auto_increment, \
		  `name` varchar(1024), \
		  `data` blob, \
		  `size` int, \
		  primary KEY(`id`) \
		  )";

	int result = MysqL_query(&MysqL, sql.c_str());
	if(result != 0)
	{
		cout << "CREATE TABLE Failed" << MysqL_error(&MysqL) << endl;
	}

	// 2 清空表 truncate t_data
	sql = "truncate t_data";

	result = MysqL_query(&MysqL, sql.c_str());
	if(result != 0)
	{
		cerr << "truncate Failed" << MysqL_error(&MysqL) << endl;
	}

	// 3 初始化stmt		MysqL_stmt_init
	MysqL_STMT* stmt = MysqL_stmt_init(&MysqL);
	if(!stmt)
	{
		cerr << "MysqL_stmt_init Failed!" << MysqL_stmt_error(stmt) << endl;
	}

	// 4 预处理sql语句
	sql = "insert into `t_data` (`name`, `data`, `size`) values(?, ?, ?)";
	if(MysqL_stmt_prepare(stmt, sql.c_str(), sql.size()))
	{
		cerr << "MysqL_stmt_prepare Failed!" << MysqL_stmt_error(stmt) << endl;
	}

	// 5 打开并读取文件
	string filename = "20200816104741.jpg";
	// 读取文件有多种方式,我们写代码原则都是要跨平台的,我们要用C++的方式来做这个文件的读取,我们要用到fstream这个库

	// 得到文件大小和文件二进制地址(这个二进制地址涉及到空间的动态的分配和释放)
	// 读取二进制文件
	fstream in(filename, ios::in | ios::binary);
	if(!in.is_open())
	{
		cerr << "file " << filename << "open Failed!" << endl;
	}
	// 为了得到文件大小,可以移动文件指针到文件结尾处,通过位置你就知道文件大小了
	// 也就是说从结尾的位置往前移,移多少呢,移动到开始位置,
	in.seekg(0, ios::end);
	int filesize = in.tellg();
	// 因为一会还要读文件,所以需要把文件指针移到文件开头
	// 回到开头
	in.seekg(0, ios::beg);

	// 分配空间大小
	char* data = new char[filesize];
	// 因为你不能保证read读文件能一次读完,所以保险起见我们通过循环来读
	int readedSize = 0;	// 已经读了多少
	while(!in.eof())
	{
		// 因为我们一直在往data里面读,所以指针得移位,读了多少就移多少;每次读的字节数量也应减少已读取的字节数量
		in.read(data + readedSize, filesize - readedSize);

		if((filesize - readedSize) <= 0)
		{
			cout << "读取文件完毕" << endl;
			break;
		}

		// 如果第一次没读完,我们得知道上一次读了多少
		// 读取了多少字节
		if(in.gcount() <= 0)
		{
			cerr << "file " << filename << " in.read Failed!" << endl;
			break;	// 假如出错我们就直接跳出while循环
		}

		readedSize += in.gcount();
	}
	in.close();
	//delete data;

	// 6 绑定字段 要绑定3个字段:name data size
	// 第一个字段是我们的文件名
	MysqL_BIND bind[3] = {0};
	bind[0].buffer_type = MysqL_TYPE_STRING;	// name 文件名 这是我们的第一个字段
	bind[0].buffer = (char*)filename.c_str();
	bind[0].buffer_length = filename.size();

	// 第二个字段是我们的二进制文件
	bind[1].buffer_type = MysqL_TYPE_BLOB;	// data 文件的二进制内容
	bind[1].buffer = data;	// 二进制文件
	bind[1].buffer_length = filesize;

	// 有时候我们不需要从数据库里把二进制文件读出来,我们只需要显示一下文件列表:文件名和文件大小,所以需要第三个字段来存文件大小
	// 文件大小 整型的话它的长度是固定的4字节大小,所以不需要写buffer_length
	bind[2].buffer_type = MysqL_TYPE_LONG;
	bind[2].buffer = &filesize;

	// 绑定 该函数返回0是成功
	if(MysqL_stmt_bind_param(stmt, bind) != 0)
	{
		cerr << "MysqL_stmt_bind_param Failed!" << MysqL_stmt_error(stmt) << endl;
	}

	// 7 执行stmt sql
	if(MysqL_stmt_execute(stmt) != 0)
	{
		cerr << "MysqL_stmt_execute Failed!" << MysqL_stmt_error(stmt) << endl;
	}

	// 原则:空间是尽晚申请,尽早释放,尽量减少对资源的占用时间
	delete data;
	MysqL_stmt_close(stmt);	// 释放stmt 清理掉预处理的sql语句

	// 8 查询数据库中的二进制数据,并保存为本地文件

	// 题外话:通过sql语句中的limit可以进行分页	例如:sql = "select * fromt t_data limit 1";
	sql = "select * from t_data";	// 先简单来做,尽量不要关联太多东西
	result = MysqL_query(&MysqL, sql.c_str());
	if(result != 0)
	{
		cerr << "MysqL_query Failed!" << MysqL_error(&MysqL) << endl;
	}
	// 取到sql命令执行的结果集
	MysqL_RES* res = MysqL_store_result(&MysqL);
	if(!res)
	{
		cerr << "MysqL_store_result Failed!" << MysqL_error(&MysqL) << endl;
	}
	// 取一行数据 实际上数据库中也就一行数据 MysqL_ROW是一个数组
	MysqL_ROW row = MysqL_fetch_row(res);
	if(!row)
	{
		cerr << "MysqL_fetch_row Failed!" << MysqL_error(&MysqL) << endl;
	}
	// 我们可以通过第三个字段取得文件的大小
	cout << "id:" << row[0] << " name:" << row[1] << " size:" << row[3] << endl;

	// 如果我们在不知道size的情况下,也可以通过一个方式来获取数据大小
	// 获取每列数据的大小,该函数返回的是一个数组
	unsigned long *length = MysqL_fetch_lengths(res);
	// 获取上一个函数返回的数组的元素个数,即获取有几列数据
	//MysqL_field_count(&MysqL);	// 这个是取所操作表中的字段数
	int columnNum = MysqL_num_fields(res);	// 这个是根据结果集来做的
	for(int i = 0; i < columnNum; i++)
	{
		cout << "[" << length[i] << "]" << endl;
	}

	// 写入本地文件
	filename = "out_";
	filename += row[1];
	fstream out(filename, ios::out | ios::binary);
	if(!out.is_open())
	{
		cerr << "open file " << filename << " Failed!" << endl;
	}
	out.write(row[2], length[2]);
	out.close();

	MysqL_close(&MysqL);
	MysqL_library_end();
	ret = 0;
	cout << "MysqL 5.5.40" << endl;

    getchar();
	return ret;
}
我们写入了数据库,并且从数据库里面把它读了出来,并且显示出来,这样的话,我们插入二进制,并且读取二进制的整个操作就完成了。
3、MysqL存储过程
分析存储过程调用方法通过代码创建存储过程
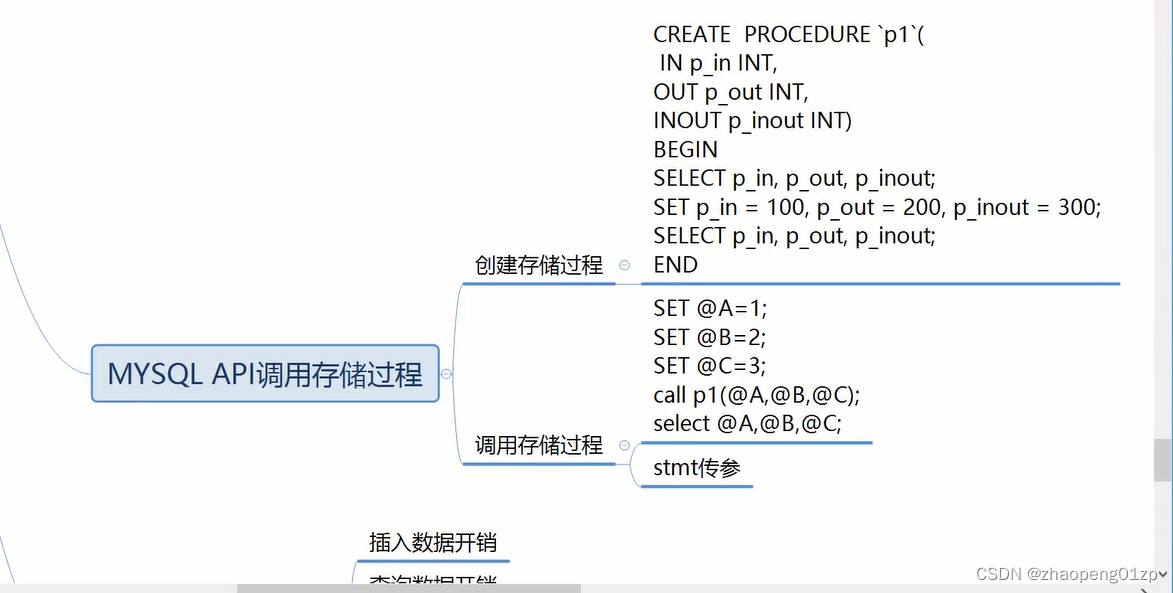
存储过程其实就是一系列sql语句的整合,是数据库内部全部已经编译好的,它的执行效率是最高的;存储过程使得业务和界面真正的完全隔离。
(1)我们怎么给这个存储过程输入参数;
(2)我们如果是在存储过程里面执行的sql语句,它的结果集是否能获取;
(3)返回的参数我们怎么获取;
string sql = "";
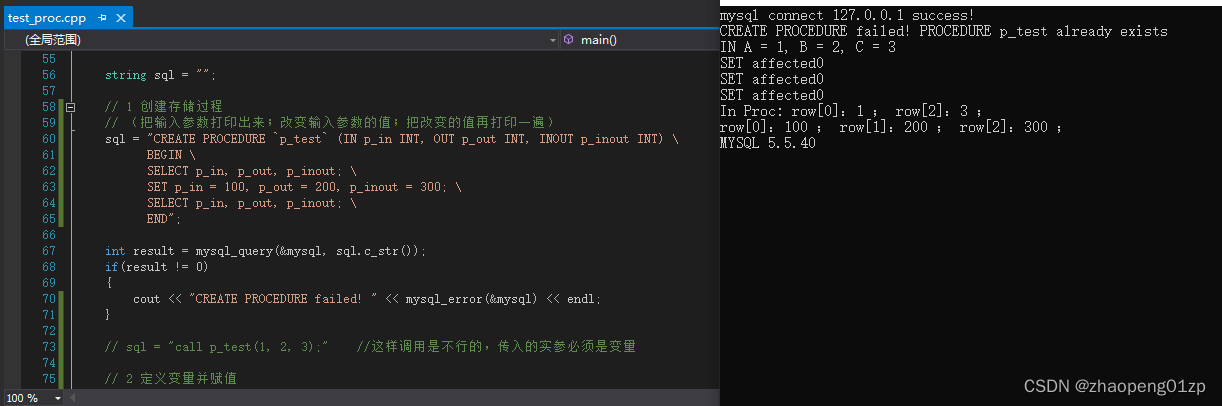
// 1 创建存储过程
// (把输入参数打印出来;改变输入参数的值;把改变的值再打印一遍)
sql = "CREATE PROCEDURE `p_test` (IN p_in INT, OUT p_out INT, INOUT p_inout INT) \
BEGIN \
SELECT p_in, p_out, p_inout; \
SET p_in = 100, p_out = 200, p_inout = 300; \
SELECT p_in, p_out, p_inout; \
END";
通过MysqL API调用存储过程并传递参数获取返回值
// test_transaction.cpp : 此代码为win32平台,MysqL为32位版本。

#include <iostream>
#include <winsock.h>
#include "MysqL.h"
#include <thread>
#include <string>
#include <sstream>
#include <stdio.h>
#include <map>
#include <chrono>
#include <fstream>

using std::cout;
using std::endl;
using std::string;
using std::cerr;
using std::fstream;
using std::ios;

int main()
{
	int ret = -1;

	// 初始化MysqL上下文
	MysqL MysqL;
	MysqL_library_init(0, 0, 0);
	if (!MysqL_init(&MysqL))
	{
		cout << "MysqL init Failed " << MysqL_error(&MysqL) << endl;
		return ret;
	}

	// 这里只是为了演示所以用了明文,实际开发中应写入加密的ini文件中
	const char* host = "127.0.0.1";
	//const char* host = "192.168.0.222";
	const char* user = "root";
	const char* passwd = "123456";
	const char* db = "zpdatabase";	// 数据库名称

	// 连接登录数据库
	// 支持多条sql语句:最后一个参数为CLIENT_MULTI_STATEMENTS
	if (!MysqL_real_connect(&MysqL, host, user, passwd, db, 3306, nullptr, CLIENT_MULTI_STATEMENTS))
	{
		cout << "MysqL connect Failed! " << MysqL_error(&MysqL) << endl;

		MysqL_close(&MysqL);
		return ret;
	}
	else
	{
		cout << "MysqL connect " << host << " success!" << endl;

	}

	string sql = "";

	// 1 创建存储过程
	// (把输入参数打印出来;改变输入参数的值;把改变的值再打印一遍)
	sql = "CREATE PROCEDURE `p_test` (IN p_in INT, OUT p_out INT, INOUT p_inout INT) \
		  BEGIN \
		  SELECT p_in, p_out, p_inout; \
		  SET p_in = 100, p_out = 200, p_inout = 300; \
		  SELECT p_in, p_out, p_inout; \
		  END";

	int result = MysqL_query(&MysqL, sql.c_str());
	if(result != 0)
	{
		cout << "CREATE PROCEDURE Failed! " << MysqL_error(&MysqL) << endl;
	}

	// sql = "call p_test(1, 2, 3);"	//这样调用是不行的,传入的实参必须是变量

	// 2 定义变量并赋值
	sql = "SET @A = 1; SET @B = 2; SET @C = 3";
	result = MysqL_query(&MysqL, sql.c_str());
	if(result != 0)
	{
		cout << "SET ParaMETER Failed! " << MysqL_error(&MysqL) << endl;
	}

	// 3 调用存储过程 call
	sql = "CALL p_test(@A, @B, @C)";
	result = MysqL_query(&MysqL, sql.c_str());
	if(result != 0)
	{
		cout << "CALL PROCEDURE Failed! " << MysqL_error(&MysqL) << endl;
	}

	// 4 获取存储过程的结果
	sql = "SELECT @A, @B, @C";
	result = MysqL_query(&MysqL, sql.c_str());
	if(result != 0)
	{
		cout << "MysqL_query Failed! " << MysqL_error(&MysqL) << endl;
	}

	MysqL_close(&MysqL);
	MysqL_library_end();
	ret = 0;
	cout << "MysqL 5.5.40" << endl;

    getchar();
	return ret;
}
我们先执行一次上面的程序看看有没有问题:
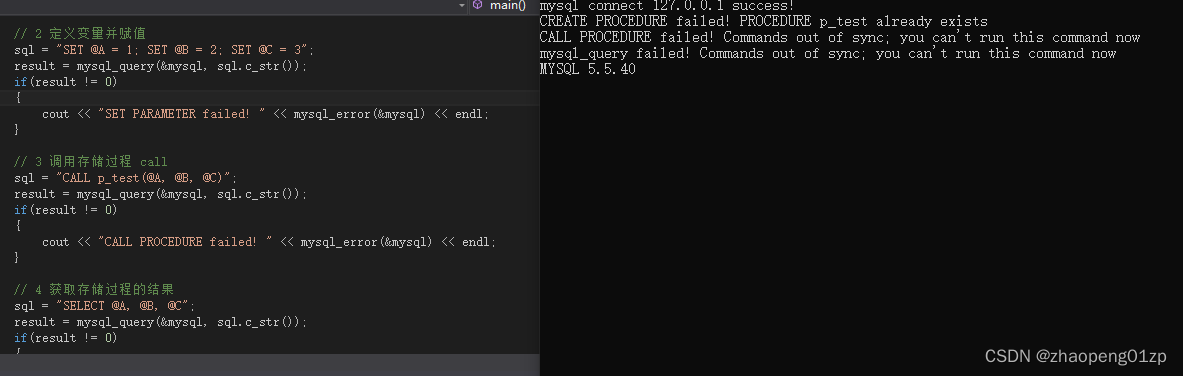
看上图我们运行后出现右图的错误,CREATE PROCEDURE Failed!这是因为我们运行了两遍该程序,p_test这个存储过程已经存在了,所以报创建存储过程失败,这个错误不用管它;
CALL PROCEDURE Failed! 这是因为我们执行第2步的sql语句,没有去获取它的结果集,虽然SET语句是对变量进行赋值,它是没有结果集的,所以说我们可以不获取它的结果。
但是由于第2步执行了多条sql语句,所以在第3步调用存储过程的时候,它显示你的结果集没有释放,所以存储过程没法调用。
对于第2步中的多条sql语句的多条结果集我们要给它遍历一下:
// 2 定义变量并赋值
	sql = "SET @A = 1; SET @B = 2; SET @C = 3";
	result = MysqL_query(&MysqL, sql.c_str());
	if(result != 0)
	{
		cout << "SET ParaMETER Failed! " << MysqL_error(&MysqL) << endl;
	}
	do
	{
		cout << "SET affected" << MysqL_affected_rows(&MysqL) << endl;
	}while (MysqL_next_result(&MysqL) == 0);
	// 0表示还有结果 -1没有结果 >1错误

	// 3 调用存储过程 call
	sql = "CALL p_test(@A, @B, @C)";
	result = MysqL_query(&MysqL, sql.c_str());
	if(result != 0)
	{
		cout << "CALL PROCEDURE Failed! " << MysqL_error(&MysqL) << endl;
	}
我们运行一下程序看看:

可以看到它其实影响的行数是0条,但是你必须要把结果集给它遍历一下,因为你有多条sql语句,主要是调用MysqL_next_result这个API;
如果你不是执行多条的话,那么遍历这步就不用做了;
因为它没有结果集(SET语句没有结果集返回),所以也不用释放结果集。
目前通过上图我们知道,调用存储过程这步我们没有错误了,最后一个错误是第4步获取存储过程的结果的时候,这里的话我们要把存储过程的结果给它返回,返回结果的话同样也是要遍历结果集。
这个p_test存储过程中的sql语句,有的有结果集(例如SELECT),有的没有结果集(例如SET语句),只有有结果集的我们才处理,没有结果集我们暂时就不处理了(比方说它里面做了SET,这个SET其实我们先不用管它)。
// test_transaction.cpp : 此代码为win32平台,MysqL为32位版本。

#include <iostream>
#include <winsock.h>
#include "MysqL.h"
#include <thread>
#include <string>
#include <sstream>
#include <stdio.h>
#include <map>
#include <chrono>
#include <fstream>

using std::cout;
using std::endl;
using std::string;
using std::cerr;
using std::fstream;
using std::ios;

int main()
{
	int ret = -1;

	// 初始化MysqL上下文
	MysqL MysqL;
	MysqL_library_init(0, 0, 0);
	if (!MysqL_init(&MysqL))
	{
		cout << "MysqL init Failed " << MysqL_error(&MysqL) << endl;
		return ret;
	}

	// 这里只是为了演示所以用了明文,实际开发中应写入加密的ini文件中
	const char* host = "127.0.0.1";
	//const char* host = "192.168.0.222";
	const char* user = "root";
	const char* passwd = "123456";
	const char* db = "zpdatabase";	// 数据库名称

	// 连接登录数据库
	// 支持多条sql语句:最后一个参数为CLIENT_MULTI_STATEMENTS
	if (!MysqL_real_connect(&MysqL, host, user, passwd, db, 3306, nullptr, CLIENT_MULTI_STATEMENTS))
	{
		cout << "MysqL connect Failed! " << MysqL_error(&MysqL) << endl;

		MysqL_close(&MysqL);
		return ret;
	}
	else
	{
		cout << "MysqL connect " << host << " success!" << endl;

	}

	string sql = "";

	// 1 创建存储过程
	// (把输入参数打印出来;改变输入参数的值;把改变的值再打印一遍)
	sql = "CREATE PROCEDURE `p_test` (IN p_in INT, OUT p_out INT, INOUT p_inout INT) \
		  BEGIN \
		  SELECT p_in, p_out, p_inout; \
		  SET p_in = 100, p_out = 200, p_inout = 300; \
		  SELECT p_in, p_out, p_inout; \
		  END";

	int result = MysqL_query(&MysqL, sql.c_str());
	if(result != 0)
	{
		cout << "CREATE PROCEDURE Failed! " << MysqL_error(&MysqL) << endl;
	}

	// sql = "call p_test(1, 2, 3);"	//这样调用是不行的,传入的实参必须是变量

	// 2 定义变量并赋值
	cout << "IN A = 1, B = 2, C = 3" << endl;
	sql = "SET @A = 1; SET @B = 2; SET @C = 3";
	result = MysqL_query(&MysqL, sql.c_str());
	if(result != 0)
	{
		cout << "SET ParaMETER Failed! " << MysqL_error(&MysqL) << endl;
	}
	do
	{
		cout << "SET affected" << MysqL_affected_rows(&MysqL) << endl;
	}while (MysqL_next_result(&MysqL) == 0);
	// 0表示还有结果 -1没有结果 >1错误

	// 3 调用存储过程 call
	sql = "CALL p_test(@A, @B, @C)";
	result = MysqL_query(&MysqL, sql.c_str());
	if(result != 0)
	{
		cout << "CALL PROCEDURE Failed! " << MysqL_error(&MysqL) << endl;
	}
	cout << "In Proc: ";
	do
	{
		MysqL_RES* res = MysqL_store_result(&MysqL);
		if(!res)
			continue;

		// 首先要知道字段的数量
		int fcount = MysqL_num_fields(res);

		// 打印结果集
		for(;;)
		{
			// 提取一行记录
			MysqL_ROW row = MysqL_fetch_row(res);
			if(!row)
				break;
			for(int i = 0; i < fcount; i++)
			{
				// 打印前做下判断,因为MysqL里面是有NULL数据的,你打印NULL的话是会出错的
				if(row[i] != NULL)
				{
					cout << "row[" << i << "]:" << row[i] << " ; ";
				}
			}
			cout << endl;
		}
	}while (MysqL_next_result(&MysqL) == 0);

	// 4 获取存储过程的结果
	sql = "SELECT @A, @B, @C";
	result = MysqL_query(&MysqL, sql.c_str());
	if(result != 0)
	{
		cout << "MysqL_query Failed! " << MysqL_error(&MysqL) << endl;
	}

	MysqL_close(&MysqL);
	MysqL_library_end();
	ret = 0;
	cout << "MysqL 5.5.40" << endl;

    getchar();
	return ret;
}
通过上图的运行结果,我们可以看到只有1和3,没有2,为什么没有2,那是因为我们2是NULL,我们修改下代码把NULL打印出来:
// 3 调用存储过程 call
	sql = "CALL p_test(@A, @B, @C)";
	result = MysqL_query(&MysqL, sql.c_str());
	if(result != 0)
	{
		cout << "CALL PROCEDURE Failed! " << MysqL_error(&MysqL) << endl;
	}
	cout << "In Proc: ";
	do
	{
		MysqL_RES* res = MysqL_store_result(&MysqL);
		if(!res)
			continue;

		// 首先要知道字段的数量
		int fcount = MysqL_num_fields(res);

		// 打印结果集
		for(;;)
		{
			// 提取一行记录
			MysqL_ROW row = MysqL_fetch_row(res);
			if(!row)
				break;
			for(int i = 0; i < fcount; i++)
			{
				// 打印前做下判断,因为MysqL里面是有NULL数据的,你打印NULL的话是会出错的
				if(row[i] != NULL)
				{
					cout << "row[" << i << "]:" << row[i] << " ; ";
				}
				else
					cout << "row[" << i << "]:" << row[i] << " ; ";
			}
			cout << endl;
		}
	}while (MysqL_next_result(&MysqL) == 0);
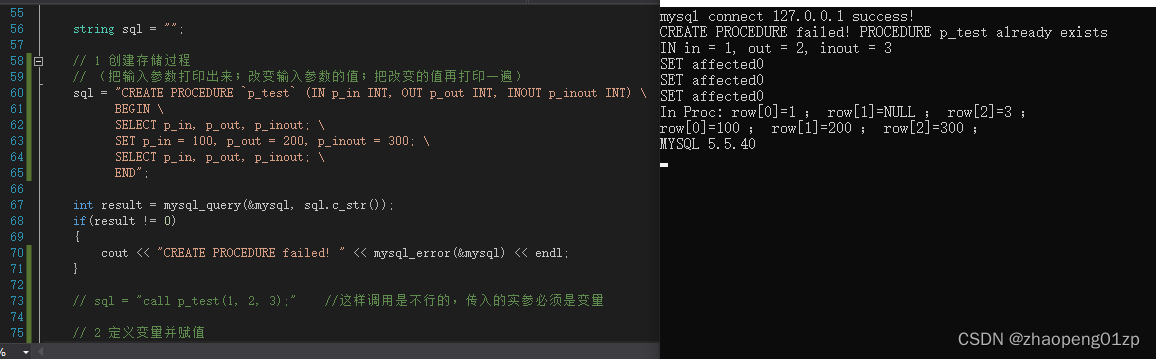
我们第2个参数的类型是OUT,传进来的OUT类型参数的值是没有用的,所以它在存储过程中的值是NULL,而传进去的INOUT类型的参数是有用的;所以说传进存储过程中的OUT类型的参数@B的值2是没有用的;
所以说inout传进去了,in也传进去了,而这个out没有传进去。
接着我们来看下获取存储过程返回的变量:
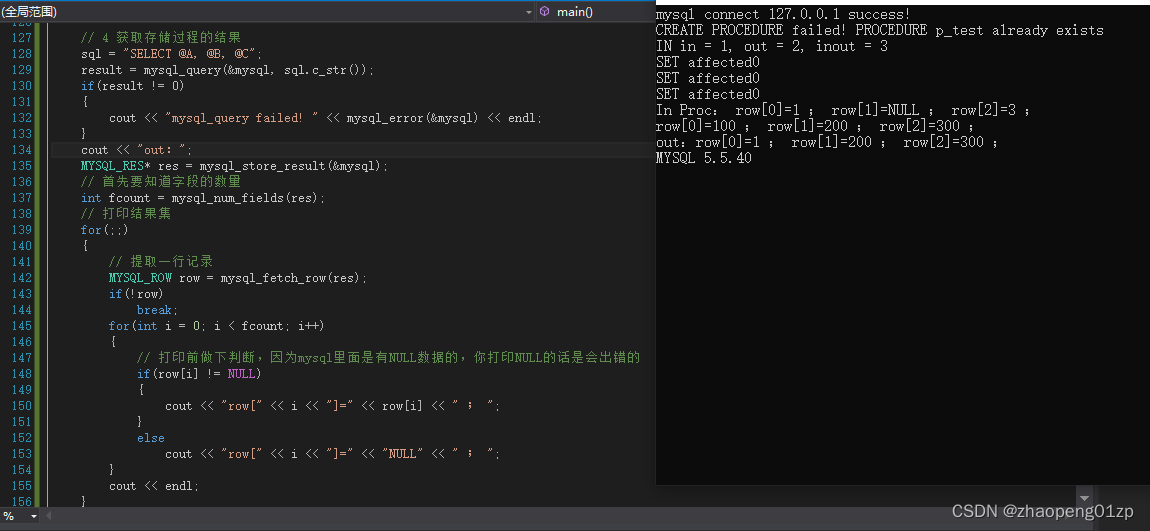
因为我们知道最后这一条sql语句只返回了一行结果集,有3个字段,所以可以直接打印这3个字段:
	// 4 获取存储过程的结果
	sql = "SELECT @A, @B, @C";
	result = MysqL_query(&MysqL, sql.c_str());
	if(result != 0)
	{
		cout << "MysqL_query Failed! " << MysqL_error(&MysqL) << endl;
	}
	MysqL_RES* res = MysqL_store_result(&MysqL);
	cout << "out:";
	MysqL_ROW row = MysqL_fetch_row(res);
	cout << "in=" << row[0] << " ";
	cout << "out=" << row[1] << " ";
	cout << "inout=" << row[2] << " ";

	// 最后别忘了释放结果集,不释放的话会有内存泄漏的
	MysqL_free_result(res);
	cout << endl;

	MysqL_close(&MysqL);
	MysqL_library_end();
	ret = 0;
	cout << "MysqL 5.5.40" << endl;

    getchar();
	return ret;
}
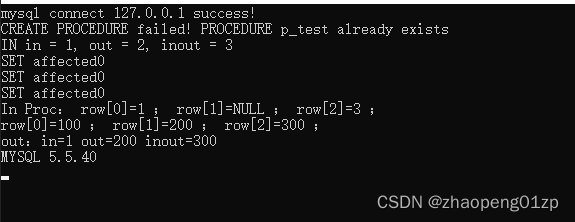
我们看一下程序执行的结果,输入的in是1,经过我们的存储过程,给它设成了100,但返回的还是1,因为它只是输入,是IN类型的;
传入的第2个变量值是2,在存储过程中被修改成200,所以出来就是200,因为第2个参数的类型是OUT,但是在存储过程内部并没有取得传入的值;
第3个参数的类型是INOUT,即输入又输出,它是3进来的,被改成了300,所以出来就是300。
这样的话我们就完成了存储过程的3种参数的传递,具体内部是什么业务逻辑我们都可以做,我们只要清楚它的参数是怎么传进去,怎么取出来就可以了。