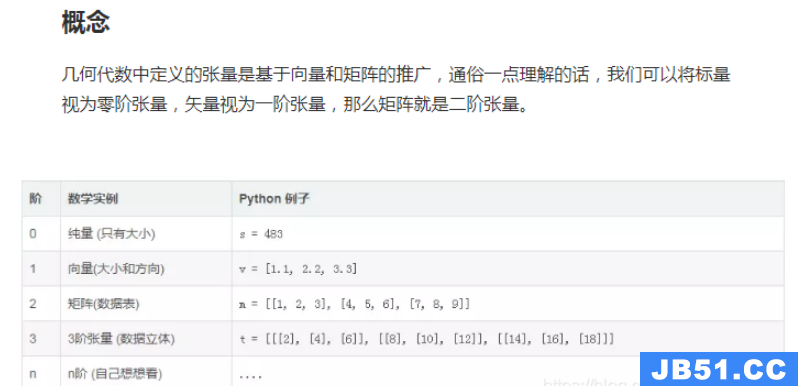
有三种计算图的构建方式:静态计算图,动态计算图,以及Autograph。
TensorFlow 2.0主要使用的是动态计算图和Autograph。
动态计算图易于调试,编码效率较高,但执行效率偏低。
静态计算图执行效率很高,但较难调试。
而Autograph机制可以将动态图转换成静态计算图,兼收执行效率和编码效率之利。
当然Autograph机制能够转换的代码并不是没有任何约束的,有一些编码规范需要遵循,否则可能会转换失败或者不符合预期。
前面我们介绍了Autograph的编码规范和Autograph转换成静态图的原理。
本篇我们介绍使用tf.Module来更好地构建Autograph。
一,Autograph和tf.Module概述
前面在介绍Autograph的编码规范时提到构建Autograph时应该避免在@tf.function修饰的函数内部定义tf.Variable.
但是如果在函数外部定义tf.Variable的话,又会显得这个函数有外部变量依赖,封装不够完美。
一种简单的思路是定义一个类,并将相关的tf.Variable创建放在类的初始化方法中。而将函数的逻辑放在其他方法中。
这样一顿猛如虎的操作之后,我们会觉得一切都如同人法地地法天天法道道法自然般的自然。
惊喜的是,TensorFlow提供了一个基类tf.Module,通过继承它构建子类,我们不仅可以获得以上的自然而然,而且可以非常方便地管理变量,还可以非常方便地管理它引用的其它Module,最重要的是,我们能够利用tf.saved_model保存模型并实现跨平台部署使用。
实际上,tf.keras.models.Model,tf.keras.layers.Layer 都是继承自tf.Module的,提供了方便的变量管理和所引用的子模块管理的功能。
因此,利用tf.Module提供的封装,再结合TensoFlow丰富的低阶API,实际上我们能够基于TensorFlow开发任意机器学习模型(而非仅仅是神经网络模型),并实现跨平台部署使用。
二,应用tf.Module封装Autograph
定义一个简单的function。
import tensorflow as tf
x = tf.Variable(1.0,dtype=tf.float32)

# 在tf.function中用input_signature限定输入张量的签名类型:shape和dtype
@tf.function(input_signature=[tf.TensorSpec(shape = [],dtype = tf.float32)])
def add_print(a):
    x.assign_add(a)
    tf.print(x)
    return(x)
add_print(tf.constant(3.0))
 add_print(tf.constant(3)) #输入不符合张量签名的参数将报错
4
下面利用tf.Module的子类化将其封装一下。
class DemoModule(tf.Module):
    def __init__(self,init_value = tf.constant(0.0),name=None):
        super(DemoModule,self).__init__(name=name)
        with self.name_scope:  相当于with tf.name_scope("demo_module")
            self.x = tf.Variable(init_value,dtype = tf.float32,trainable=True)


    @tf.function(input_signature=[tf.TensorSpec(shape = [],1)"> tf.float32)])
     addprint(self,a):
        with self.name_scope:
            self.x.assign_add(a)
            tf.(self.x)
            (self.x)

 执行
demo = DemoModule(init_value = tf.constant(1.0))
result = demo.addprint(tf.constant(5.0))
6
 查看模块中的全部变量和全部可训练变量
(demo.variables)
print(demo.trainable_variables)
(<tf.Variable 'demo_module/Variable:0' shape=() dtype=float32, numpy=6.0>,)
(<tf.Variable 'demo_module/Variable:0' shape=() dtype=float32,)
 查看模块中的全部子模块
demo.submodules
 使用tf.saved_model 保存模型,并指定需要跨平台部署的方法
tf.saved_model.save(demo,"./data/demo/1",signatures = {serving_default":demo.addprint})
WARNING:tensorflow:From /usr/local/lib/python3.6/dist-packages/tensorflow/python/ops/resource_variable_ops.py:1817: calling BaseResourceVariable.__init__ (from tensorflow.python.ops.resource_variable_ops) with constraint is deprecated and will be removed in a future version.
Instructions for updating:
If using Keras pass *_constraint arguments to layers.
INFO:tensorflow:Assets written to: ./data/demo/1/assets
 加载模型
demo2 = tf.saved_model.load(")
demo2.addprint(tf.constant(5.0))
11
<tf.Tensor: shape=(),dtype=float32,numpy=11.0>
 查看模型文件相关信息,红框标出来的输出信息在模型部署和跨平台使用时有可能会用到
!saved_model_cli show --dir ./data/demo/1 --all
MetaGraphDef with tag-set: 'serve' contains the following SignatureDefs:

signature_def[__saved_model_init_op]:
  The given SavedModel SignatureDef contains the following input(s):
  The given SavedModel SignatureDef contains the following output(s):
    outputs[] tensor_info:
        dtype: DT_INVALID
        shape: unknown_rank
        name: NoOp
  Method name is:

signature_def[]:
  The given SavedModel SignatureDef contains the following input(s):
    inputs[a] tensor_info:
        dtype: DT_FLOAT
        shape: ()
        name: serving_default_a:0
  The given SavedModel SignatureDef contains the following output(s):
    outputs[output_0] tensor_info:
        dtype: DT_FLOAT
        shape: ()
        name: StatefulPartitionedCall:0
  Method name is: tensorflow/serving/predict
WARNING: Logging before flag parsing goes to stderr.
W0411 02:47:30.452981 139671888869248 deprecation.py:506] From /usr/local/lib/python2.7/dist-packages/tensorflow_core/python/ops/resource_variable_ops.py:1786: calling _constraint arguments to layers.

Defined Functions:
  Function Name: addprint
    Option 1
      Callable with:
        Argument 1
          a: TensorSpec(shape=(),dtype=tf.float32,name=u')
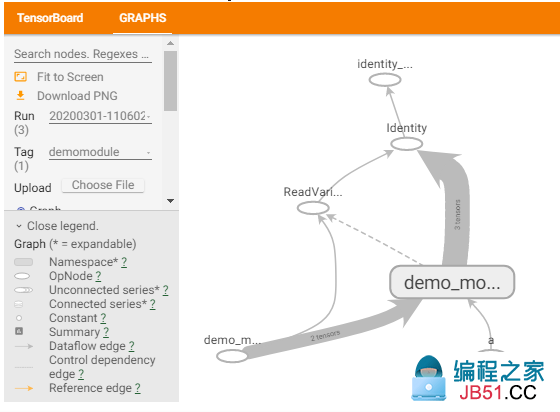
在tensorboard中查看计算图,模块会被添加模块名demo_module,方便层次化呈现计算图结构。
 datetime

 创建日志
stamp = datetime.datetime.now().strftime(%Y%m%d-%H%M%S)
logdir = ./data/demomodule/%s' % stamp
writer = tf.summary.create_file_writer(logdir)

 开启autograph跟踪
tf.summary.trace_on(graph=True,profiler=True)

 执行autograph
demo = DemoModule(init_value = tf.constant(0.0))
result = demo.addprint(tf.constant(5.0))

 将计算图信息写入日志
with writer.as_default():
    tf.summary.trace_export(
        name=demomodule,step=0,profiler_outdir=logdir)


 启动 tensorboard在jupyter中的魔法命令
%reload_ext tensorboard
from tensorboard  notebook
notebook.list()
notebook.start(--logdir ./data/demomodule/")
除了利用tf.Module的子类化实现封装,我们也可以通过给tf.Module添加属性的方法进行封装。
mymodule = tf.Module()
mymodule.x = tf.Variable(0.0)

@tf.function(input_signature=[tf.TensorSpec(shape = [],1)"> tf.float32)])
 addprint(a):
    mymodule.x.assign_add(a)
    tf.(mymodule.x)
     (mymodule.x)

mymodule.addprint = addprint
mymodule.addprint(tf.constant(1.0)).numpy()

(mymodule.variables)

# 使用tf.saved_model 保存模型
tf.saved_model.save(mymodule,1)">./data/mymodule:mymodule.addprint})

 加载模型
mymodule2 = tf.saved_model.load()
mymodule2.addprint(tf.constant(5.0))
1
(<tf.Variable 'Variable:0' shape=() dtype=float32,numpy=1.0>,)
INFO:tensorflow:Assets written to: ./data/mymodule/assets
6
<tf.Tensor: shape=(),numpy=6.0>
三,tf.Module和tf.keras.Model,tf.keras.layers.Layer
tf.keras中的模型和层都是继承tf.Module实现的,也具有变量管理和子模块管理功能。
 tensorflow as tf
from tensorflow.keras  models,layers,losses,metrics
(issubclass(tf.keras.Model,tf.Module))
(issubclass(tf.keras.layers.Layer,1)">print(issubclass(tf.keras.Model,tf.keras.layers.Layer))
True
True
True
tf.keras.backend.clear_session()

model = models.Sequential()

model.add(layers.Dense(4,input_shape = (10))
model.add(layers.Dense(1))
model.summary()
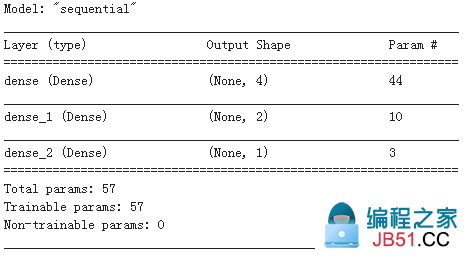
model.variables
[<tf.Variable dense/kernel:0' shape=(10,4) dtype=float32,numpy=
 array([[-0.24266458,-0.45152673,-0.5430875,-0.35098866],[ 0.36108053,-0.32325,0.3329792,0.332795140.5707406,0.6214677,-0.32870707,-0.12539297-0.41743976,-0.3998926,-0.46740663,0.6105366 ],[ 0.54347396,0.5108323,0.4747305,-0.404514  ],[ 0.4390788,-0.1988923,0.40562296,0.57931125-0.02557009,-0.440827,-0.26627067,-0.0769726 ]],dtype=float32)>dense/bias:0' shape=(4,) dtype=float32,numpy=array([0.,0.,0.],dtype=float32)>dense_1/kernel:0
 array([[ 0.17386723,0.91301870.9303725,-0.4667368dense_1/bias:0' shape=(2,1)">dense_2/kernel:0
 array([[ 0.4870274dense_2/bias:0' shape=(1,numpy=array([0.],dtype=float32)>]
model.layers[0].trainable = False 冻结第0层的变量,使其不可训练
model.trainable_variables
[<tf.Variable
model.submodules
(<tensorflow.python.keras.engine.input_layer.InputLayer at 0x7fac6c6c2278><tensorflow.python.keras.layers.core.Dense at 0x7fac6c6c2438>
model.layers
[<tensorflow.python.keras.layers.core.Dense at 0x7fac6e3e1908>
(model.name)
print(model.name_scope())
sequential
sequential
参考:
开源电子书地址:https://lyhue1991.github.io/eat_tensorflow2_in_30_days/
GitHub 项目地址:https://github.com/lyhue1991/eat_tensorflow2_in_30_days