接上一篇,我们来练习一下组件的封装和组件的传值
九宫格例子:
老样子,我们又图,没图说个xx
预期效果:
先来看看没有封装组件前的代码
'use strict';
var React = require('react-native');
var {
  AppRegistry,StyleSheet,Text,View,PixelRatio,} = React;
var stylesForXC = StyleSheet.create({
    container : {
        height: 84,borderWidth:1,borderColor: 'red',flexDirection: 'row',marginTop: 25,marginLeft: 5,marginRight: 5,borderRadius: 5,/*圆角半径*/
        padding: 2,backgroundColor: '#ff0997',},item: {
        flex: 1,height: 80,flex: {
        flex: 1,center: {
        justifyContent: 'center',/*垂直水平居中,其实是按照flexDriection的方向居中*/
        alignItems : 'center',/*水平居中*/
    },font : {
        color: '#fff',fontSize: 16,fontWeight: 'bold',lineLeft: {
        borderLeftWidth: 1/PixelRatio.get(),borderColor: '#fff',lineCenter: {
        borderBottomWidth:1/PixelRatio.get(),}
})

var wxsPrj = React.createClass({
  render: function() {
    return (
    <View style = {stylesForXC.flex}> <View style = {[stylesForXC.container]}> <View style = {[stylesForXC.item,stylesForXC.center]}> <Text style= {stylesForXC.font}>我想回家</Text> </View> <View style = {[stylesForXC.item,stylesForXC.lineLeft]}> <View style = {[stylesForXC.center,stylesForXC.flex,stylesForXC.lineCenter]}> <Text style= {stylesForXC.font}>黄焖鸡</Text> </View> <View style = {[stylesForXC.center,stylesForXC.flex]}> <Text style= {stylesForXC.font}>打印机</Text> </View> </View> <View style = {[stylesForXC.item,stylesForXC.lineCenter]}> <Text style= {stylesForXC.font}>美女</Text> </View> <View style = {[stylesForXC.center,stylesForXC.flex]}> <Text style= {stylesForXC.font}>年货来了</Text> </View> </View> </View> </View> ); } }) AppRegistry.registerComponent('wxsPrj',() => wxsPrj);
我们发现,在主接口函数中的界面布局很多,这样不利于我们模块化的思想我们搞出些事情,把里边界面的布局代码封装成一个组件NineBox
代码变动:
var NineBox = React.createClass({
    render:function(){
        return(
        <View style = {stylesForXC.flex}>
        <View style = {[stylesForXC.container]}>
            <View style = {[stylesForXC.item,stylesForXC.center]}>
                <Text style= {stylesForXC.font}>我想回家</Text>
            </View>

            <View style = {[stylesForXC.item,stylesForXC.lineLeft]}>
                <View style = {[stylesForXC.center,stylesForXC.lineCenter]}>
                    <Text style= {stylesForXC.font}>黄焖鸡</Text>
                </View>
                <View style = {[stylesForXC.center,stylesForXC.flex]}>
                    <Text style= {stylesForXC.font}>打印机</Text>
                </View>
            </View>

            <View style = {[stylesForXC.item,stylesForXC.lineCenter]}>
                    <Text style= {stylesForXC.font}>美女</Text>
                </View>
                <View style = {[stylesForXC.center,stylesForXC.flex]}>
                    <Text style= {stylesForXC.font}>年货来了</Text>
                </View>
            </View>
        </View>
        </View>
        );
    }
})


var wxsPrj = React.createClass({
  render: function() {
    return (
            <NineBox></NineBox>
        );
    }
})
不难发现,我们重新创建一个组件,把布局放进去,然后在主接口函数中调用一下就ok,显得简洁明了
这里有个需要大家注意的地方,这种组件定义的时候,组件名称开头一定要大写英文字母
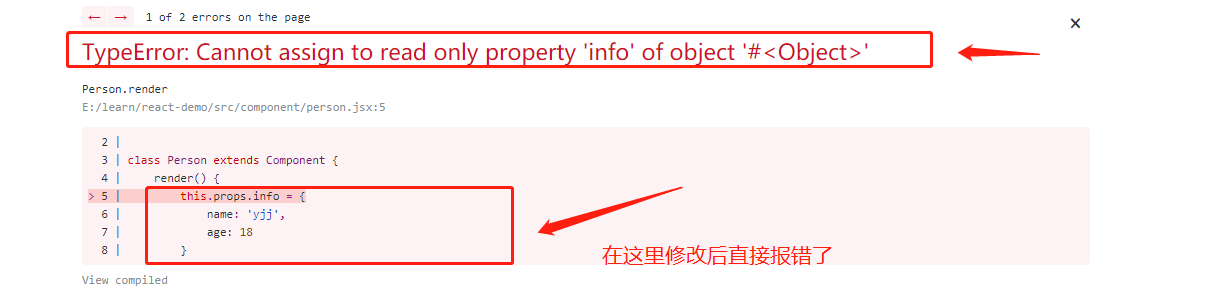
好了,问题又来了,我们现在想把效果途中的“美女”改成“帅哥”那么,就目前的代码来说,我们只能找到“美女”替换了,但是,我们是组件开发啊同志们,怎么能这样low,这个时候我们就需要来定义组件参数了,把它写活,到时候传一个变量即可,废话不多说。
var NineBox = React.createClass({
    render:function(){
        return(
        <View style = {stylesForXC.flex}>
        <View style = {[stylesForXC.container]}>
            <View style = {[stylesForXC.item,stylesForXC.center]}>
                <Text style= {stylesForXC.font}>{this.props.one}</Text>
            </View>

            <View style = {[stylesForXC.item,stylesForXC.lineLeft]}>
                <View style = {[stylesForXC.center,stylesForXC.flex,stylesForXC.lineCenter]}>
                    <Text style= {stylesForXC.font}>{this.props.second1}</Text>
                </View>
                <View style = {[stylesForXC.center,stylesForXC.flex]}>
                    <Text style= {stylesForXC.font}>{this.props.second2}</Text>
                </View>
            </View>

            <View style = {[stylesForXC.item,stylesForXC.lineCenter]}>
                    <Text style= {stylesForXC.font}>{this.props.third1}</Text>
                </View>
                <View style = {[stylesForXC.center,stylesForXC.flex]}>
                    <Text style= {stylesForXC.font}>{this.props.third2}</Text>
                </View>
            </View>
        </View>
        </View>
        );
    }
})


var wxsPrj = React.createClass({
  render: function() {
    return (

            <NineBox one = "我到家了" second1 = "四件套"  second2 = "八杯茶" third1 = "帅哥" third2 = "舒服的大床"></NineBox>

        );
    }
})
看看效果:
<NineBox one = "我到家了" second1 = "四件套" second2 = "八杯茶" third1 = "帅哥" third2 = "舒服的大床"></NineBox>中的one, second1,second2,third1,third2,就是在NineBox组件定义的时候使用的{this.props.second1}等