JIT编译原理
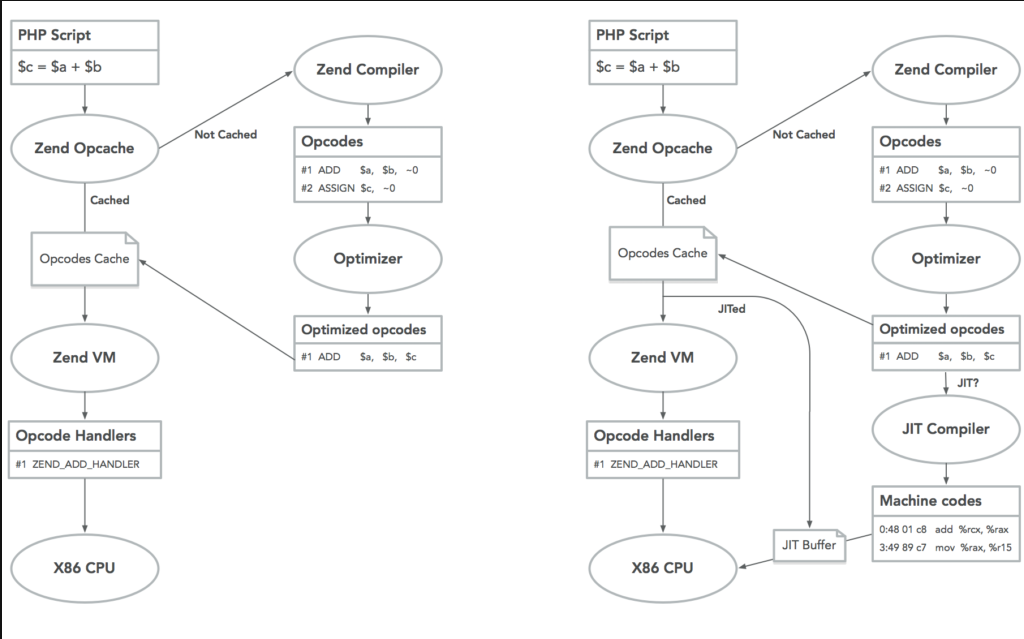
一.查看JIT编译原理图
二.Zend Opcache作用
1.检查opcodes是否缓存
2.zend compiler编译器进行编译生成opcodes
3.optimizer优化器生成优化后的opcodes
4.把优化后的opcodes放入opcodes cache缓存
5.经过zend vm虚拟机生成opcodes handlers处理程序
6.送入x86 cpu架构进行执行
三.JIT编译原理
1.检查opcodes是否缓存
2.zend compiler编译器进行编译生成opcodes
3.optimizer优化器生成优化后的opcodes
4.把优化后的opcodes放入opcodes cache缓存
5.jit编译器把optimized opcodes再次编译成汇编机器码machine codes
6.进入zend vm虚拟前先检查是否开启jit引擎
7.如果已经开启了jit引擎则直接读取机器码中的jit buffer代码片段
8.送入x86 cpu架构进行执行
四.Opcache示意图的关键点
1.Opcache会做opcode层面的优化,比如图中的两条opcode合并为一条
2.PHP8的JIT目前是在Opcache之中提供的
3.JIT在Opcache优化之后的基础上,结合Runtime的信息再次优化,直接生成机器码
4.JIT不是原来Opcache优化的替代,是增强

Tracing JIT和Function JIT编译引擎
一.JIT功能开启#PHP.ini
opcache.jit=1205
opcache.jit_buffer_size=64M
二.opcache.jit说明
0: 不使用
1: 使用
2.寄存器分配策略
0: 不使用寄存器分配
1: 局部(block)域分配
2: 全局(function)域分配
3.JIT触发策略
0: PHP脚本载入的时候就JIT
1: 当函数第一次被执行时JIT
2: 在一次运行后,JIT调用次数最多的百分之(opcache.prof_threshold * 100)的函数
3: 当函数/方法执行超过N(N和opcache.jit_hot_func相关)次以后JIT
5: 当一个Trace执行超过N次(和opcache.jit_hot_loop, jit_hot_return等有关)以后JIT
4.JIT优化策略,数值越大优化力度越大
0: 不JIT
2: 内敛opcode handler调用
3: 基于类型推断做函数级别的JIT
5: 基于类型推断,过程调用图做脚本级别的JIT
三.JIT配置
1.disable
在启动时完全禁用JIT功能,并且在运行时无法启用
2.off
禁用,但是可以在运行时启用JIT
3.on
启用tracing模式
4.tracing
数值配置的别名1254
5.function
数值配置的别名1205
四.JIT实用配置
opcache.jit=tracing
opcache.jit_buffer_size=64M
Opcodes编译原理
一.opcodes作用opcodes是一种PHP脚本编译后的中间语言,就像java的bytecode,或者.net的msl
<?PHP
echo "Hello World";
$a = 1 + 1;
echo $a;
?>
#PHP的语言引擎Zend
1.Scanning(Lexing) ,将PHP代码转换为语言片段(Tokens)
2.Parsing, 将Tokens转换成简单而有意义的表达式
3.Compilation, 将表达式编译成Opocdes
4.Execution, 顺次执行Opcodes,每次一条,从而实现PHP脚本的功能
四.Scanning
#index.PHP
<?PHP
$str='<?PHP
echo "Hello World";
$a = 1 + 1;
echo $a;
?>';
$arr=$tokens=token_get_all($str);
echo "<pre>";
print_r($arr);
echo "</pre>";
?>Array
(
[0] => Array
(
[0] => 367
[1] => Array
(
[0] => 316
[1] => echo
)
[2] => Array
(
[0] => 370
[1] =>
)
[3] => Array
(
[0] => 315
[1] => "Hello World"
)
[4] => ;
[5] => Array
(
[0] => 370
[1] =>
)
[6] => =
[7] => Array
(
[0] => 370
[1] =>
)
[8] => Array
(
[0] => 305
[1] => 1
)
[9] => Array
(
[0] => 370
[1] =>
)
[10] => +
[11] => Array
(
[0] => 370
[1] =>
)
[12] => Array
(
[0] => 305
[1] => 1
)
[13] => ;
[14] => Array
(
[0] => 370
[1] =>
)
[15] => Array
(
[0] => 316
[1] => echo
)
[16] => Array
(
[0] => 370
[1] =>
)
[17] => ;
)
2.Parsing
#接下来,就是Parsing阶段了,Parsing首先会丢弃Tokens Array中的多余的空格,将剩下的转成一个一个的简单的表达式
1.echo a constant string
2.add two numbers together
3.store the result of the prior expression to a variable
4.echo a variable
3.Compilation
#它会把Tokens编译成一个个op_array
* ZEND_ECHO 'Hello World'
* ZEND_ADD ~0 1 1
* ZEND_ASSIGN !0 ~0
* ZEND_ECHO !0
> ```
4.由Zend引擎一行一行读取并执行.
Opcache和JIT功能开启
一.opcache配置#PHP.ini
zend_extension=/usr/local/PHP/lib/PHP/extensions/no-debug-non-zts-20200930/opcache.so
opcache.enable=1
opcache.enable_cli=1
二.jit配置
#PHP.ini
1.使用数值
opcache.jit=1235
opcache.jit_buffer_size=64M
2.使用简单标记
opcache.jit=tracing
opcache.jit_buffer_size=64M
三.检测
PHPinfo();
JIT高性能测试
一.PHP原生代码#index.PHP
<?PHP
$a=1;
$b=2;
$c=$a+$b;
?>二.获得JIT汇编后的机器码
/usr/local/PHP/bin/PHP -d opcache.jit=1205 -d opcache.jit_debug=0x01 index.PHP
/usr/local/PHP/bin/PHP -d opcache.jit=function -d opcache.jit_debug=0x01 index.PHP
JIT$simple: ; (/tmp/1.PHP)
sub $0x10, %rsp
jmp .L2
.L1:
add $0x1, %rdx三.JIT基准测试
#Zend/bench.PHP
#cp /mnt/PHP-8.0.0/Zend/bench.PHP /usr/local/Nginx/html/bbs/1.jit禁用
/usr/local/PHP/bin/PHP -d opcache.jit_buffer_size=0 bench.PHP
/usr/local/PHP/bin/PHP -d opcache.jit=disable bench.PHP2.jit开启
/usr/local/PHP/bin/PHP -d opcache.jit_buffer_size=64M -d opcache.jit=1205 bench.PHP
/usr/local/PHP/bin/PHP -d opcache.jit=tracing bench.PHP
四.JIT计算压力测试
#index.PHP
<?PHP
$a=1;
$b=2;
$c=$a+$b;
?>#win ab
ab -n10 -c10 http://bbs.linux.com/index.PHP
ab -n1000 -c1000 http://bbs.linux.com/index.PHP
ab -n10000 -c10000 http://bbs.linux.com/index.PHP
五.JIT WEB压力测试
#index.PHP
PHPinfo();#win ab
ab -n10 -c10 http://bbs.linux.com/index.PHP
ab -n1000 -c1000 http://bbs.linux.com/index.PHP
ab -n10000 -c10000 http://bbs.linux.com/index.PHP


