目录
前言
如果你不想看这里,那么可以直接跳到后面去。
在官网开了Vue.js和Vue CLI的官方文档,也只介绍了在普通html项目怎么使用,现在我自己整理了下,各个模块在基于webpack的Vue项目中的使用。相关介绍也可以去官网查看,本文仅介绍使用方法,因为也是新手小白,有错误的地方还请多多指正。本问有些地方引用了菜鸟教程的在线编辑器,在这里感谢菜鸟教程做出的贡献。
安装
Node 版本要求
Vue CLI 需要 Node.js 8.9 或更高版本 (推荐 8.11.0+)。你可以使用 nvm 或 nvm-windows在同一台电脑中管理多个 Node 版本。
关于旧版本
Vue CLI 的包名称由
vue-cli改成了@vue/cli。 如果你已经全局安装了旧版本的vue-cli(1.x 或 2.x),你需要先通过npm uninstall vue-cli -g或yarn global remove vue-cli卸载它。
安装好Node.js后就可以开始Vue的起步了。
因为要连接国外的资源,所以会下载的手会很慢。请保持网速。
淘宝镜像
解决这个情况可以使用淘宝的镜像以及命令cnpm,但是有时候会出问题,安装时保证npm版本大于3.0
查看npm版本:
$ npm -v
升级npm:
$ npm install npm -g
安装cnpm:
$ npm install -g cnpm --registry=https://registry.npm.taobao.org
安装完成后就可以用cnpm代替npm了。一下教程使用的还是npm。
开始
首先使用命令安装vue:
$ npm install vue
查看是否安装成功,本命令为查看版本:
$ vue --version
安装全局Vue CLI
$ npm install --global vue-cli
创建一个vue项目,vueweb为项目名称,你也可以在安装的时候更改,注意项目名称里面不要有大写字母,也不要使用中文。
$ vue init webpack vueweb
注意,这里会有一些配置,我来解释一下(#后面为我的注释,不要输入进去):
? Project name (vueweb)                     # 项目名称,括号中为默认名称,回车即可
? Project description (A Vue.js project)    # 项目描述信息,回车即可
? Author 1419908068 <1419908068@qq.com>     # 项目作者,默认即可
? Vue build standalone                      # 好像是打包的时候用的,回车即可
? Install vue-router?(Y/N)Y                # 是否安装vue-router,建议:Y
? Use ESLint to lint your code? (Y/N)      # 是否使用ESLint验证,建议:N,否则后面因为格式会出很多问题。
? Set up unit tests(Y/N) Yes               # 是否安装单元测试,没什么用,建议:N
? Setup e2e tests with Nightwatch(Y/n)?     #是否安装E2E测试框架NightWatch,建议:N
# 项目创建后是否要为你运行“npm install”?这里选择包管理工具
# 选项有三个(上下箭头选择,回车即为选定)建议 : yes use npm
Should we run 'npm install' for you after the project has been created?

# 使用npm
yes,use npm

# 使用yarn
yes,use yarn

# 自己操作
no,I will handle that myself
安装完成后就可以开发了,当然任何开发都少不了开发工具,这里推荐使用HBuilder,占用体积小,功能强大。当然也可以使用微软的Visual Studio,但是这个占用内存太大了。本教程使用的是HBuilder X 2.4.4.
测试是否安装成功
打开HBuilder然后倒入项目vueweb,右键项目选择外部命令/插件,再点击npm run dev
如果报一下错误:
> vueweb@1.0.0 dev D:\文件\JavaWebx项目\vueTest\vueweb

> webpack-dev-server --inline --progress --config build/webpack.dev.conf.js

'webpack-dev-server' 不是内部或外部命令,也不是可运行的程序
或批处理文件。
npm ERR! code ELIFECYCLE
npm ERR! errno 1
npm ERR! vueweb@1.0.0 dev: `webpack-dev-server --inline --progress --config build/webpack.dev.conf.js`
npm ERR! Exit status 1
npm ERR!
npm ERR! Failed at the vueweb@1.0.0 dev script.
npm ERR! This is probably not a problem with npm. There is likely additional logging output above.

npm ERR! A complete log of this run can be found in:
npm ERR!     C:\Users\Administrator\AppData\Roaming\npm-cache\_logs\2019-12-10T13_06_55_461Z-debug.log
不要慌运行npm install,等待安装完毕之后,在点击npm run dev
在浏览器输入http://localhost:8080
显示该页面即可。
目录结构
| 目录/文件 | 说明 |
|---|---|
| build | 项目构建(webpack)相关代码 |
| config | 配置目录,包括端口号等。我们初学可以使用默认的。 |
| node_modules | npm 加载的项目依赖模块 |
| src | 这里是我们要开发的目录,基本上要做的事情都在这个目录里。里面包含了几个目录及文件:assets: 放置一些图片,如logo等。components: 目录里面放了一个组件文件,可以不用。App.vue: 项目入口文件,我们也可以直接将组件写这里,而不使用 components 目录。main.js: 项目的核心文件。 |
| static | 静态资源目录,如图片、字体等。 |
| test | 初始测试目录,可删除 |
| .xxxx文件 | 这些是一些配置文件,包括语法配置,git配置等。 |
| index.html | 首页入口文件,你可以添加一些 meta 信息或统计代码啥的。 |
| package.json | 项目配置文件。 |
| README.md | 项目的说明文档,markdown 格式 |
现在我们来修改一些配置:
在src/router/index.js中的export default new Router({后面添加mode:‘history’,这样可以让路径上的#去掉。
找到src/components/HelloWorld.vue,我们在学习路由(router)之前就以HelloWorld.vue页面为模板进行开发
这个时候浏览器页面会显示为这样,不用管他:
起步
使用之前有一些注意事项需要说明一下:
-
所有页面文件后缀必须为.vue,后面会讲到怎么使用
-
Vue文件中基本要有的三个标签:template
、script、style`
<template>
	<!-- 注意所有HTML标签必须用一个大的标签包裹,否则会报错 -->
	<div class="hello">
	</div>
</template>

<script>
   export default {
		name: 'name',  // name一般为文件名,后面使用路由时需要配置
		data() {       // 数据绑定
	}
}
</script>

<!-- 添加“scoped”属性以将CSS限制到此组件 -->
<style scoped>
</style>
- 编写时请严格按照语法编写
Vue模板语法
Vue.js 使用了基于 HTML 的模板语法,允许开发者声明式地将 DOM 绑定至底层 Vue 实例的数据。所有 Vue.js 的模板都是合法的 HTML ,所以能被遵循规范的浏览器和 HTML 解析器解析。
插值
- 文本
数据绑定最常见的方式就是用双大括号来显示,代码中{{ msg }}中的msg与下面data中的msg相互绑定。下面msg属性发生改变,那么插值处的内容也会更新。
<template>
  <div class="hello">
    <h1>{{ msg }}</h1>
  </div>
</template>

<script>
export default {
  name: 'HelloWorld',
  data () {
    return {
      msg: 'Welcome to Your Vue.js App'
    }
  }
}
</script>
- 原始HTML
双大括号仅仅显示的是普通文本,如果想输出正在的HTML,那么需要使用v-html指令:
<template>
	<div class="hello">
		<p>这是普通文本:{{ msg }}</p>
		<p>这是HTML:<span v-html="msg"></span></p>
	</div>
</template>

<script>
	export default {
		name: 'HelloWorld',
		data() {
			return {
				msg: '<span style = "color:red"> Welcome<span>'
			}
		}
	}
</script>
- 属性
HTML属性的值应使用v-bind指令来改变。
<template>
	<div class="hello">
		<label for="r1">修改背景颜色</label><input type="checkbox" v-model="use" id="r1">
		<label for="r2">隐藏</label><input type="checkbox" v-model="hidd" id="r2">
		<p v-bind:class="{'class1': use}" v-bind:hidden="hidd"><span v-html="msg"></span></p>
	</div>
</template>

<script>
	export default {
		name: 'HelloWorld',
		data() {
			return {
				msg: '<span style = "color:red"> Welcome<span>',
				use : false,
				hidd: false
			}
		}
	}
</script>

<!-- Add "scoped" attribute to limit CSS to this component only -->
<style scoped>
	.class1{
		background-color: #B5D592;
	}
</style>
以下实例判断 class1 的值,如果为user为 true 使用 class1 类的样式,否则不使用,hidd为true则使用hidden属性,否则不使用。
-
JavaScript表达式
-
Vue中提供了完全的JavaScript表达式的支持。
<template>
	<div class="hello">
		{{ number + 1 }}<br/> <!--number加1-->

		{{ ok ? 'YES' : 'NO' }}<br/><!--三元运算-->

		{{ message.split('').reverse().join('') }}<br/><!--反向输出-->
	</div>
</template>

<script>
	export default {
		name: 'HelloWorld',
		data() {
			return {
				message: 'vijar-wang.github.io',
				ok: false,
				number : 2
			}
		}
	}
</script>

<!-- Add "scoped" attribute to limit CSS to this component only -->
<style scoped>
</style>
- 过滤器
Vue.js 允许你自定义过滤器,被用作一些常见的文本格式化。由"|"指示,使用过滤器完成和上面一样的想过:
<template>
	<div class="hello">
		{{ ok | filter1 }}<br/><!--三元运算-->

		{{ message }}<br/><!--反向输出-->
	</div>
</template>

<script>
	export default {
		name: 'HelloWorld',
		data() {
			return {
				message: 'vijar-wang.github.io',
				ok: false
			}
		},filters:{
			filter1:function(value){
				// value为 | 前面的值
				if(value){
					value = 'ok的值为true'
				}else{
					value = 'ok的值为false'
				}
				return value
			},
			filter2:function(value){
				value = value.split('').reverse().join('')
				return value;
			}
		}
	}
</script>

<!-- Add "scoped" attribute to limit CSS to this component only -->
<style scoped>
</style>
Vue条件语句
Vue提供v-if指令来判断元素是否渲染,同时还有v-else表示else,v-else-if表示if else,但是注意else必须紧跟在v-if下面,否则不会渲染。
<template>
	<div class="hello">
	<h1 v-if="ok">Yes</h1>
	<h2 v-else-if="!ok">No</h2>
	<h2 v-else>{{ok}}</h2>
	</div>
</template>

<script>
	export default {
		name: 'HelloWorld',
		data() {
			return {
				ok: true
			}
		}
	}
</script>

<!-- Add "scoped" attribute to limit CSS to this component only -->
<style scoped>
</style>
还有v-show来判断是否渲染
<h1 v-show="ok">Hello!</h1>
Vue循环语句
Vue的循环使用v-for指令,v-for指令需要以site in sites的形式的语法,sites是数组,site是迭代元素的别名。使用命令时加载需要遍历的标签上即可。
<template>
	<ul>
		<li v-for="(week,index) in weeks">{{index}}:{{week}}</li>
	</ul>
</template>

<script>
	export default {
		name: 'HelloWorld',
		data() {
			return {
				weeks: ['Monday', "Tuesday", "Wednesday", 'Thursdat', 'Friday', 'Staurday', 'Sunday']
			}
		}
	}
</script>

<!-- Add "scoped" attribute to limit CSS to this component only -->
<style scoped>
	ul li {
		list-style: none;
	}
</style>
渲染结果:
- 0:Monday
- 1:Tuesday
- 2:Wednesday
- 3:Thursdat
- 4:Friday
- 5:Staurday
- 6:Sunday
关键词computed,在处理一些复杂逻辑时是很有用的,
<template>
	<div>
		<p>原始字符串: {{ message }}</p>
		<p>计算后反转字符串: {{ reversedMessage }}</p>
	</div>
</template>

<script>
	export default {
		name: 'HelloWorld',
		data() {
			return {
				message: 'vijar-wang.github.io'
			}
		},
		computed: {
			reversedMessage: function() {
				return this.message.split('').reverse().join('')
			}
		}
	}
</script>

<!-- Add "scoped" attribute to limit CSS to this component only -->
<style scoped>
</style>
渲染结果
原始字符串: vijar-wang.github.io
计算后反转字符串: oi.buhtig.gnaw-rajiv
可以通过 watch 来响应数据的变化
<template>
	<div>
		千米 : <input type="text" v-model="kilometers">
		米 : <input type="text" v-model="meters">
	</div>
</template>

<script>
	export default {
		name: 'HelloWorld',
		data() {
			return {
				kilometers: 0,
				meters: 0
			}
		},
		watch: {
			kilometers: function(val) {
				this.kilometers = val;
				this.meters = this.kilometers * 1000
			},
			meters: function(val) {
				this.kilometers = val / 1000;
				this.meters = val;
			}
		}
	}
</script>

<!-- Add "scoped" attribute to limit CSS to this component only -->
<style scoped>
</style>
Vue事件处理
可以用 v-on 指令监听 DOM 事件,并在触发时运行一些 JavaScript 代码。
点击事件
<template>
	<div>
		<button v-on:click="kilometers++">点击第{{kilometers}}次</button>
	</div>
</template>

<script>
	export default {
		name: 'HelloWorld',
		data() {
			return {
				kilometers: 0
			}
		}
	}
</script>

<!-- Add "scoped" attribute to limit CSS to this component only -->
<style scoped>
</style>
除了点击事件,还有其他事件修饰
<!-- 阻止单击事件继续传播 -->
<a v-on:click.stop="doThis"></a>

<!-- 提交事件不再重载页面 -->
<form v-on:submit.prevent="onSubmit"></form>

<!-- 修饰符可以串联 -->
<a v-on:click.stop.prevent="doThat"></a>

<!-- 只有修饰符 -->
<form v-on:submit.prevent></form>

<!-- 添加事件监听器时使用事件捕获模式 -->
<!-- 即元素自身触发的事件先在此处理,然后才交由内部元素进行处理 -->
<div v-on:click.capture="doThis">...</div>

<!-- 只当在 event.target 是当前元素自身时触发处理函数 -->
<!-- 即事件不是从内部元素触发的 -->
<div v-on:click.self="doThat">...</div>

<!-- 点击事件将只会触发一次 -->
<a v-on:click.once="doThis"></a>
按键处理
<!-- 只有在 `keyCode` 是 13 时调用 `vm.submit()` -->
<input v-on:keyup.13="submit">
各按键的值如下:
| keyCode | 实际键值 |
|---|---|
| 48到57 | 0到9 |
| 65到90 | a到z(A到Z) |
| 112到135 | F1到F24 |
| 8 | BackSpace(退格) |
| 9 | Tab |
| 13 | Enter(回车) |
| 20 | Caps_Lock(大写锁定) |
| 32 | Space(空格键) |
| 37 | Left(左箭头) |
| 38 | Up(上箭头) |
| 39 | Right(右箭头) |
| 40 | Down(下箭头) |
但是记住每个keyCode时很不容易的,Vue 为最常用的按键提供了别名,使用方法:
<template>
	<div>
		<!-- <button v-on:click="kilometers++">点击第{{kilometers}}次</button> -->
		测试enter:<input v-on:keyup.enter="enterKey()" /><br/>
		测试spaceKey:<input v-on:keyup.space="spaceKey()" /><br/>
		测试escKey:<input v-on:keyup.esc="escKey()" /><br/>
		测试delete:<input v-on:keyup.delete="deleteKey()" /><br/>
	</div>
</template>

<script>
	export default {
		name: 'HelloWorld',
		data() {
			return {
				kilometers: 0,
				meters: 0
			}
		},
		methods:{
			enterKey(){ alert("你按下了enter键")},
			spaceKey(){ alert("你按下了space键")},
			escKey(){ alert("你按下了esc键")},
			deleteKey(){ alert("你按下了delete键")}
		}
	}

</script>
<!-- Add "scoped" attribute to limit CSS to this component only -->
<style scoped>
</style>
全部的按键别名:
.enter.tab-
.delete(捕获“删除”和“退格”键) .esc.space.up.down.left.right
可以通过全局 config.keyCodes 对象自定义按键修饰符别名:
// 可以使用 `v-on:keyup.f1`Vue.config.keyCodes.f1 = 112
向上面的按键监听可以改为动态的监听
<template>
	<div>
	</div>
</template>

<script>
	export default {
		name: 'HelloWorld',
		data() {
			return {
				kilometers: 0,
				meters: 0
			}
		},
		created() {
			document.onkeydown = function(e){
				var key = window.event.keyCode;
				if(key == 13){
					alert("按下了enter");
				}else if(key == 32){
					alert("按下了Space");
				}

			}
		}
	}
</script>
<!-- Add "scoped" attribute to limit CSS to this component only -->
<style scoped>
</style>
这样在点击enter和space的时候就会弹出提示框。
鼠标监听
.left.right.middle
这些修饰符会限制处理函数仅响应特定的鼠标按钮。
Vue表单绑定
你可以用 v-model 指令在表单 、 及 `` 元素上创建双向数据绑定。
<template>
	<div>
		<input v-model="name" />
	</div>
</template>

<script>
	export default {
		name: 'HelloWorld',
		data() {
			return {
				name: "小明"
			}
		}
	}
</script>
<!-- Add "scoped" attribute to limit CSS to this component only -->
<style scoped>
</style>
当data中name的值发生改变,表单中的值也会发生改变。
不仅仅是输入框,复选框,单选框、select也可以双向绑定。<template>
<div>
<h5>单选测试</h5><br />
<input v-model="redio" value="false" id="false" type="radio" name="tadiotest" />
<label for="false">博主是帅哥</label>
<input v-model="redio" value="true" id="true" type="radio" name="tadiotest" />
<label for="true">博主是帅哥</label>
<p>你选择了:{{redio}}</p>
<h5>复选框测试</h5><br />
<input type="checkbox" id="xigua" value="西瓜" v-model="check" /><label for="yes">西瓜</label>
<input type="checkbox" id="juzi" value="橘子" v-model="check" /><label for="juzi">橘子</label>
<input type="checkbox" id="taozi" value="桃子" v-model="check" /><label for="taozi">桃子</label>
<p>你选择了:{{check}}</p>
<h5>下拉框测试</h5><br />
<select v-model="selected" name="fruit">
<option value="">选择一个</option>
<option value="软件技术">软件技术</option>
<option value="网络技术">网络技术</option>
</select>
<p>你选择了:{{selected}}</p>
</div>
</template>
<script>
export default {
name: 'HelloWorld',
data() {
return {
redio:"false",
check:[],
selected:""
}
}
}
</script>
<!-- Add "scoped" attribute to limit CSS to this component only -->
<style scoped>
</style>
修饰符
在默认情况下,v-model 在每次 input 事件触发后将输入框的值与数据进行同步 (除了上述输入法组合文字时)。你可以添加 lazy 修饰符,从而转变为使用 change事件进行同步:
<!-- 在“change”时而非“input”时更新 --><input v-model.lazy="msg" >
如果想自动将用户的输入值转为数值类型,可以给 v-model 添加 number 修饰符:
<input v-model.number="age" type="number">
这通常很有用,因为即使在 type="number" 时,HTML 输入元素的值也总会返回字符串。如果这个值无法被 parseFloat() 解析,则会返回原始的值。
如果要自动过滤用户输入的首尾空白字符,可以给 v-model 添加 trim 修饰符:
<input v-model.trim="msg">
Vue组件
组件是可复用的 Vue 实例,且带有一个名字:在这个例子中是 ``。我们可以在一个通过 new Vue 创建的 Vue 根实例中,把这个组件作为自定义元素来使用。
定义全局组件
在main.js文件中加入以下代码,然后再想要使用的页面直接调用标签就好,com1为全局组件。
var com = {
		template: '<h1>这是一个全局自定义的组件</h1>'
	}
Vue.component("com1",com)
定义局部组件
<template>
	<div>
	<com></com>
	</div>
</template>

<script>
	var com = {
		template: '<h1>这是一个自定义的组件</h1>'
	}
	export default {
		name: 'HelloWorld',
		data() {
			return {

			}
		},
		components:{
			'com':com
		}
	}
</script>
<!-- Add "scoped" attribute to limit CSS to this component only -->
<style scoped>
</style>
本例中的com就是局部组件,只能在这一个页面中使用。
如果自定义的组件是一个页面,那么使用import导入,例如你创建一个tmp.vue的文件作为模板,你可以这样使用它:
import Tmp from '@/commponents/tmp'  //@符号代表src目录
Vue.component("Tmp",Tmp)
如果是要在全局引入,可以把上面代码写到main.js文件中去。
HTML 中的特性名是大小写不敏感的,所以浏览器会把所有大写字符解释为小写字符。这意味着当你使用 DOM 中的模板时,camelCase (驼峰命名法) 的 prop 名需要使用其等价的 kebab-case (短横线分隔命名) 命名
Prop
prop 是父组件用来传递数据的一个自定义属性。
父组件的数据需要通过 props 把数据传给子组件,子组件需要显式地用 props 选项声明 “prop”
<template>
	<div>
	<com message="message属性"></com>
	</div>
</template>

<script>
	var com = {
		props:["message"],
		template: '<h1>{{message}}</h1>'
	}
	export default {
		name: 'HelloWorld',
		components:{
			'com':com
		}
	}
</script>
<!-- Add "scoped" attribute to limit CSS to this component only -->
<style scoped>
</style>
前面静态绑定Prop,动态绑定可以通过v-bind指令来绑定:
<template>
	<div>
		<input v-model="msg" /><br />
		<com v-bind:message="msg"></com>
	</div>
</template>

<script>
	var com = {
		props: ["message"],
		template: '<h1>{{message}}</h1>'
	}
	export default {
		name: 'HelloWorld',
		data() {
			return {
				msg: "动态绑定内容"
			}
		},
		components: {
			'com': com
		}
	}
</script>
<!-- Add "scoped" attribute to limit CSS to this component only -->
<style scoped>
</style>
这里只要改变表单中的内容,自定义组件中的内容也会改变
Vue自定义事件、指令
前面讲了父组件向子组件传值,那么从子组件向父组件传值就需要用到自定义事件了
自定义事件
只配合一个事件名使用 $emit:
<template>
	<div>
		<my-button v-on:welcome="coInfo"></my-button>
	</div>
</template>

<script>
	var butt = {
		template: '<button v-on:click="$emit(\'welcome\')">点击我</button>'
	}
	export default {
		name: 'HelloWorld',
		methods:{
			coInfo(){
				console.log("123");
			}
		},
		components: {
			'my-button': butt
		}
	}
</script>
<!-- Add "scoped" attribute to limit CSS to this component only -->
<style scoped>
</style>
上面实例是一个简单的自定义事件,使用了Vue的$emit API
创建一个普通的按钮自定义组件,给他一个自定义事件welcome然后在使用该组件的时候通过点击点击coInfo方法。
配合额外的参数使用 $emit:
<template>
	<div>
		<my-button v-on:welcome="coInfo"></my-button>
	</div>
</template>

<script>
	var butt = {
		template: '<button v-on:click="addValue">点击我</button>',
		data(){
			return{
				num : 0
			}
		},
		methods:{
			addValue(){
				this.num = this.num +1;
				this.$emit("welcome",this.num);
			}
		}
	}
	export default {
		name: 'HelloWorld',
		methods:{
			coInfo(num){
				console.log(num);
			}
		},
		components: {
			'my-button': butt
		}
	}
</script>
<!-- Add "scoped" attribute to limit CSS to this component only -->
<style scoped>
</style>
在这里发现和上面不同的是$emit中多了个参数。现在解释一下全部代码。butt还是一个自定义组件,但是这个组件中包含了data参数(注意data格式)num,以及方法addValue。当点击自定义组件按钮时,num就会+1输出到控制台上。
自定义指令
除了默认的指令(v-model和v-bind),Vue也允许用户自定义指令。
举个聚焦输入框的例子:
<template>
	<div>
		<input v-focus />
	</div>
</template>

<script>
	export default {
		name: 'HelloWorld',
		methods:{

		},directives:{  //自定义指令组件
			focus:{  //指令名称
				inserted:function(el){  //inserted为钩子函数
					el.focus()
					el.placeholder = "获取到焦点"
				}
			}
		}
	}
</script>
<!-- Add "scoped" attribute to limit CSS to this component only -->
<style scoped>
</style>
钩子函数
一个指令定义对象可以提供如下几个钩子函数 (均为可选):
-
bind:只调用一次,指令第一次绑定到元素时调用。在这里可以进行一次性的初始化设置。 -
inserted:被绑定元素插入父节点时调用 (仅保证父节点存在,但不一定已被插入文档中)。 -
update:所在组件的 VNode 更新时调用,但是可能发生在其子 VNode 更新之前。指令的值可能发生了改变,也可能没有。但是你可以通过比较更新前后的值来忽略不必要的模板更新 (详细的钩子函数参数见下)。 -
componentUpdated:指令所在组件的 VNode 及其子 VNode 全部更新后调用。 -
unbind:只调用一次,指令与元素解绑时调用。
钩子函数参数
指令钩子函数会被传入以下参数:
-
el:指令所绑定的元素,可以用来直接操作 DOM 。binding:一个对象,包含以下属性:name:指令名,不包括v-前缀。value:指令的绑定值,例如:v-my-directive="1 + 1"中,绑定值为2。oldValue:指令绑定的前一个值,仅在update和componentUpdated钩子中可用。无论值是否改变都可用。expression:字符串形式的指令表达式。例如v-my-directive="1 + 1"中,表达式为"1 + 1"。arg:传给指令的参数,可选。例如v-my-directive:foo中,参数为"foo"。modifiers:一个包含修饰符的对象。例如:v-my-directive.foo.bar中,修饰符对象为{ foo: true, bar: true }。 -
vnode:Vue 编译生成的虚拟节点。移步 VNode API 来了解更多详情。 -
oldVnode:上一个虚拟节点,仅在update和componentUpdated钩子中可用。
钩子函数即为directives组件的函数,函数参数及为function()括号中的参数。
Vue路由
官方路由
对于路由官方文档讲的非常详细。这里简单示范一下路由的基本用发,如果需要用查看更多的内容请去文档,vue-router 文档
Vue项目中使用
Vue项目因为是用webpack模板,所以src目录下会自带一个router目录,其中index.js及为路由的配置文件
默认index.js内容为:
import Vue from 'vue'
import Router from 'vue-router'
import HelloWorld from '@/components/HelloWorld'

Vue.use(Router)

export default new Router({
  routes: [
    {
      path: '/',
      name: 'HelloWorld',
      component: HelloWorld
    }
  ]
})
在main.js中有一行import router from './router',即为导入路由配置文件。
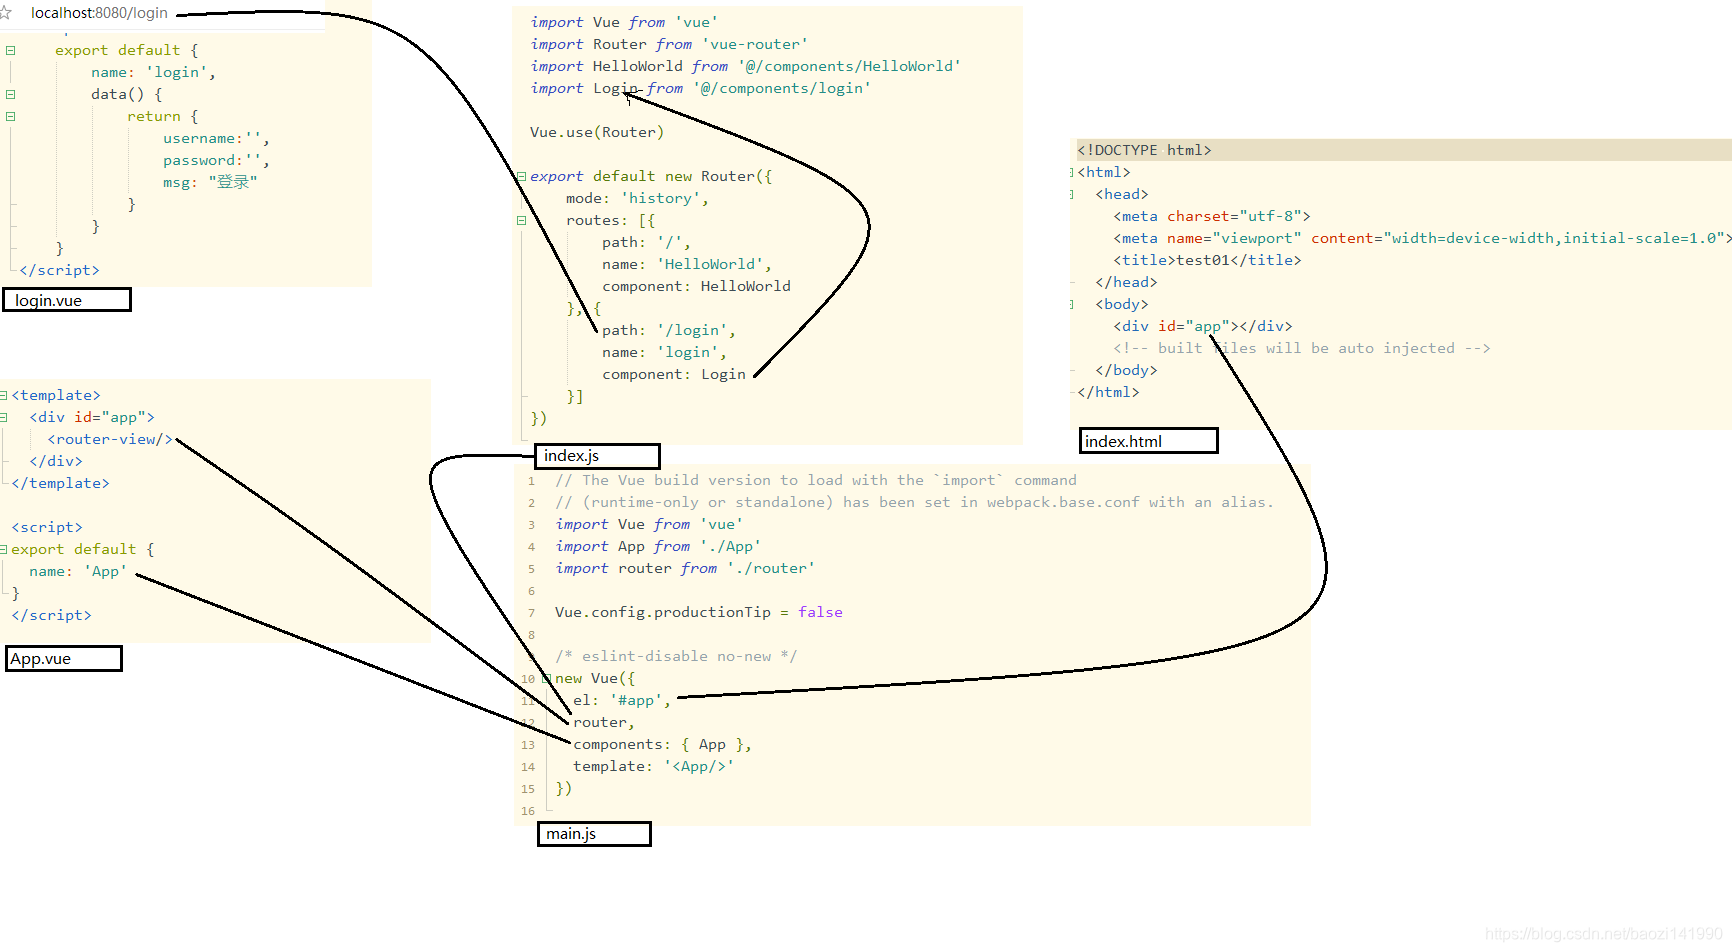
这里以一个登录项目为例、
首先在src/cpmponents目录下模仿HelloWorld新建两个vue文件。
Login.vue
<template>
	<div>
	<form name="form1">
		<label for="username">用户名</label><input id="username" v-model="username" name="username" /><br />
		<label for="password">密码</label><input id="password" v-model="password" name="password" />
	</form>
    <button @click="login()">登录</button>
	<p style="color: red;" id="msg">{{msg}}</p>
	</div>
</template>

<script>
	export default{
		name: "login",
		data(){
			return{
				username:'',  //用户名
				password:'',  //密码
				msg:""        //提示信息
			}
		},
		methods:{
			login(){
				// 登录的用户名为 'xiaoming',密码为 '123'
				if(this.username == "xiaoming" && this.password == "123"){
					// 路由的编程式导航,还有其他的看下面
					this.$router.push({
						path:"/index",   //跳转路径
						query:{  //使用query携带参数,会显示在url上面
							username:this.username
						}
					})
				}else{
					this.msg = "用户名或密码错误!"
				}
			}
		}
	}
</script>

<style>
</style>
Index.vue
<template>
	<div>
		<h1 v-if="username!=''">欢迎您!{{username}}</h1>
		<h1 v-else>您未登录!</h1>
	</div>
</template>

<script>
	export default{
		namme:"index",
		data(){
			return{
				username :""
			}
		},
		created() {  //当页面创建时加载
			this.username = this.$route.query.username;  //接收路由参数
		}
	}
</script>

<style>
</style>
配置路由index.js文件:
import Vue from 'vue'
import Router from 'vue-router'
import HelloWorld from '@/components/HelloWorld'
import Login from '@/components/Login'
import Index from '@/components/Index'

Vue.use(Router)

export default new Router({
	routes: [{
			path: '/',
			name: 'HelloWorld',
			component: HelloWorld,
			meta:{
				title:"HelloWorld"
			}
		},
		{
			path: '/login',
			name: 'login',
			component: Login,
			meta:{
				title:"登录"
			}
		},
		{
			path: '/index',
			name: 'index',
			component: Index,
			meta:{
				title:"首页"
			}
		}
	]
})
默认模式,在main.js中加入:
router.beforeEach((to, from, next) => {
    if(to.meta.title){
        document.title = to.meta.title
    	next()
    }
})
history模式在main.js中加入:
if(router.history.current.meta.title){
	document.title = router.history.current.meta.title;
}
这样配置在默认路由下可以显示title。
初步分析,页面之间的调用关系如图:
详解
路由的导航分为声明式导航和编程式导航
| 声明式 | 编程式 |
|---|---|
<router-link :to="..."> |
router.push(...) |
-
声明式路由
<router-link>标签会被渲染成一个a标签,传递参数形式为:<router-link :to="{path:'/login', query:{name:username}}"> -
编程式路由
// 字符串
router.push('home')

// 对象
router.push({ path: 'home' })

// 命名的路由
router.push({ name: 'user', params: { userId: '123' }})

// 带查询参数,变成 /register?plan=private
router.push({ path: 'register', query: { plan: 'private' }})
注意,path和params不能同时使用,否则params会失效。使用path会在URL上面显示传递的数据,要想不显示就是用name
-
数据获取
在路由到的界面使用
watch组件来监听路由是否有变化。watch: { // 如果路由有变化,会再次执行fetchData方法 '$route': 'fetchData' }, methods:{ fetchData(){ this.$route.params.userId; //若是使用的query则吧params换成`query` } }心细的人会发现,前面跳转页面为
$router,接收数据为$route,这里要注意是不一样的。
相关属性
replace
跟 router.push 很像,唯一的不同就是,它不会向 history 添加新记录,而是跟它的方法名一样 —— 替换掉当前的 history 记录。
| 声明式 | 编程式 |
|---|---|
<router-link :to="..." replace> |
router.push(...) |
append
设置 append 属性后,则在当前 (相对) 路径前添加基路径。例如,我们从 /a 导航到一个相对路径 b,如果没有配置 append,则路径为 /b,如果配了,则为 /a/b
<router-link :to="{ path: '/b'}" append></router-link>
例:
当前路径:localhost:8080/a
使用append路由到/b后路径:localhost:8080/a/b
不使用:localhost:8080/b
tag
有时候想要 渲染成某种标签,例如。 于是我们使用 tag prop 类指定何种标签,同样它还是会监听点击,触发导航。
<router-link to="/foo" tag="li">foo</router-link>
<!-- 渲染结果 -->
<li>foo</li>
VueAjax
官网只介绍了如何引入axios,这里是设置全局引入
npm下载axios:
npm install axios --save
全局引入axios
在main.js中加入如下代码:
import axios from 'axios'
Vue.prototype.$ajax= axios
例子
添加之后就能在vue文件methods中使用$ajax,例:
执行 GET 请求
  axios.get('/user?ID=12345')
  .then(function (response) {
    console.log(response); //回调函数
  })
  .catch(function (error) {
    console.log(error); //请求失败
  });

// 可选地,上面的请求可以这样做
axios.get('/user', {
    params: {
      ID: 12345
    }
  })
  .then(function (response) {
    console.log(response);
  })
  .catch(function (error) {
    console.log(error);
  });
执行POST请求
axios.post('/user', {
    firstName: 'Fred',
    lastName: 'Flintstone'
  })
  .then(function (response) {
    console.log(response);
  })
  .catch(function (error) {
    console.log(error);
  });
axios API
可以通过向 axios 传递相关配置来创建请求
// 发送 POST 请求
axios({
  method: 'post',
  url: '/user/12345',
  data: {
    firstName: 'Fred',
    lastName: 'Flintstone'
  }
});
//axios(url[, config])
// 发送 GET 请求(默认的方法)
axios('/user/12345');
axios跨域问题
在config/index.js文件中找到proxyTable{},在括号中添加:
'/api': {
        target: 'http://localhost:8080/',//设置你调用的接口域名和端口号 别忘了加http
        changeOrigin: true,//如果需要跨域
        pathRewrite: {
          '^/api': '/'
                //这里理解成用面的地址,
                //后面组件中我们掉接口时直接用api代替 比如我要调
                //用'http://425.0.100.100:8888/user/add',直接写‘/api/user/add’即可
        }
      }
但是这样处理有个问题啊,只能在开发环境使用。真正线上时还是需要封装一下
封装axios
在一些大型项目中会封装axios,并且添加拦截器。在src下创建目录utils,在utils下创建js文件fetch.js。内容如下:
import axios from 'axios'

Date.prototype.Format = function (fmt) {
  let o = {
    "M+": this.getMonth() + 1,
    "d+": this.getDate(),
    "h+": this.getHours(),
    "m+": this.getMinutes(),
    "s+": this.getSeconds(),
    "q+": Math.floor((this.getMonth() + 3) / 3),
    "S": this.getMilliseconds()
  }
  if (/(y+)/.test(fmt))
    fmt = fmt.replace(RegExp.$1, (this.getFullYear() + "").substr(4 - RegExp.$1.length))
  for (var k in o)
    if (new RegExp("(" + k + ")").test(fmt))
      fmt = fmt.replace(RegExp.$1, (RegExp.$1.length == 1) ? (o[k]) : (("00" + o[k]).substr(("" + o[k]).length)))
  return fmt
}
// respone拦截器
axios.interceptors.response.use(response => {
  return response.data
}, error => {
  return error.data
})
axios.defaults.withCredentials = false

function checkStatus(response) {
  // loading
  // 如果http状态码正常,则直接返回数据
  if (response && (response.status === 200 || response.status === 304 || response.status === 400)) {
    return response
    // 如果不需要除了data之外的数据,可以直接 return response.data
  }
  // 异常状态下,把错误信息返回去
  return {
    status: -404,
    msg: '网络异常'
  }
}

function checkCode(res) {
  // 如果code异常(这里已经包括网络错误,服务器错误,后端抛出的错误),可以弹出一个错误提示,告诉用户
  if (res.status === -404) {
    console.log(res.msg)
  }
  if (res.data && (!res.data.success)) {
    // alert(res.data.error_msg)
  }
  // console.log('loadding')
  return res
}

function timestampToTime(timestamp) {
  let date = new Date(timestamp),
    Y = date.getFullYear() + '-',
    M = (date.getMonth() + 1 < 10 ? '0' + (date.getMonth() + 1) : date.getMonth() + 1) + '-',
    D = date.getDate() + ' ',
    h = date.getHours() + ':',
    m = date.getMinutes() + ':',
    s = date.getSeconds()
  return Y + M + D + h + m + s
}

export default {
  post(url, data) {
    return axios({
      method: 'post',
      url,
      //data: qs.stringify(data),
      data,
      timeout: 15000,
      headers: {
        'X-Requested-With': 'XMLHttpRequest',
        // 'Content-Type': 'application/x-www-form-urlencoded; charset=UTF-8'
        'content-type': 'application/json;charset=UTF-8'
      }
    }).then(
      (response) => {
        return response
      }
    ).then(
      (res) => {
        return res
      }
    )
  },

  upload(url, data) {
    let form = new FormData()
    Object.keys(data).forEach(value => {
      form.append(value, data[value])
    })
    return axios({
      method: 'post',
      // baseURL: process.env.BASE_API,
      url,
      data,
      transformRequest: [function (data) {
        let ret = ''
        for (let it in data) {
          ret += encodeURIComponent(it) + '=' + encodeURIComponent(data[it]) + '&'
        }
        return ret
      }],
      timeout: 15000,
      headers: {
        // 'X-Requested-With': 'XMLHttpRequest',
        'Content-Type': 'application/x-www-form-urlencoded'
      }
    }).then(
      (response) => {
        return response
      }
    ).then(
      (res) => {
        return res
      }
    )
  },

  get(url, params) {
    return axios({
      method: 'get',
      // baseURL: process.env.BASE_API,
      url,
      params, // get 请求时带的参数
      timeout: 15000
    }).then(
      (response) => {
        return response
      }
    ).then(
      (res) => {
        return res
      }
    )
  },
  put(url, data) {
    return axios({
      method: 'put',
      baseURL: process.env.BASE_API,
      url,
      data,
      timeout: 15000
    }).then(
      (response) => {
        return response
      }
    ).then(
      (res) => {
        return res
      }
    )
  },
  time(tamp) {
    return timestampToTime(tamp)
  }
}
然后再main.js中加入以下代码:
import fetch from './utils/fetch'

const extend = Vue.prototype
extend.$post = fetch.post
extend.$get = fetch.get
extend.$form = fetch.form
然后再vue文件使用的时候就很方便了:
this.$post('http://localhost:8080/Mybatis_war_exploded/upload.do',imageFile)
				  .then(function (response) {
				    console.log(response);
				  })
				  .catch(function (error) {
				    console.log(error);
				  });
结束
教程到这里就结束了,新手小白。写这个一边写一边自己做的,如果有错误的地方请留言多多指教。