ElasticSearch查询
一、存放数据
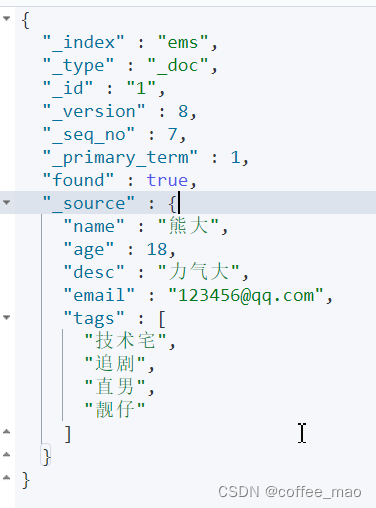
PUT ems/_doc/1
{
  "name": "熊大",
  "age": 18,
  "desc": "力气大",
  "email": "123456@qq.com"
}

二、修改数据
注意修改使用post方式时,需要带修改的参数,否则就和put是一致的,会造成数据的覆盖(丢失)
使用put方式进行修改目标字段,要注意其他字段不能改变要不然也是会覆盖
POST ems/_doc/1
{
  "doc": {
    "desc": "聪明"
  }
}
正确的进行修改
PUT ems/_doc/1
{
  "name": "熊大",
  "age": 18,
  "desc": "憨厚老实",
  "email": "111111@qq.com"
}

POST ems/_doc/1/_update
{
  "doc": {
    "desc": "聪明",
    "email": "000000@qq.com"
  }
}

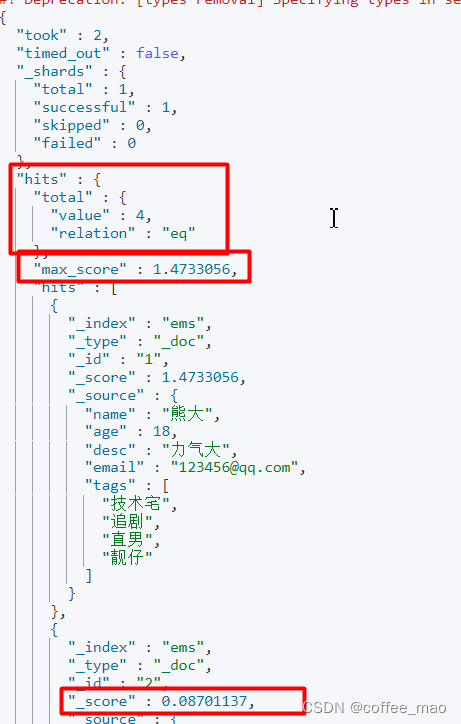
三、查询数据
GET ems/_doc/1
GET ems/_doc/_search?q=name:熊大
GET ems/_doc/_search
{
  "query": {
    "match": {
      "name": "熊大"
    }
  }
}
新增数据

3.1 查询
GET ems/_doc/_search
{
  "query": {
    "match": {
      "name": "熊大"
    }
  }
}
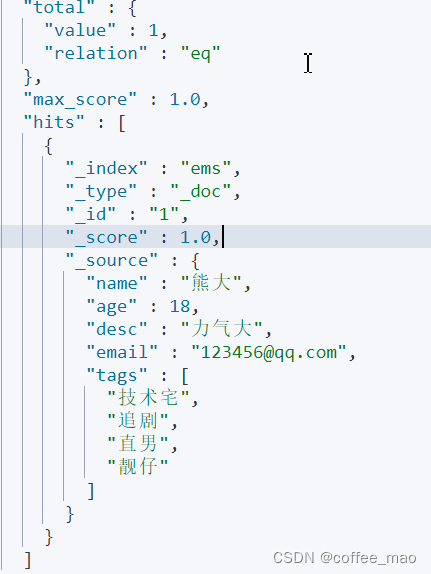
3.2 过滤
查询数据并过滤,只保留name和email
GET ems/_doc/_search
{
  "query": {
    "match": {
      "name": "熊大"
    }
  },
  "_source": ["name","email"]
}
3.3 排序
查询过滤再排序desc,asc
GET ems/_doc/_search
{
  "query": {
    "match": {
      "name": "熊大"
    }
  },
  "_source": ["name","age"],
  "sort": {
    "age": {
      "order": "asc"
    }
  }
}
3.4 分页
结果分页from,size
GET ems/_doc/_search
{
  "query": {
    "match": {
      "name": "熊大"
    }
  },
  "_source": ["name","age"],
  "sort": {
    "age": {
      "order": "asc"
    }
  },
  "from": 0,
  "size": 2
}
3.5 多条件查询
注意must是[ ],and–> must,or–> should,must_not–> 不等于
GET ems/_doc/_search
{
  "query": {
    "bool": {
      "must": [
        {
          "match": {
            "name": "熊大"
          }
        },
        {
          "match": {
            "age": 18
          }
        }
      ]
    }
  }
}
GET ems/_doc/_search
{
  "query": {
    "bool": {
      "must_not": [
        {
          "match": {
            "age": 18
          }
        }
      ]
    }
  }
}
3.6 多条件过滤
GET ems/_doc/_search
{
  "query": {
    "bool": {
      "must": [
        {
          "match": {
            "age": 18
          }
        }
      ],
      "filter": {
        "range": {
          "age": {
            "gte": 18,
            "lt": 25
          }
        }
      }
    }
  }
}
结果是
匹配条件查询
GET ems/_doc/_search
{
  "query": {
    "match": {
      "tags":"渣男 技术"
    }
  }
}
删除刚才的索引,新建索引,测试keyword 倒排索引,效率更高和standard
PUT ems
{
"mappings": {
"properties": {
"name": {
"type": "text"
},
"desc": {
"type": "keyword"
}
}
}
}
PUT ems/_doc/1
{
"name": "加菲猫学习 java name",
"desc": "加肥猫学习 es desc"
}
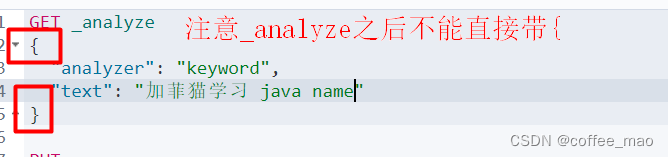
GET _analyze
{
"analyzer": "keyword",
"text": "加菲猫学习 java name"
}
结果
keyword被拆分成为一个整体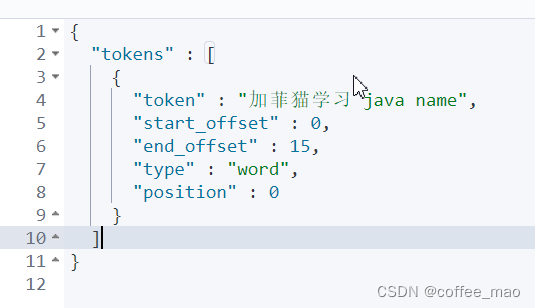
keyword被看做是一个整体,不会被分词器分析
GET _analyze
{
  "analyzer": "keyword",
  "text": "加菲猫学习 java name"
}

GET _analyze
{
  "analyzer": "standard",
  "text": "加菲猫学习 java name"
}
// 前提 安装ik分词器
GET _analyze
{
  "analyzer": "ik_smart",
  "text": "加肥猫学习 java name"
}

GET _analyze
{
  "analyzer": "ik_max_word",
  "text": "加肥猫学习 java name"
}
3.7 查询高亮显示
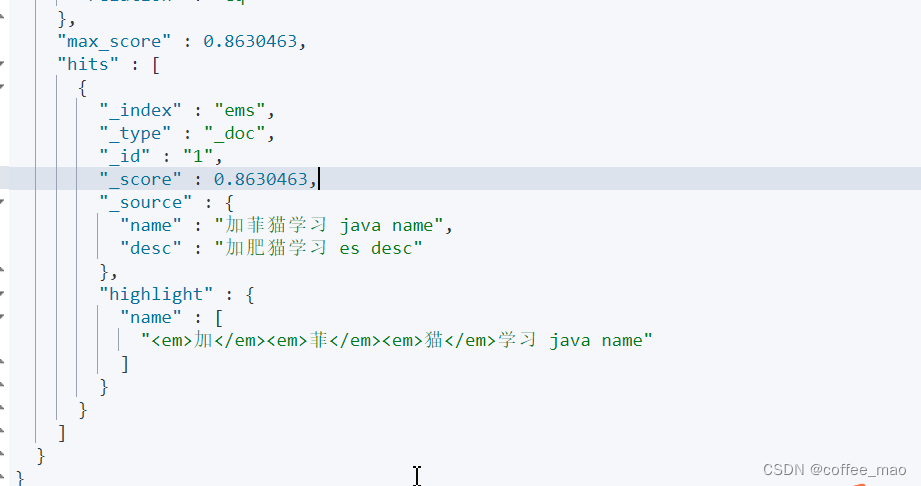
GET ems/_doc/_search
{
  "query": {
    "match": {
      "name": "加菲猫"
    }
  },
  "highlight": {
    "fields": {
      "name":{}
    }
  }
}
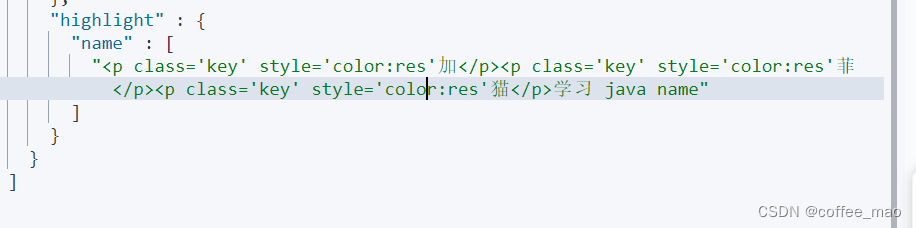
自定义高亮
  "highlight": {
    "pre_tags": "<p class='key' style='color:res'",
    "post_tags": "</p>",
    "fields": {
      "name":{}
    }
  }
四、京东实战
文档
https://www.elastic.co/guide/en/elasticsearch/client/index.html
4.1 常见Api
创建索引
        // 1.创建索引请求
        CreateIndexRequest request = new CreateIndexRequest("jd-search");
        // 2.执行创建请求,请求后获得响应createIndexResponse
        CreateIndexResponse response = restHighLevelClient.indices().create(request, RequestOptions.DEFAULT);
        System.out.println(response);
        System.out.println(response.isAcknowledged());// 查看是否创建成功
        System.out.println(response);// 查看返回对象
        restHighLevelClient.close();
注意在SpringBoot中的测试类,可能存在自动导入的对象一直为空的情况,解决方法加注解@RunWith(SpringRunner.class)
注解依赖
        <dependency>
            <groupId>org.springframework.boot</groupId>
            <artifactId>spring-boot-starter-test</artifactId>
            <version>2.7.2</version>
        </dependency>
判断索引是否存在
    @Test
    public void testExistIndex() throws IOException {
        GetIndexRequest request = new GetIndexRequest("jd-search");
        boolean response = restHighLevelClient.indices().exists(request, RequestOptions.DEFAULT);
        System.out.println(response);
        restHighLevelClient.close();
    }
GetIndexRequest拿到索引的请求,restHighLevelClient.indices().exists判断请求
删除索引
    @Test
    public void testDeleteIndex() throws IOException {
        DeleteIndexRequest request = new DeleteIndexRequest("jd-search");
        AcknowledgedResponse response = restHighLevelClient.indices().delete(request, RequestOptions.DEFAULT);
        restHighLevelClient.close();
    }
增加文档
        User user = new User("熊大", 18);
        IndexRequest request = new IndexRequest("jd-search");
        request.id("1");
        request.timeout("1s");
        // request.timeout(TimeValue.timeValueSeconds(1));
        IndexRequest source = request.source(JSON.toJSONString(user), XContentType.JSON);
        IndexResponse indexResponse = restHighLevelClient.index(request, RequestOptions.DEFAULT);
        System.out.println(indexResponse.toString());
        System.out.println(indexResponse.status());
1、对象初始化,创建请求request
2、规则 put到索引下的文档中
3、将数据封装成JSON,放入到请求
4、客户端发起请求,获取相应的结果
注意,如果没有将数据封装成JSON字符串,报错如下,大致意思是验证失败,缺少源和缺少内容类型
org.elasticsearch.action.ActionRequestValidationException: Validation Failed: 1: source is missing;2: content type is missing;
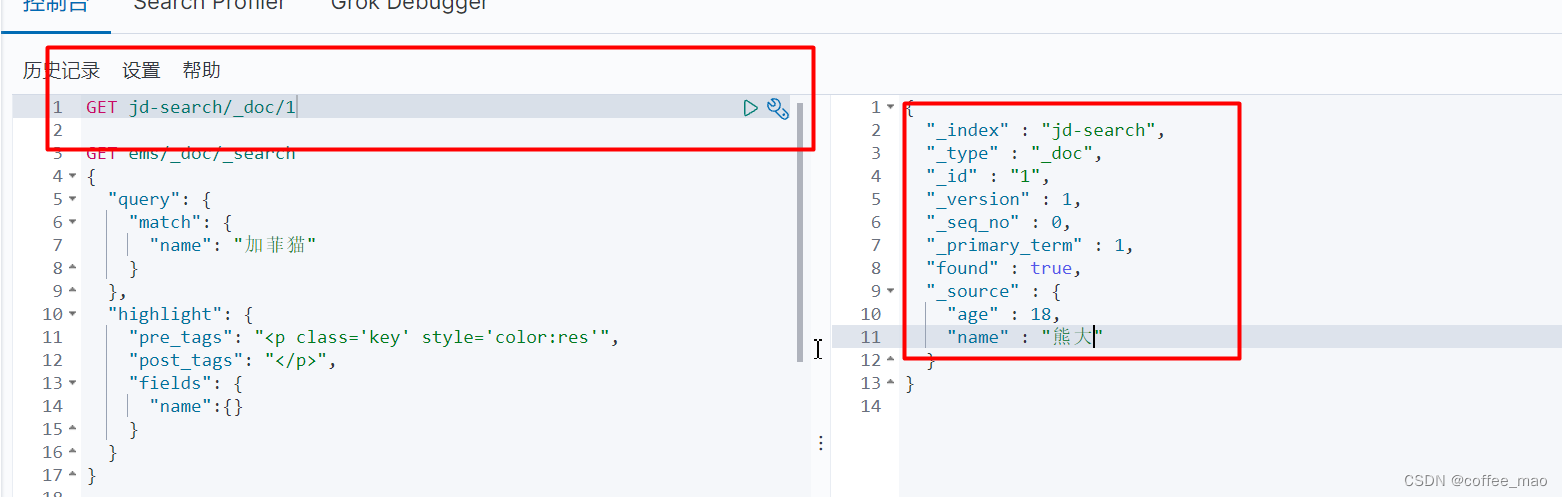
获取文档
查看文档中是否存在索引信息
    @Test
    public void testDocIsExists() throws IOException {
        GetRequest request = new GetRequest("jd-search", "2");
        request.fetchSourceContext(new FetchSourceContext(false));
        request.storedFields("_none_");

        boolean exists = restHighLevelClient.exists(request, RequestOptions.DEFAULT);
        System.out.println(exists);
    }
查看文档信息
    @Test
    public void getDocInfo() throws IOException {
        GetRequest request = new GetRequest("jd-search", "1");
        GetResponse response = restHighLevelClient.get(request, RequestOptions.DEFAULT);
        System.out.println(response.getSourceAsString());
        System.out.println(response);
    }
response就相当于get jd-search/_doc/1
{"age":18,"name":"熊大"}
{"_index":"jd-search","_type":"_doc","_id":"1","_version":1,"_seq_no":0,"_primary_term":1,"found":true,"_source":{"age":18,"name":"熊大"}}
修改文档
    @Test
    public void updateDocInfo() throws IOException {
        UpdateRequest updateRequest = new UpdateRequest("jd-search", "1");
        updateRequest.timeout(TimeValue.timeValueSeconds(1));
        User user = new User("熊妹妹", 18);
        updateRequest.doc(JSON.toJSONString(user),XContentType.JSON);
        UpdateResponse update = restHighLevelClient.update(updateRequest, RequestOptions.DEFAULT);
        System.out.println(update.status());
    }
删除文档内容
    @Test
    public void deleteDoc() throws IOException{
        DeleteRequest request = new DeleteRequest("jd-search", "1");
        request.timeout(TimeValue.timeValueSeconds(1));
        DeleteResponse delete = restHighLevelClient.delete(request, RequestOptions.DEFAULT);
        System.out.println(delete.status());
    }
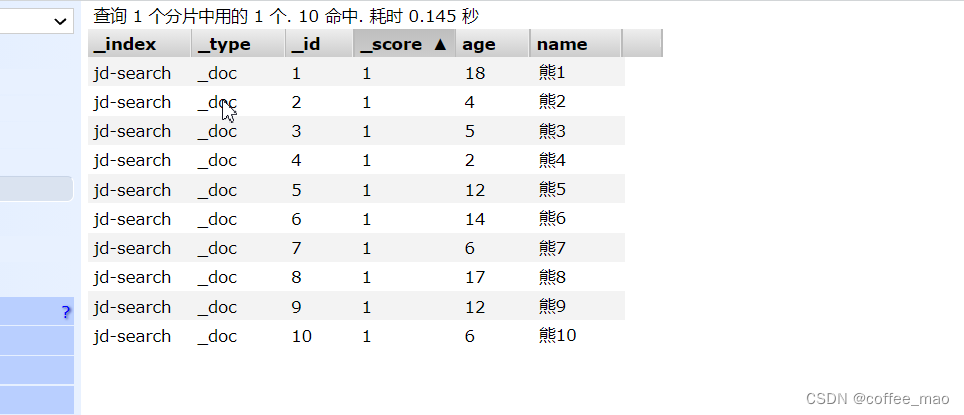
批量插入
    @Test
    public void addInfo() throws IOException{
        BulkRequest bulkRequest = new BulkRequest();
        bulkRequest.timeout(TimeValue.timeValueSeconds(1));

        ArrayList<User> users = new ArrayList<>();
        Random random = new Random();
        for (int i = 1; i < 11; i++) {
            users.add(new User("熊"+i,random.nextInt(20)+1));
        }

        for (int i = 0; i < users.size(); i++) {
            bulkRequest.add(
                    new IndexRequest("jd-search")
                    .id(""+(i+1))
                    .source(JSON.toJSONString(users.get(i)),XContentType.JSON));
        }

        BulkResponse bulk = restHighLevelClient.bulk(bulkRequest, RequestOptions.DEFAULT);
        System.out.println(bulk.hasFailures());
    }
查询
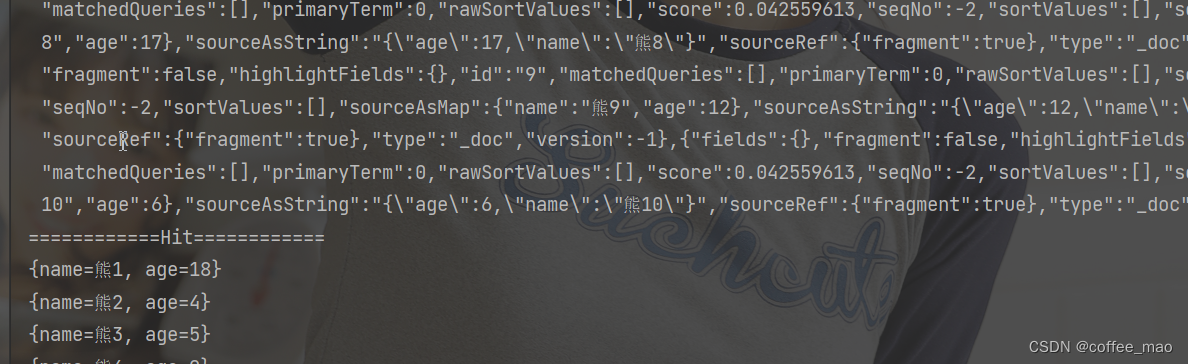
    @Test
    public void testSearch() throws IOException {
        SearchRequest searchRequest = new SearchRequest(ES_INDEX);
        SearchSourceBuilder sourceBuilder = new SearchSourceBuilder();
        TermQueryBuilder termQueryBuilder = QueryBuilders.termQuery("name", "熊");
        sourceBuilder.query(termQueryBuilder);
//        sourceBuilder.from(1);
//        sourceBuilder.size(5);

        sourceBuilder.timeout(new TimeValue(60, TimeUnit.SECONDS));

        searchRequest.source(sourceBuilder);

        SearchResponse search = restHighLevelClient.search(searchRequest, RequestOptions.DEFAULT);
        System.out.println(JSON.toJSONString(search.getHits().getHits()));
        System.out.println("============Hit============");
        for (SearchHit hit : search.getHits().getHits()) {
            System.out.println(hit.getSourceAsMap());
        }
    }
4.2 项目搭建
pom.xml
    <parent>
        <groupId>org.springframework.boot</groupId>
        <artifactId>spring-boot-starter-parent</artifactId>
        <version>2.7.2</version>
        <relativePath/> <!-- lookup parent from repository -->
    </parent>
    <properties>
        <java.version>11</java.version>
        <!-- 统一版本 -->
        <elasticsearch.version>7.6.1</elasticsearch.version>
    </properties>
    <dependencies>

        <!-- thymeleaf -->
        <dependency>
            <groupId>org.springframework.boot</groupId>
            <artifactId>spring-boot-starter-thymeleaf</artifactId>
        </dependency>

        <dependency>
            <groupId>junit</groupId>
            <artifactId>junit</artifactId>
            <version>4.13</version>
        </dependency>

        <dependency>
            <groupId>org.springframework.boot</groupId>
            <artifactId>spring-boot-starter-data-elasticsearch</artifactId>
        </dependency>

        <dependency>
            <groupId>com.alibaba</groupId>
            <artifactId>fastjson</artifactId>
            <version>1.2.70</version>
        </dependency>
        <!-- lombok需要安装插件 -->
        <dependency>
            <groupId>org.projectlombok</groupId>
            <artifactId>lombok</artifactId>
            <optional>true</optional>
        </dependency>

        <dependency>
            <groupId>org.springframework.boot</groupId>
            <artifactId>spring-boot-starter</artifactId>
            <version>2.7.2</version>
        </dependency>

        <dependency>
            <groupId>org.springframework.boot</groupId>
            <artifactId>spring-boot-starter-test</artifactId>
            <version>2.7.2</version>
        </dependency>

        <dependency>
            <groupId>org.springframework.boot</groupId>
            <artifactId>spring-boot-starter-web</artifactId>
            <version>2.7.2</version>
        </dependency>

        <dependency>
            <groupId>org.elasticsearch.client</groupId>
            <artifactId>elasticsearch-rest-high-level-client</artifactId>
            <version>7.6.1</version>
        </dependency>
        <dependency>
            <groupId>org.springframework</groupId>
            <artifactId>spring-test</artifactId>
            <version>5.3.22</version>
            <scope>test</scope>
        </dependency>

    </dependencies>
4.3 京东网页解析
application.yml
server:
  port: 8080

spring:
  thymeleaf:
    cache: false
ElasticSearchClientConfig负责连接本地的 es
@Configuration
public class ElasticSearchClientConfig {

    @Bean
    public RestHighLevelClient restHighLevelClient(){
        RestHighLevelClient client = new RestHighLevelClient(
            RestClient.builder(
                    new HttpHost("localhost",9200,"http")));
        return client;
    }
}
IndexController负责跳转首页
@Controller
public class IndexController {

    @GetMapping({"/","/index"})
    public String index(){
        return "index";
    }
}
这里注意如果访问不到,检查thymeleaf模板是否导入
        <!-- thymeleaf -->
        <dependency>
            <groupId>org.springframework.boot</groupId>
            <artifactId>spring-boot-starter-thymeleaf</artifactId>
        </dependency>
HtmlParseUtil 负责网页解析
public class HtmlParseUtil {

    public List<Content> ParseJd(String keyword) throws IOException {
        // https://search.jd.com/Search?keyword=java
        String url = "https://search.jd.com/Search?keyword=" + keyword;

        // 解析网页 document对象
        Document document = Jsoup.parse(new URL(url), 30000);
        Element goodsList = document.getElementById("J_goodsList");
        // 获取<li>
        Elements liElements = goodsList.getElementsByTag("li");

        ArrayList<Content> list = new ArrayList<>();

        for (Element el : liElements) {
            String img = el.getElementsByTag("img").eq(0).attr("data-lazy-img");
            String price = el.getElementsByClass("p-price").eq(0).text();
            String title = el.getElementsByClass("p-name").eq(0).text();
            Content goods = new Content();
            goods.setImg(img);
            goods.setPrice(price);
            goods.setTitle(title);
            list.add(goods);
        }
        return list;
    }
}
注意由于网页的懒加载原因,要找到图片的真实地址data-lazy-img

es 索引工具类
public class EsConst {
    public static final String JD_GOODS = "jd_goods";;
}
保存网页中商品的实体类
public class Content {

    private String title;

    private String img;

    private String price;

}
4.4 业务实现和控制器
ContentService业务接口
public interface ContentService {
    /**
     * 解析关键字搜索网页的内容,将其存入到 JD_GOODS索引中的方法声明
     * @param keyword
     * @throws IOException
     */
    Boolean parseContent(String keyword) throws IOException;

    List<Map<String,Object>> searchPage(String keyword,int from,int size) throws IOException;
}
具体业务实现
@Service
public class ContentServiceImpl implements ContentService {

    @Resource
    private RestHighLevelClient restHighLevelClient;

    /**
     * 解析网页搜索的内容,存入到索引的方法实现
     * @param keyword
     * @throws IOException
     */
    @Override
    public Boolean parseContent(String keyword) throws IOException {
        List<Content> contents = new HtmlParseUtil().ParseJd(keyword);
        // 将查询数据放入到 es 中
        BulkRequest bulkRequest = new BulkRequest();
        bulkRequest.timeout(new TimeValue(2, TimeUnit.SECONDS));
        for (int i = 0; i < contents.size(); i++) {
            bulkRequest.add(
                    new IndexRequest(JD_GOODS)
                    .source(JSON.toJSONString(contents.get(i)), XContentType.JSON));
        }
        BulkResponse bulk = restHighLevelClient.bulk(bulkRequest, RequestOptions.DEFAULT);
        return !bulk.hasFailures();
    }

    /**
     * 分页搜索实现
     * @param keyword 搜索的关键字
     * @param from 页号
     * @param size 每页显示多少
     * @return
     * @throws IOException
     */
    @Override
    public List<Map<String, Object>> searchPage(String keyword, int from, int size) throws IOException {
        if (from <= 1){
            from = 1;
        }
        // 条件搜索
        SearchRequest searchRequest = new SearchRequest(JD_GOODS);
        SearchSourceBuilder sourceBuilder = new SearchSourceBuilder();

        // 分页
        sourceBuilder.from(from);
        sourceBuilder.size(size);

        // 精确匹配
        TermQueryBuilder termQueryBuilder = QueryBuilders.termQuery("title", keyword);
        sourceBuilder.query(termQueryBuilder);
        sourceBuilder.timeout(new TimeValue(60,TimeUnit.SECONDS));

        // 高亮
        HighlightBuilder highlighter = new HighlightBuilder();
        highlighter.field("title");
        // 多个高亮显示
        highlighter.requireFieldMatch(false);
        highlighter.preTags("<span style='color:red'>");
        highlighter.postTags("</span>");
        sourceBuilder.highlighter(highlighter);

        // 执行搜索
        searchRequest.source(sourceBuilder);
        SearchResponse searchResponse = restHighLevelClient.search(searchRequest, RequestOptions.DEFAULT);

        // 解析结果
        ArrayList<Map<String,Object>> list = new ArrayList<>();
        for (SearchHit hit : searchResponse.getHits().getHits()) {
            // 使用新的字段值(高亮),覆盖旧的字段值
            Map<String, Object> sourceAsMap = hit.getSourceAsMap();
            // 解析高亮字段
            Map<String, HighlightField> highlightFields = hit.getHighlightFields();

            HighlightField title = highlightFields.get("title");
            // 替换
            if (title != null){
                Text[] fragments = title.fragments();
                StringBuilder new_title = new StringBuilder();
                for (Text text : fragments) {
                    new_title.append(text);
                }
                sourceAsMap.put("title",new_title.toString());
            }
            list.add(sourceAsMap);
        }
        return list;
    }

}
ContentController调用业务的方法
@RestController
public class ContentController {

    @Autowired
    private ContentService contentService;

    @GetMapping("/parse/{keyword}")
    public Boolean parse(@PathVariable("keyword") String keyword) throws IOException {
        return contentService.parseContent(keyword);
    }

    @GetMapping("/search/{keyword}/{from}/{size}")
    public List<Map<String,Object>> search(@PathVariable("keyword") String keyword,
                                           @PathVariable("from") int from,
                                           @PathVariable("size") int size) throws IOException {
        return contentService.searchPage(keyword,from,size);
    }
}
前端架构
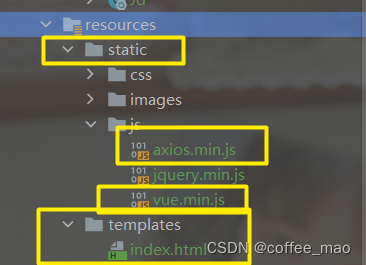
npm install vue

npm install axios
node_modules\axios\dist下面
axios.min.js,vue.min.js同理
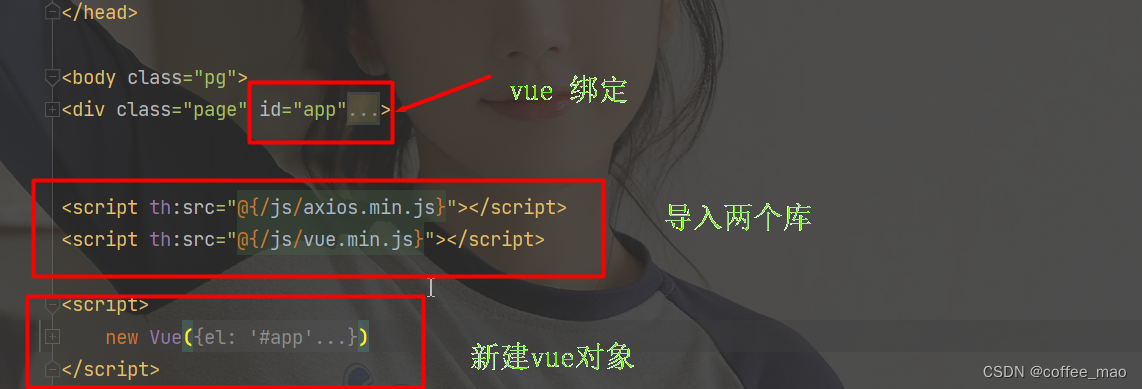
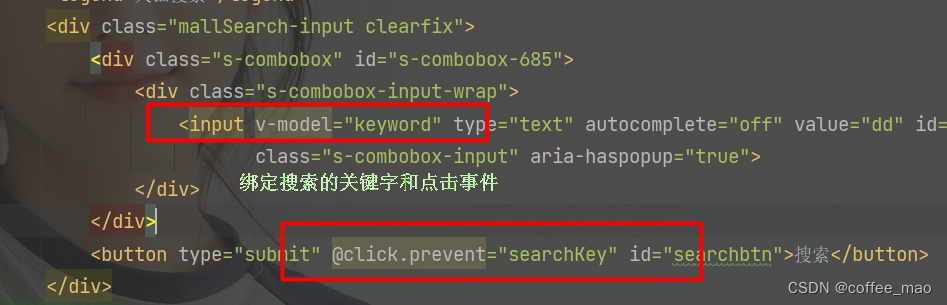
Vue对象实现前后端数据绑定
<script>
    new Vue({
        el: '#app',
        data: {
            keyword: '',
            results: []
        },
        methods: {
            searchKey(){
                let keyword = this.keyword;
                axios.get('search/'+keyword+"/1/75").then(response=>{
                    console.log(response);
                    // 前后端数据绑定
                    this.results = response.data;
                })
            }
        }
    })
</script>
前端内容遍历
                    <div class="product" v-for="result in results">
                        <div class="product-iWrap">
                            <!--商品封面-->
                            <div class="productImg-wrap">
                                <a class="productImg">
                                    <img :src="result.img">
                                </a>
                            </div>
                            <!--价格-->
                            <p class="productPrice">
                                <em>{{result.price}}</em>
                            </p>
                            <!--标题-->
                            <p class="productTitle">
                                <a v-html="result.title"></a>
<!--                                <a>{{result.title}}}</a>-->
                            </p>
                            <!-- 店铺名 -->
                            <div class="productShop">
                                <span>店铺: 加菲猫 </span>
                            </div>
                        </div>
                    </div>
4.5 效果展示
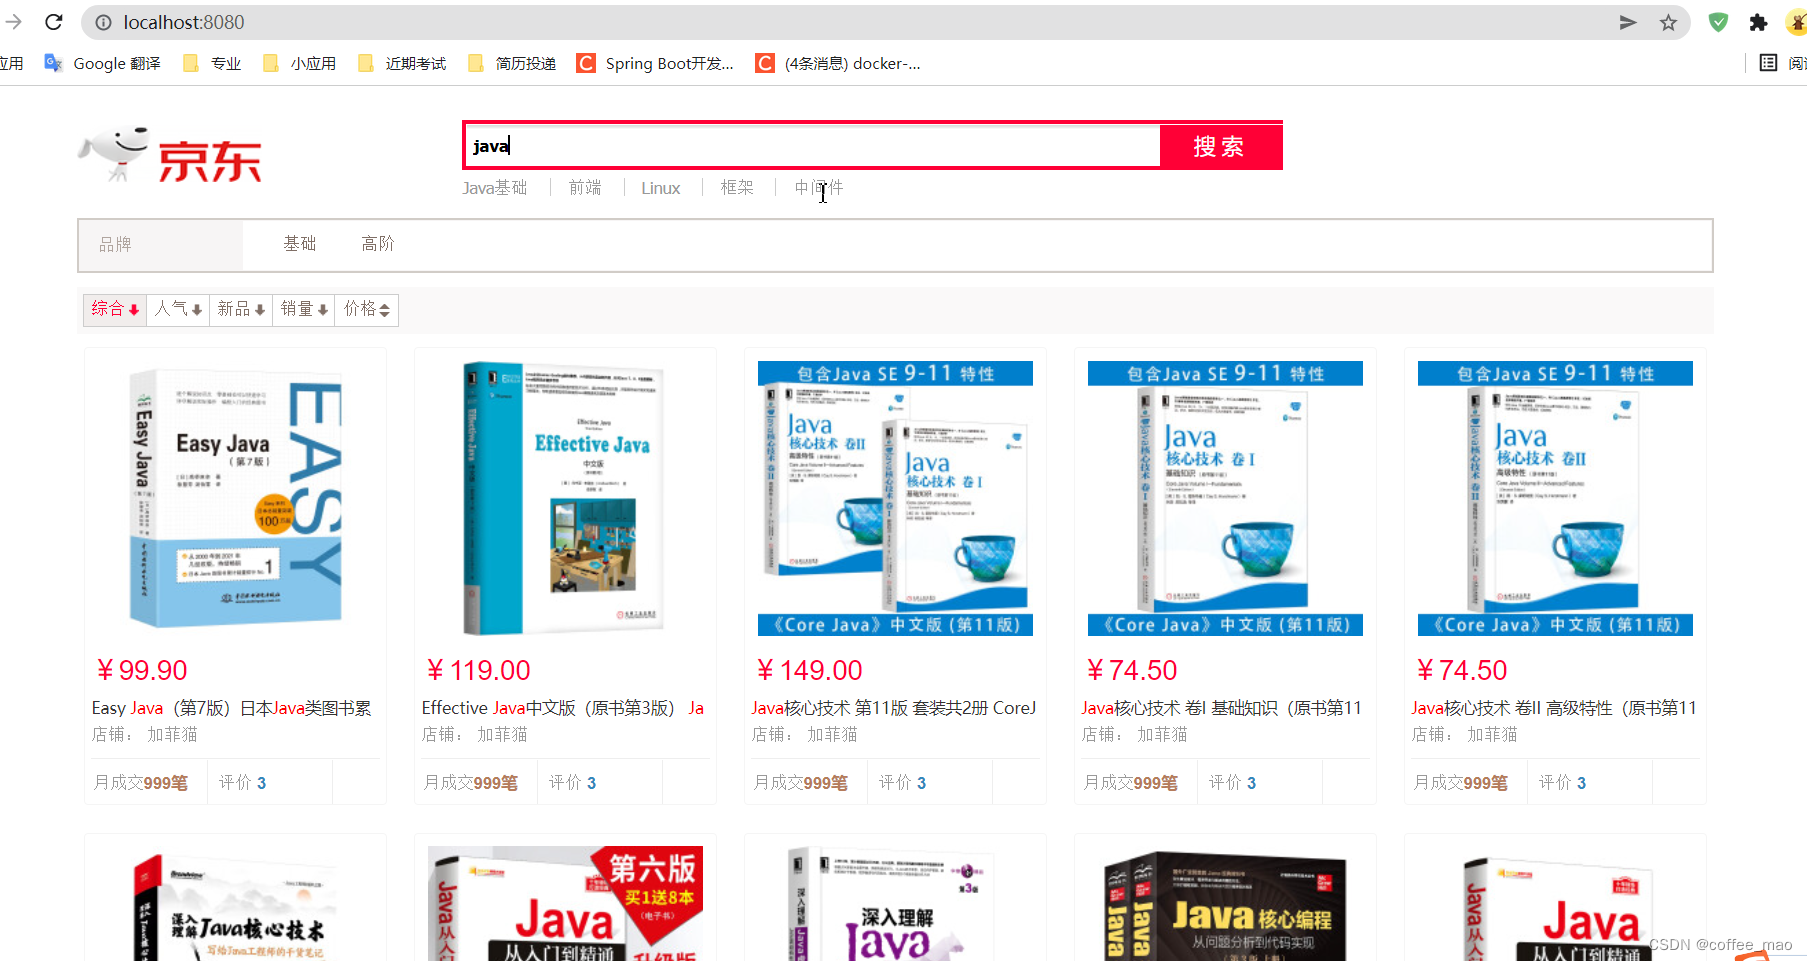
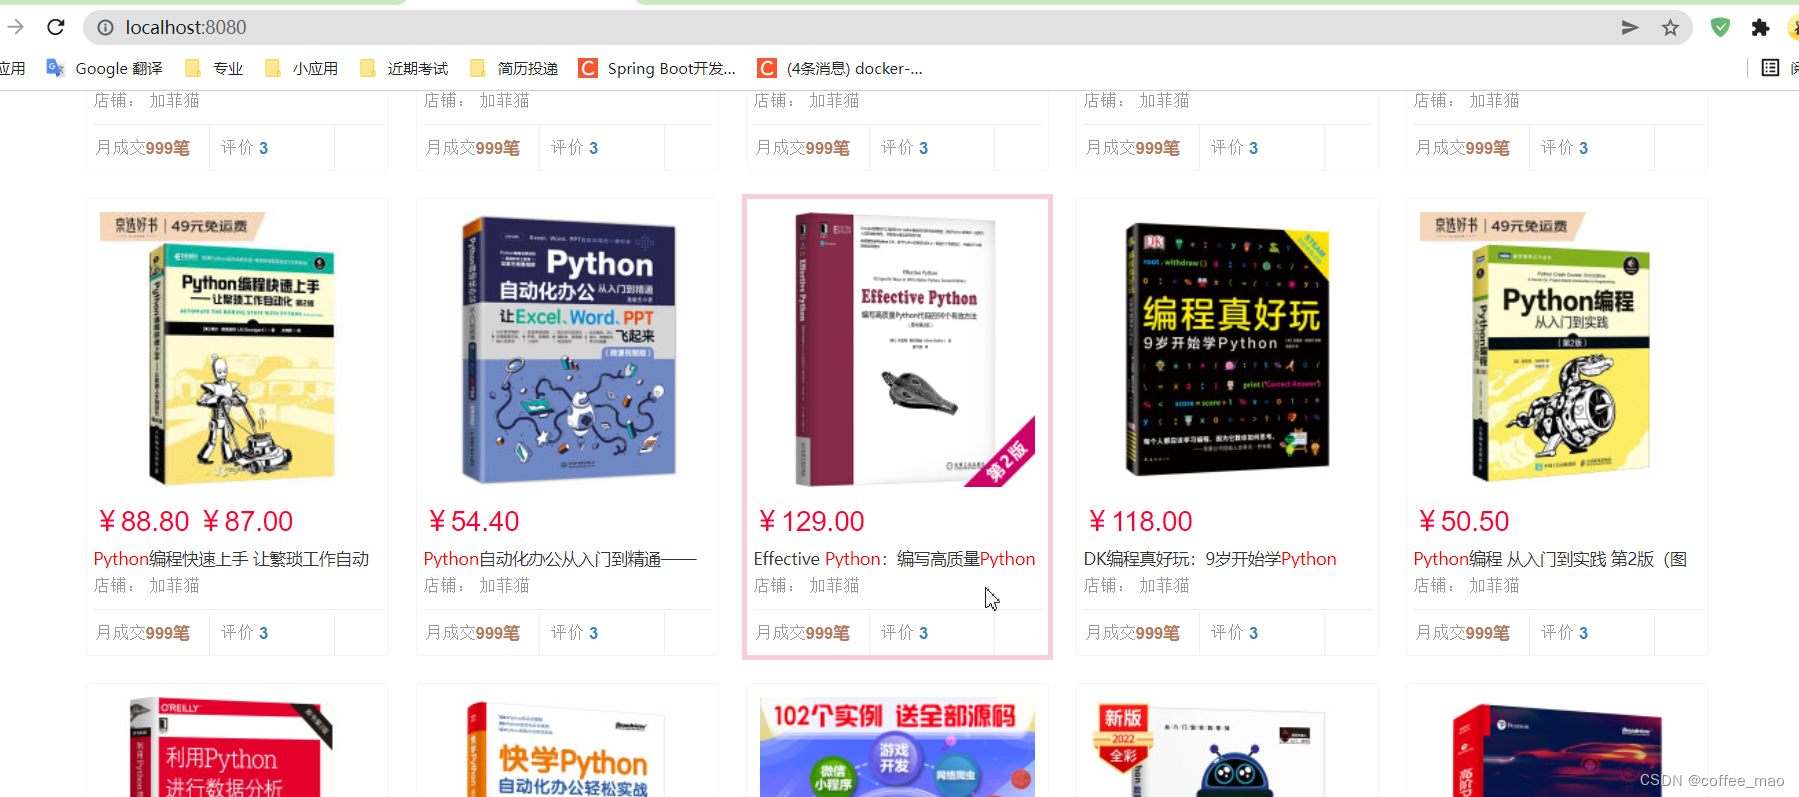
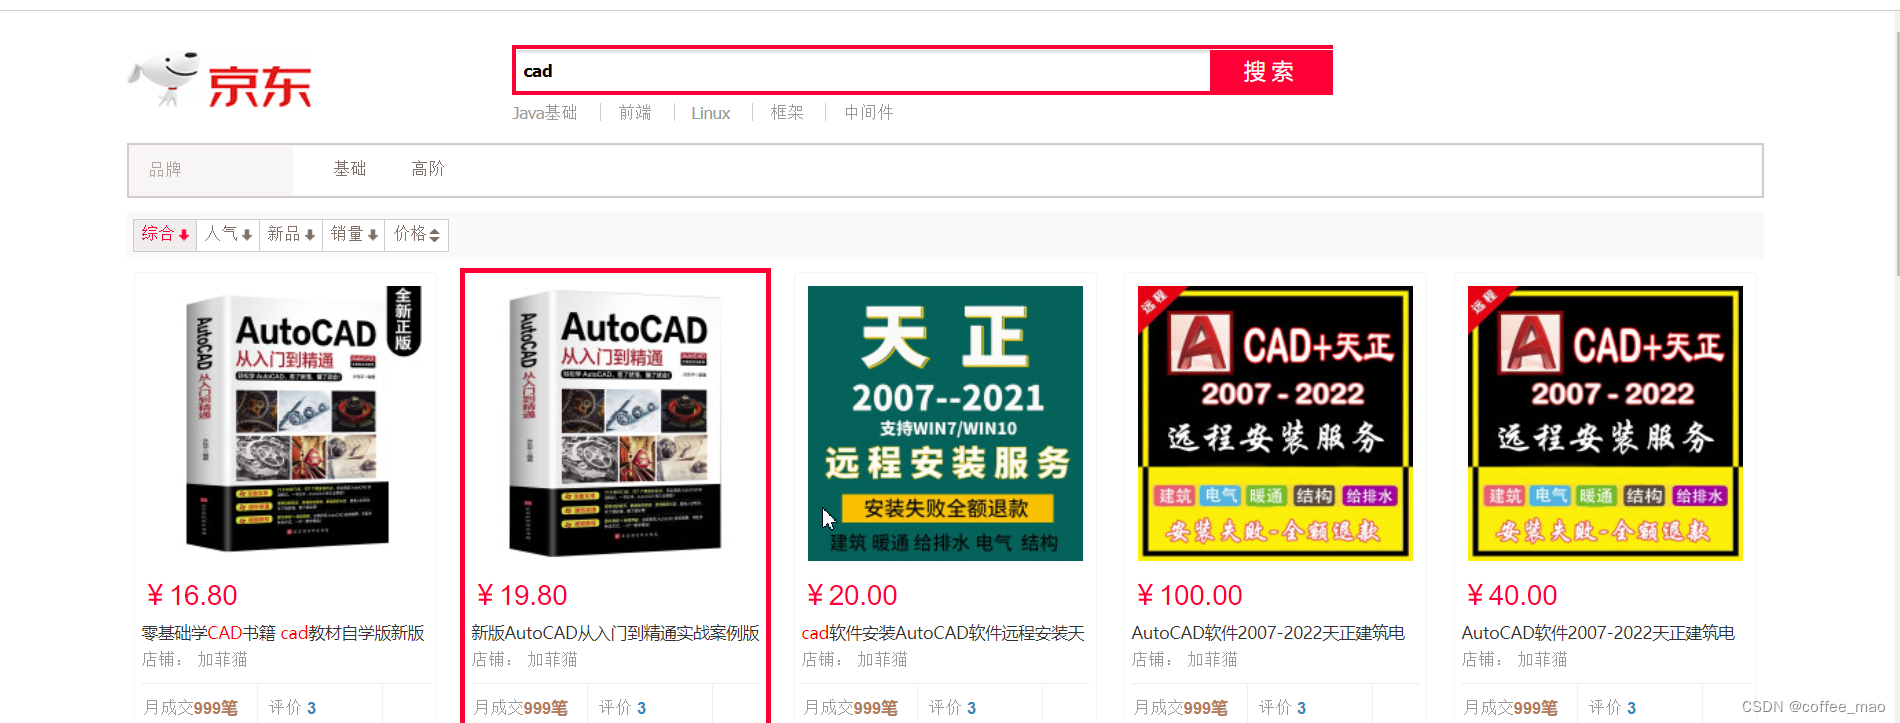
在请求解析数据内容时候,es 中内容到达30+不显示了,但是查询总量在增加,数据也确实导入进去,并且可以进行查询
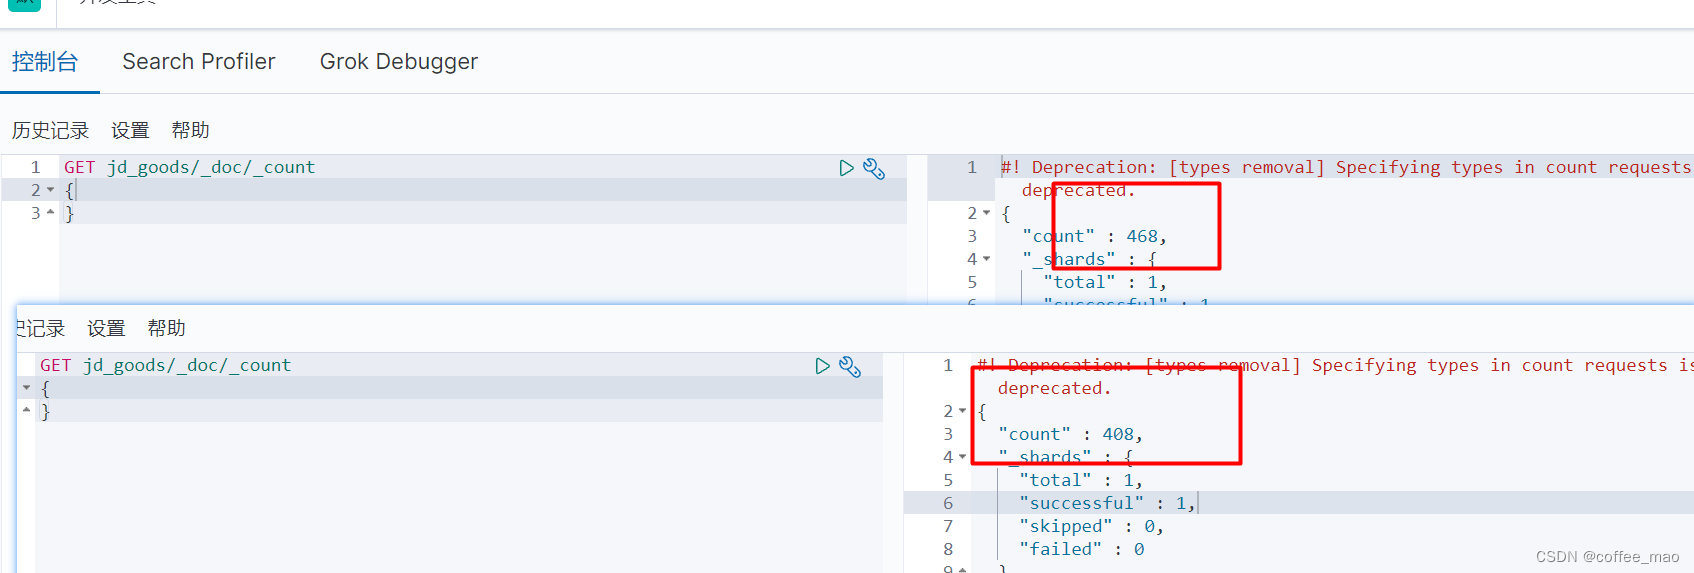
es默认支持的查询数量或查询深度是10000
修改最大深度
PUT xz-logs/_settings?preserve_existing=true
{
  "index.max_result_window" : "10000000"
}
ES7官方默认设置的索引分片数是1000,当分片被占满后,创建新索引失败
elasticsearch.yml增加cluster.max_shards_per_node: 10000