1. 缩放
cv2.resize(src, dsize, fx, fy, interpolation)
src:输入图像
dsize:(宽,高)
fx:按比例缩放时宽的系数
fy:按比例缩放时高的系数
interpolation:插值算法
| interpolation | 算法 |
|---|---|
| cv2.INTER_NEAREST | 最近邻插值 |
| cv2.INTER_LINEAR | 双线性插值 |
| cv2.INTER_CUBIC | 双三次插值 |
| cv2.INTER_AREA(效果好) | 像素区域重采样 |
def resize(img):
    cat_nearest = cv2.resize(img, (224, 224), interpolation=cv2.INTER_NEAREST)
    cat_linear = cv2.resize(img, (224, 224), interpolation=cv2.INTER_LINEAR)
    cat_cubic = cv2.resize(img, (224, 224), interpolation=cv2.INTER_CUBIC)
    cat_area = cv2.resize(img, (224, 224), interpolation=cv2.INTER_AREA)

    cv2.imshow('origin', img)
    cv2.imshow('Nearest', cat_nearest)
    cv2.imshow('Linear', cat_linear)
    cv2.imshow('Cubic', cat_cubic)
    cv2.imshow('Area', cat_area)

    cv2.waitKey(0)
    cv2.destroyAllWindows()

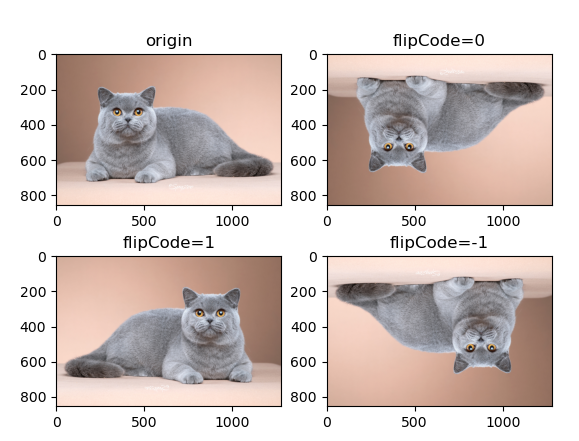
2. 翻转
cv2.flip(src, flipCode, dst)
def flip(img):
    cat_x = cv2.flip(img, flipCode=0)
    cat_y = cv2.flip(img, flipCode=1)
    cat_x_y = cv2.flip(img, flipCode=-1)

    # BGR -> RGB
    cat_flip = [img[:, :, ::-1], cat_x[:, :, ::-1], cat_y[:, :, ::-1], cat_x_y[:, :, ::-1]]
    flip_type = ['origin', 'flipCode=0', 'flipCode=1', 'flipCode=-1']

    fig = plt.figure()
    for index in range(4):
        fig.add_subplot(2, 2, index+1)
        plt.imshow(cat_flip[index])
        plt.title(flip_type[index])
    plt.show()
flipCode
0 : 以x轴为对称轴翻转
大于0:以y轴为对称轴翻转
小于0:以x轴和y轴为对称轴翻转
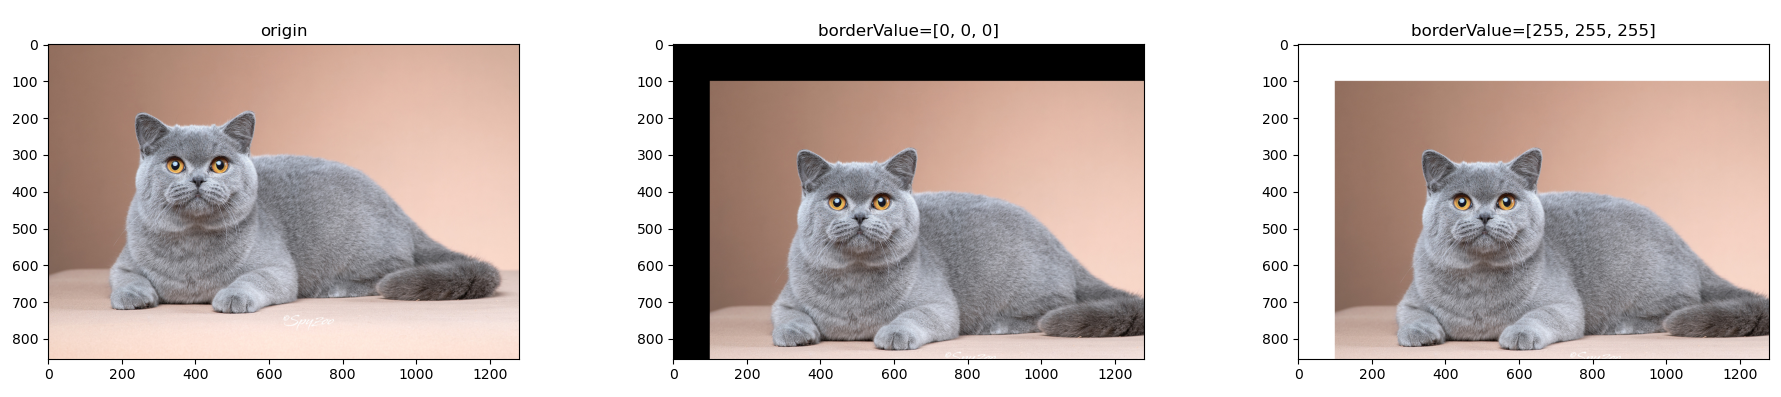
3. 平移
cv2.warpAffine(src, M, dsize, dst=None, flags=None, borderMode=None, borderValue=None)
| 参数 | 意义 |
|---|---|
| M | 变换矩阵 |
| dsize | 输出图像尺寸 |
| flags | 插值方式 |
| borderMode | 边界像素模式 |
| borderValue | 边界填充值 |
def translation(img):
    transform_matrix = np.array([[1, 0, 100], [0, 1, 100]]).astype(np.float32)
    cat_translation_0 = cv2.warpAffine(img, transform_matrix, img.shape[::-1][1:], flags=cv2.INTER_AREA,
                                       borderValue=[0, 0, 0])

    cat_translation_255 = cv2.warpAffine(img, transform_matrix, img.shape[::-1][1:], flags=cv2.INTER_AREA,
                                         borderValue=[255, 255, 255])
    # BGR -> RGB
    cat_translation = [img[:, :, ::-1], cat_translation_0[:, :, ::-1], cat_translation_255[:, :, ::-1]]
    translation_type = ['origin', 'borderValue=[0, 0, 0]', 'borderValue=[255, 255, 255]']

    fig = plt.figure()
    for index in range(3):
        fig.add_subplot(1, 3, index + 1)
        plt.imshow(cat_translation[index])
        plt.title(translation_type[index])
    plt.tight_layout()
    plt.show()
4. 旋转
cv2.getRotationMatrix2D(center, angle, scale)  # 中心,角度,缩放
cv2.warpAffine(src, M, dsize, dst=None, flags=None, borderMode=None, borderValue=None)
def rotation(img):
    cols, rows = img.shape[1], img.shape[0]
    M = cv2.getRotationMatrix2D(center=(cols//2, rows//2), angle=90, scale=0.5)
    cat_rotation = cv2.warpAffine(img, M, dsize=(cols, rows))
    plt.figure()
    plt.subplot(121)
    plt.imshow(img[:, :, ::-1])
    plt.title('origin')
    plt.subplot(122)
    plt.imshow(cat_rotation[:, :, ::-1])
    plt.title('angle=90, scale=0.5')
    plt.show()

5. 仿射变换
cv2.getAffineTransform(src, dst)
cv2.warpAffine(src, M, dsize, dst=None, flags=None, borderMode=None, borderValue=None)
def affine_transform(img):
    cols, rows = img.shape[1], img.shape[0]
    pts1 = np.array([[50, 50], [200, 50], [50, 200]], dtype=np.float32)
    pts2 = np.array([[100, 100], [200, 50], [100, 250]], dtype=np.float32)
    M = cv2.getAffineTransform(pts1, pts2)  # 三个点对求解变换矩阵
    cat_affine = cv2.warpAffine(img, M, (cols, rows))
    plt.figure()
    plt.subplot(121)
    plt.imshow(img[:, :, ::-1])
    plt.title('origin')
    plt.subplot(122)
    plt.imshow(cat_affine[:, :, ::-1])
    plt.title('affine')
    plt.show()

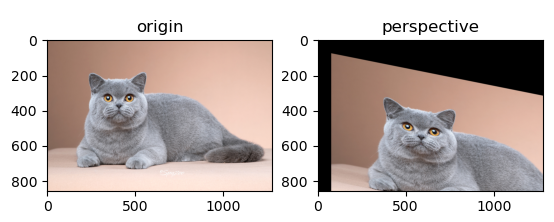
6. 透射变换
cv2.getPerspectiveTransform(src, dst)
cv2.warpPerspective(src, M, dsize, dst=None, flags=None, borderMode=None, borderValue=None)
def perspective_transform(img):
    cols, rows = img.shape[1], img.shape[0]
    pts1 = np.array([[100, 100], [100, 500], [300, 100], [300, 500]], dtype=np.float32)
    pts2 = np.array([[200, 200], [200, 600], [450, 250], [450, 650]], dtype=np.float32)
    M = cv2.getPerspectiveTransform(pts1, pts2)
    print(M.shape)
    cat_affine = cv2.warpPerspective(img, M, (cols, rows))
    plt.figure()
    plt.subplot(121)
    plt.imshow(img[:, :, ::-1])
    plt.title('origin')
    plt.subplot(122)
    plt.imshow(cat_affine[:, :, ::-1])
    plt.title('perspective')
    plt.show()