一、编译部署Nginx 1.X
安装配置:
[root@localhost ~]# groupadd nginx
[root@localhost ~]# useradd -s /sbin/nologin -g nginx -M nginx
[root@localhost ~]# systemctl stop firewalld
[root@localhost ~]# systemctl disable firewalld
#关掉selinux
#服务器文件描述符等

[root@localhost ~]# yum install gcc gcc-c++ glibc automake pcre zlip zlib-devel openssl-devel pcre-devel wget lrzsz
[root@localhost ~]# cd /usr/local/src/
[root@localhost src]# wget http://nginx.org/download/nginx-1.12.0.tar.gz
[root@localhost src]# tar -zxvf nginx-1.12.0.tar.gz
[root@localhost src]# cd nginx-1.12.0
[root@localhost nginx-1.12.0]# ./configure --prefix=/usr/local/nginx --user=nginx --group=nginx --with-http_ssl_module --with-http_flv_module --with-http_stub_status_module --with-http_gzip_static_module  --with-pcre
[root@localhost nginx-1.12.0]# make
[root@localhost nginx-1.12.0]# make install
注:
--prefix:Nginx安装目录
--user:Nginx用户
--group:Nginx用户所属组
--with-http_ssl_module:提供https支持
--with-http_flv_module:搭建flv视频服务器使用的
--with-http_stub_status_module:开启Stub Status模块,该模块会产生一个服务器状态和信息页
--with-http_gzip_static_module:开启Gzip静态模块,该模块用于发送预压缩文件
--with-pcre:perl执行文件路径


配置服务:
[root@localhost nginx-1.12.0]# vi /usr/lib/systemd/system/nginx.service
[Unit]
Description=The nginx HTTP and reverse proxy server
After=network.target remote-fs.target nss-lookup.target
[Service]
Type=forking
PIDFile=/usr/local/nginx/logs/nginx.pid
ExecStartPre=/usr/bin/rm -f /run/nginx.pid
ExecStartPre=/usr/local/nginx/sbin/nginx -t
ExecStart=/usr/local/nginx/sbin/nginx
ExecReload=/bin/kill -s HUP $MAINPID
KillMode=process
KillSignal=SIGQUIT
TimeoutStopSec=5
PrivateTmp=true
[Install]
WantedBy=multi-user.target


验证:
[root@localhost nginx-1.12.0]# chmod a+x /usr/lib/systemd/system/nginx.service
[root@localhost nginx-1.12.0]# /usr/local/nginx/sbin/nginx -t
nginx: the configuration file /usr/local/nginx/conf/nginx.conf syntax is ok
nginx: configuration file /usr/local/nginx/conf/nginx.conf test is successful

[root@localhost nginx-1.12.0]# systemctl start nginx
[root@localhost nginx-1.12.0]# ps -ef | grep nginx
root      24412      1  0 16:31 ?        00:00:00 nginx: master process /usr/local/nginx/sbin/nginx
nginx     24413  24412  0 16:31 ?        00:00:00 nginx: worker process
root      24415  10541  0 16:31 pts/0    00:00:00 grep --color=auto nginx


访问:
http://192.168.146.136

二、安装PHP 7.2.10
yum安装方式:
安装php:
[root@localhost ~]# yum -y remove httpd-tools.x86_64
[root@localhost ~]# whereis  php
[root@localhost ~]# rm -rf /usr/lib64/php /etc/php /etc/php.d/ /etc/php.ini /usr/local/php /usr/share/php /usr/local/php
[root@localhost ~]# yum -y remove php*
[root@localhost ~]# rpm -Uvh https://dl.fedoraproject.org/pub/epel/epel-release-latest-7.noarch.rpm
[root@localhost ~]# rpm -Uvh https://mirror.webtatic.com/yum/el7/webtatic-release.rpm
[root@localhost ~]# yum -y install php72w php72w-cli php72w-common php72w-devel php72w-embedded php72w-fpm php72w-gd php72w-mbstring php72w-mysqlnd php72w-opcache php72w-pdo php72w-xml


配置文件:
[root@localhost ~]# cp /usr/lib64/httpd/modules/libphp7-zts.so /usr/local/apache2.4.25/modules/
[root@localhost ~]# cp /usr/lib64/httpd/modules/libphp7.so /usr/local/apache2.4.25/modules/


相关启动命令:
[root@localhost ~]# systemctl enable php-fpm
[root@localhost ~]# systemctl start php-fpm
[root@localhost ~]# systemctl status php-fpm
编译安装方式:
新增帐号:
[root@localhost ~]# groupadd www
[root@localhost ~]# useradd -s /sbin/nologin -g www -M www


安装依赖:
[root@localhost ~]# yum install gcc autoconf gcc-c++ libxml2 libxml2-devel openssl openssl-devel bzip2 bzip2-devel libcurl libcurl-devel libjpeg libjpeg-devel libpng libpng-devel freetype freetype-devel gmp gmp-devel readline readline-devel libxslt libxslt-devel systemd-devel openjpeg-devel
libtool会生产libphp7.so


安装php7.2.10:
[root@localhost ~]# wget http://cn2.php.net/distributions/php-7.2.10.tar.gz
[root@localhost ~]# tar zxvf php-7.2.10.tar.gz
[root@localhost ~]# cd php-7.2.10
[root@localhost php-7.2.10]# ./configure \
--prefix=/usr/local/php \
--with-config-file-path=/usr/local/php/etc \
--with-zlib-dir \
--with-freetype-dir \
--enable-mbstring \
--with-libxml-dir=/usr \
--enable-xmlreader \
--enable-xmlwriter \
--enable-soap \
--enable-calendar \
--with-curl \
--with-zlib \
--with-gd \
--with-pdo-sqlite \
--with-pdo-mysql \
--with-mysqli \
--with-mysql-sock \
--enable-mysqlnd \
--disable-rpath \
--enable-inline-optimization \
--with-bz2 \
--with-zlib \
--enable-sockets \
--enable-sysvsem \
--enable-sysvshm \
--enable-pcntl \
--enable-mbregex \
--enable-exif \
--enable-bcmath \
--with-mhash \
--enable-zip \
--with-pcre-regex \
--with-jpeg-dir=/usr \
--with-png-dir=/usr \
--with-openssl \
--enable-ftp \
--with-kerberos \
--with-gettext \
--with-xmlrpc \
--with-xsl \
--enable-fpm \
--with-fpm-user=www \
--with-fpm-group=www \
--with-fpm-systemd \
--disable-fileinfo \
--disable-phpdbg \
--disable-dtrace \
--enable-opcache
[root@localhost php-7.2.10]# make
[root@localhost php-7.2.10]# make test
[root@localhost php-7.2.10]# make install


配置文件:
[root@localhost php-7.2.10]# cp php.ini-production /usr/local/php/etc/php.ini
[root@localhost php-7.2.10]# cd /usr/local/php/etc
[root@localhost etc]# cp php-fpm.conf.default php-fpm.conf
[root@localhost etc]# vim php-fpm.conf
error_log = /usr/local/php/var/php-fpm.log
pid = /usr/local/php/var/run/php-fpm.pid
[root@localhost etc]]# cd /usr/local/php/etc/php-fpm.d
[root@localhost php-fpm.d]]# cp www.conf.default


管理php-fpm服务:
[root@localhost php-fpm.d]]# cd /root/php-7.2.10
[root@localhost php-7.2.10]# cp ./sapi/fpm/php-fpm.service /usr/lib/systemd/system/
[root@localhost ~]# systemctl enable php-fpm
[root@localhost ~]# systemctl start php-fpm
[root@localhost ~]# systemctl status php-fpm


添加环境变量:
[root@localhost ~]# vim  /etc/profile
在末尾追加:
export PATH=$PATH:'/usr/local/php/bin/'
[root@localhost ~]# source /etc/profile


验证版本:
[root@localhost ~]# php -v
PHP 7.2.10 (cli) (built: Jan 21 2019 23:25:27) ( NTS )
Copyright (c) 1997-2018 The PHP Group
Zend Engine v3.2.0, Copyright (c) 1998-2018 Zend Technologies
三、配置nginx 1.12支持php7.2.10
在网站目录下建立一个文index.php的文件,验证php是否正常(下图表示成功):
[root@localhost ~]# vim /usr/local/nginx/conf/nginx.conf
        location / {
            root   html;
            index  index.html index.htm index.php;
        }
        location ~ \.php$ {
            root           html;
            fastcgi_pass   127.0.0.1:9000;
            fastcgi_index  index.php;
            fastcgi_param  SCRIPT_FILENAME  $document_root$fastcgi_script_name;
            include        fastcgi_params;
        }
[root@localhost ~]# vi /usr/local/nginx/html/index.php
<?php
phpinfo();
?>
http://192.168.146.136/
四、部署MySQL 5.6.16
1、编译安装MySQL前的准备工作
安装编译源码所需的工具和库
[root@localhost ~]# yum install gcc gcc-c++ ncurses-devel perl autoconf libtool -y
安装cmake,从http://www.cmake.org下载源码并编译安装
[root@localhost ~]# cd /root/soft
[root@localhost soft]# wget http://www.cmake.org/files/v2.8/cmake-2.8.10.2.tar.gz
如果提示SSL下载不了,就接--no-check-certificate参数
[root@localhost soft]# tar -xzvf cmake-2.8.10.2.tar.gz
[root@localhost soft]# cd cmake-2.8.10.2
[root@localhost cmake-2.8.10.2]# ./bootstrap
[root@localhost cmake-2.8.10.2]# make
[root@localhost cmake-2.8.10.2]# make install
[root@localhost cmake-2.8.10.2]# cd ~


2、设置MySQL用户和组
[root@localhost ~]# groupadd mysql
[root@localhost ~]# useradd -r -g mysql mysql


3、新建MySQL所需要的目录
新建mysql安装目录
[root@localhost ~]# mkdir -p /usr/local/mysql
新建mysql数据库数据文件目录
[root@localhost ~]# mkdir -p /data/mysqldb


4、下载MySQL源码包并解压
[root@localhost ~]# cd /root/soft
[root@localhost soft]# wget http://dev.mysql.com/get/Downloads/MySQL-5.6/mysql-5.6.16.tar.gz
[root@localhost soft]# tar -zxv -f mysql-5.6.16.tar.gz
[root@localhost soft]# cd mysql-5.6.16
从mysql5.5起,mysql源码安装开始使用cmake了,设置源码编译配置脚本。
[root@localhost mysql-5.6.16]# cmake -DCMAKE_INSTALL_PREFIX=/usr/local/mysql -DMYSQL_UNIX_ADDR=/usr/local/mysql/mysql.sock -DDEFAULT_CHARSET=utf8 -DDEFAULT_COLLATION=utf8_general_ci -DWITH_INNOBASE_STORAGE_ENGINE=1 -DWITH_ARCHIVE_STORAGE_ENGINE=1 -DWITH_BLACKHOLE_STORAGE_ENGINE=1 -DMYSQL_DATADIR=/data/mysqldb -DMYSQL_TCP_PORT=3306 -DENABLE_DOWNLOADS=1
[root@localhost mysql-5.6.16]# rm CMakeCache.txt
[root@localhost mysql-5.6.16]# make
[root@localhost mysql-5.6.16]# make install
[root@localhost mysql-5.6.16]# cd ~


5、修改mysql相关目录所有者和组
修改mysql安装目录权限:
[root@localhost ~]# cd /usr/local/mysql
[root@localhost mysql]# chown -R mysql:mysql .
[root@localhost mysql]# cd ~
修改mysql数据库文件目录权限:
[root@localhost ~]#  cd /data/mysqldb
[root@localhost mysqldb]#  chown -R mysql:mysql .
[root@localhost mysqldb]# cd ~


6、初始化mysql数据库
[root@localhost ~]# cd /usr/local/mysql
[root@localhost ~]# scripts/mysql_install_db --user=mysql --datadir=/data/mysqldb


7、生成my.cnf配置文件
[root@localhost ~]# cp /usr/local/mysql/support-files/my-default.cnf /etc/my.cnf
注:如果/etc/my.cnf文件存在,则覆盖。


8、复制mysql服务启动脚本及加入PATH路径
[root@localhost ~]# cp support-files/mysql.server /etc/init.d/mysqld
[root@localhost ~]# vi /etc/profile
PATH=/usr/local/mysql/bin:/usr/local/mysql/lib:$PATH
export PATH
[root@localhost ~]# source /etc/profile
[root@localhost ~]# echo $PATH


9、启动mysql服务并加入开机自启动(可选这个步骤,以后可以自己启动的)
[root@localhost ~]# vi /etc/my.cnf
#填入下面这行
datadir = /data/mysqldb
[root@localhost ~]# service mysqld start
[root@localhost ~]# chkconfig mysqld on


10、检查mysql服务是否启动
[root@localhost ~]# netstat -tulnp | grep 3306
[root@localhost ~]# mysql -u root -p
密码为空,如果能登陆上,则安装成功。


11、修改MySQL用户root的密码
[root@localhost ~]# /usr/local/mysql/bin/mysql_secure_installation
密码123456


12.测试php连接数据库
将网站目录下index.php内容替换成如下,验证数据库是否正常(如下图表示正常):
[root@localhost ~]# vi /usr/local/nginx/html/test.php
<?php
    $mysqli = new mysqli("localhost", "root", "123456");
    if(!$mysqli)  {
        echo"database error";
    }else{
        echo"php env successful";
    }
    $mysqli->close();
?>


13、可能会出现的错误
问题:
ERROR 2002 (HY000): Can't connect to local MySQL server through socket '/tmp/mysql.sock' (2)
解决:
新建一个链接或在mysql中加入-S参数,直接指出mysql.sock位置。
[root@localhost ~]# ln -s /usr/local/mysql/data/mysql.sock /tmp/mysql.sock
[root@localhost ~]# /usr/local/mysql/bin/mysql -u root -S /usr/local/mysql/data/mysql.sock
五、部署测试网站
部署一个网站(CMS)作为测试,国内比较有名的CMS有织梦、phpcms等,国外有worepress、drupal等。这里以drupal 8为例。详细可参考:https://www.drupal.org/docs/user_guide/en/index.html
1、建立数据库、数据库用户和密码、授权用户权限
[root@localhost ~]# mysql -u root -p
Enter password:
mysql> show databases;
+--------------------+
| Database           |
+--------------------+
| information_schema |
| mysql              |
| performance_schema |
+--------------------+
4 rows in set (0.00 sec)
mysql> CREATE DATABASE drupal CHARACTER SET utf8 COLLATE utf8_general_ci;
mysql> CREATE USER drupal@localhost IDENTIFIED BY '123456';
mysql> GRANT SELECT, INSERT, UPDATE, DELETE, CREATE, DROP, INDEX, ALTER, CREATE TEMPORARY TABLES ON drupal.* TO 'drupal'@'localhost' IDENTIFIED BY '123456';
mysql> flush privileges;
mysql> exit


2、下载设置网站
[root@localhost ~]# cd /usr/local/nginx/html/
[root@localhost QME]# wget https://ftp.drupal.org/files/projects/drupal-8.6.1.tar.gz
[root@localhost QME]# tar -zxvf drupal-8.6.1.tar.gz
[root@localhost QME]# rm -f drupal-8.6.1.tar.gz
[root@localhost QME]# mv drupal-8.6.1/* .
#权限设置


3、输入如下地址启动安装程序
 文章浏览阅读3.7k次,点赞2次,收藏5次。Nginx学习笔记一、N...
 文章浏览阅读1.7w次,点赞14次,收藏61次。我们在使用容器的...
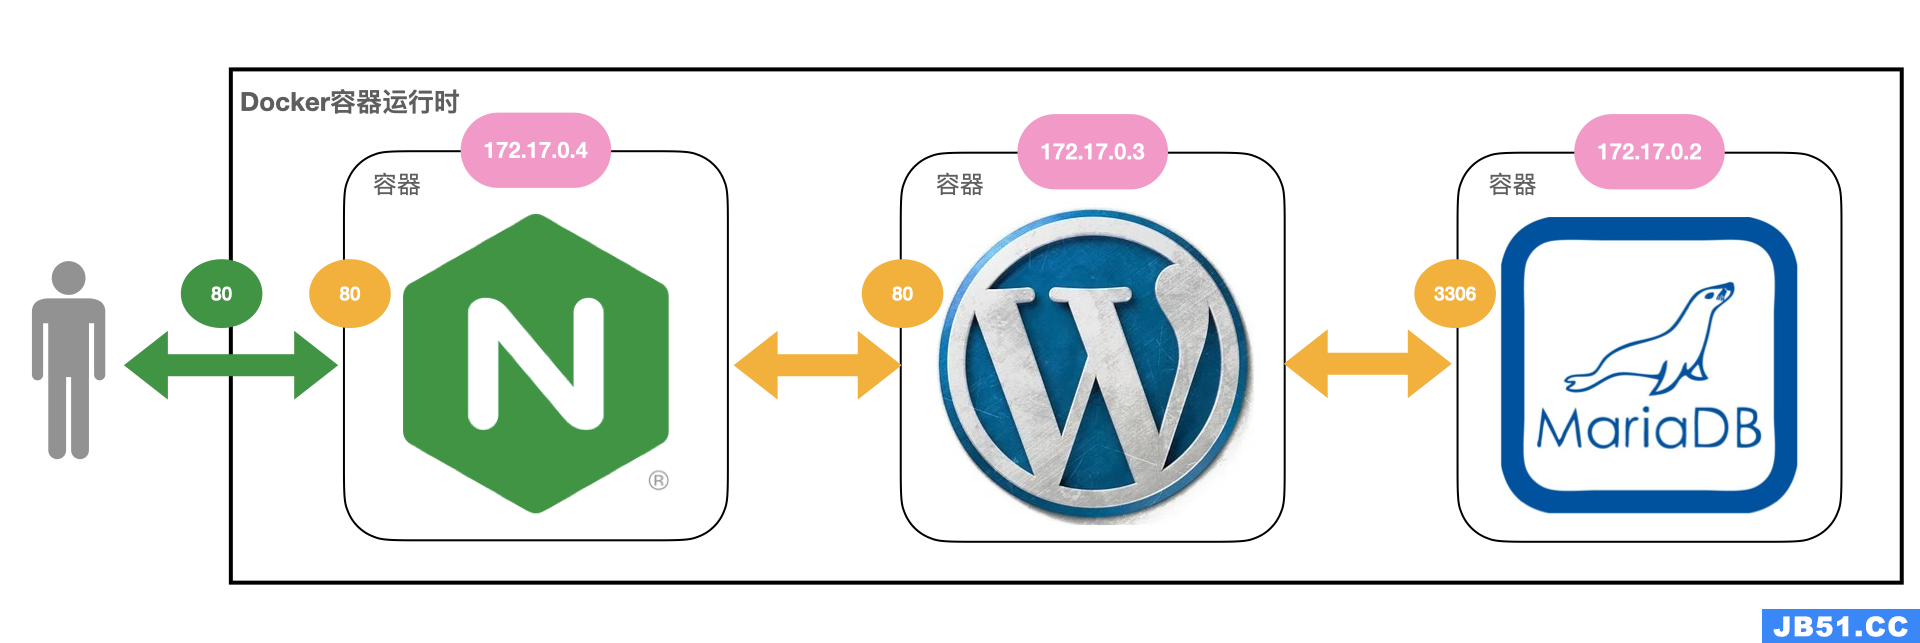 文章浏览阅读2.7k次。docker 和 docker-compose 部署 nginx+...
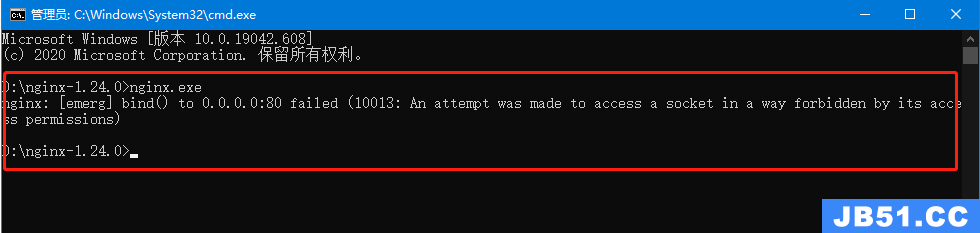 文章浏览阅读1.3k次。5:再次启动nginx,可以正常启动,可以...
 文章浏览阅读3.1w次,点赞105次,收藏182次。高性能:Nginx ...