常用命令
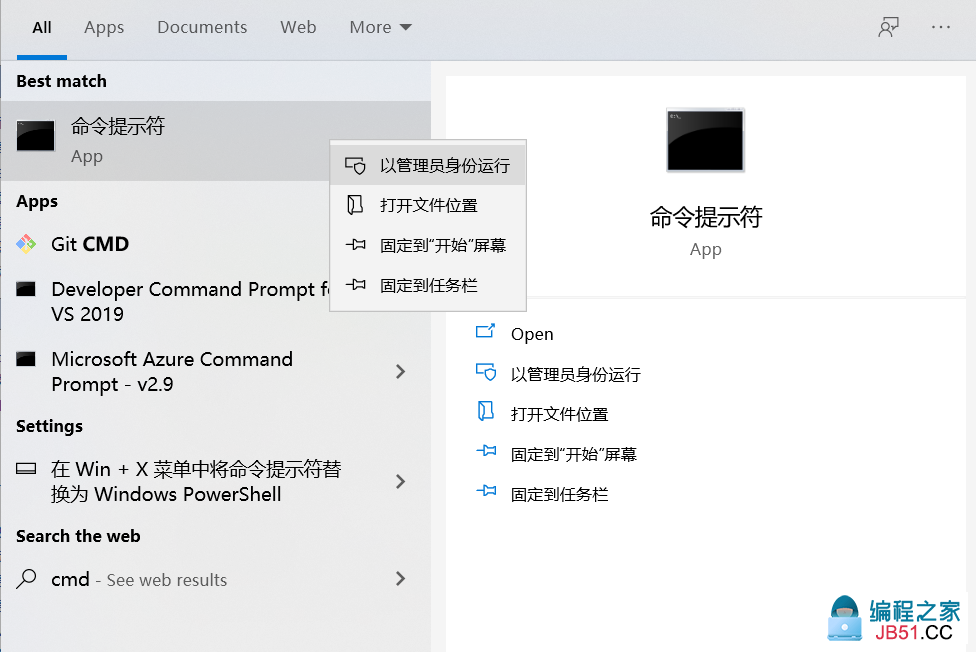
打开CMD命令窗口(记住使用管理员身份运行),我们就可以在命令窗口中做一些MySQL的命令操作了:
服务启动和关闭
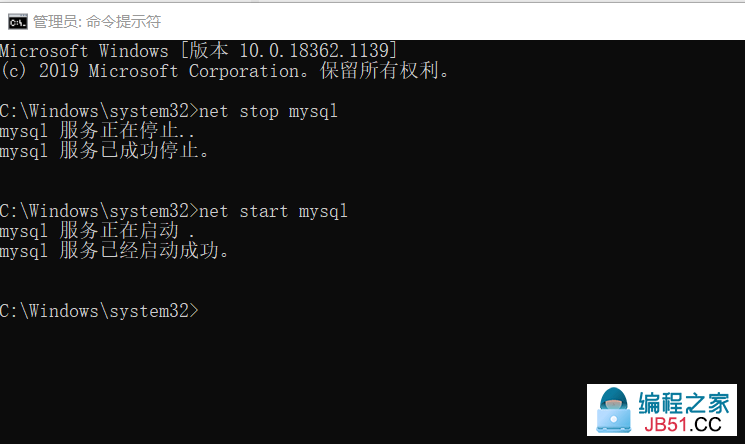
这个我们上一个章节使用过了:net start mysql,这是服务命令,不是语句命令,后面不需要加引号
1 net stop mysql --代表停止MySQL服务
2 net start mysq --代表启动MySQL服务
MySQL登录命令
这个我们前面一章我们也了解过,使用过了:mysql -h 主机名 -P 端口 -u 用户名 -p,前面一章有对-h,-u,-p 作过解释,这边 -P 是指Port 端口。
1 mysql -h localhost -P 3306 -u root -p

默认情况下登陆本机,其实端口和主机都可以省略的:
1 mysql -u 用户名 -p
查看数据库版本
1 mysql> select version();
2 +-----------+
3 | version() |
4 +-----------+
5 | 5.7.30    |
6 +-----------+
7 1 row in set (0.00 sec)
显示所有数据库
 1 mysql> show databases;
 2 +--------------------+
 3 | Database           |
 4 +--------------------+
 5 | information_schema |
 6 | mysql              |
 7 | performance_schema |
 8 | sys                |
 9 +--------------------+
10 4 rows 0.00 sec)
使用某个库:use关键字
1 mysql> use mysql;
2 Database changed
显示所选库中的所有表信息
 show tables;
 2 +---------------------------+
 3 | Tables_in_mysql           |
 4 +---------------------------+
 5 | columns_priv              |
 6 | db                        |
 7 | engine_cost               |
 8 | event                     |
 9 | func                      |
10 | general_log               |
11 | gtid_executed             |
12 | help_category             |
13 | help_keyword              |
14 | help_relation             |
15 | help_topic                |
16 | innodb_index_stats        |
17 | innodb_table_stats        |
18 | ndb_binlog_index          |
19 | plugin                    |
20 | proc                      |
21 | procs_priv                |
22 | proxies_priv              |
23 | server_cost               |
24 | servers                   |
25 | slave_master_info         |
26 | slave_relay_log_info      |
27 | slave_worker_info         |
28 | slow_log                  |
29 | tables_priv               |
30 | time_zone                 |
31 | time_zone_leap_second     |
32 | time_zone_name            |
33 | time_zone_transition      |
34 | time_zone_transition_type |
35 | user                      |
36 +---------------------------+
37 31 rows 0.00 sec)
从其他数据库中查询表
show tables from databasename
 1 mysql> show tables from mysql;
0.00 sec)
输出表的创建语句脚本
用于获取脚本进行表结构迁移之类的
 show create table columns_priv;
 2 +--------------+-------------------------------------------------------------------------------------------------------------------------------------------------------------------------------------------------------------------------------------------------------------------------------------------------------------------------------------------------------------------------------------------------------------------------------------------------------------------------------------------------------------------------------------------------------------------------------------------------------------------------------------------------------------------------------+
 3 | Table        | Create Table                                                                                                                                                                                                                                                                                                                                                                                                                                                                                                                                                                                                                                                                  |
 4 +--------------+-------------------------------------------------------------------------------------------------------------------------------------------------------------------------------------------------------------------------------------------------------------------------------------------------------------------------------------------------------------------------------------------------------------------------------------------------------------------------------------------------------------------------------------------------------------------------------------------------------------------------------------------------------------------------------+
 5 | columns_priv | CREATE TABLE `columns_priv` (
 6   `Host` char(60) COLLATE utf8_bin NOT NULL DEFAULT '', 7   `Db` 64) COLLATE utf8_bin NOT NULL DEFAULT  8   `User` 32) COLLATE utf8_bin NOT NULL DEFAULT  9   `Table_name` 10   `Column_name` 11   `Timestamp` timestamp NOT NULL DEFAULT CURRENT_TIMESTAMP ON UPDATE CURRENT_TIMESTAMP,1)">12   `Column_priv` set('Select',InsertUpdateReferences') CHARACTER SET utf8 NOT NULL DEFAULT 13   PRIMARY KEY (`Host`,`Db`,`User`,`Table_name`,`Column_name`)
14 ) ENGINE=MyISAM DEFAULT CHARSET=utf8 COLLATE=utf8_bin COMMENT=Column privileges' |
15 +--------------+-------------------------------------------------------------------------------------------------------------------------------------------------------------------------------------------------------------------------------------------------------------------------------------------------------------------------------------------------------------------------------------------------------------------------------------------------------------------------------------------------------------------------------------------------------------------------------------------------------------------------------------------------------------------------------+
16 0.00 sec)
查看表结构
以表格的信息输出表的结构,一目了然
 desc columns_priv;
 2 +-------------+----------------------------------------------+------+-----+-------------------+-----------------------------+
 3 | Field       | Type                                         | Null | Key | Default           | Extra                       |
 4 +-------------+----------------------------------------------+------+-----+-------------------+-----------------------------+
 5 | Host        | 60)                                     | NO   | PRI |                   |                             |
 6 | Db          | 64)                                     | NO   | PRI |                   |                             |
 7 | User        | 32)                                     | NO   | PRI |                   |                             |
 8 | Table_name  |  9 | Column_name | 10 | Timestamp   | timestamp                                    | NO   |     | CURRENT_TIMESTAMP | on update CURRENT_TIMESTAMP |
11 | Column_priv | ') | NO   |     |                   |                             |
12 +-------------+----------------------------------------------+------+-----+-------------------+-----------------------------+
13 7 rows 0.00 sec)
查看当前所在库
 database();
2 +------------+
3 | database() |
4 +------------+
5 | mysql      |
6 +------------+
0.00 sec)
查看所有库引擎
 show engines;
 2 +--------------------+---------+----------------------------------------------------------------+--------------+------+------------+
 3 | Engine             | Support | Comment                                                        | Transactions | XA   | Savepoints |
 4 +--------------------+---------+----------------------------------------------------------------+--------------+------+------------+
 5 | InnoDB             | DEFAULT | Supports transactions,row-level locking,and foreign keys     | YES          | YES  | YES        |
 6 | MRG_MYISAM         | YES     | Collection of identical MyISAM tables                          | NO           | NO   | NO         |
 7 | MEMORY             | YES     | Hash based,stored in memory,useful for temporary tables      | NO           | NO   | NO         |
 8 | BLACKHOLE          | YES     | /dev/null storage engine (anything you write to it disappears) | NO           | NO   | NO         |
 9 | MyISAM             | YES     | MyISAM storage engine                                          | NO           | NO   | NO         |
10 | CSV                | YES     | CSV storage engine                                             | NO           | NO   | NO         |
11 | ARCHIVE            | YES     | Archive storage engine                                         | NO           | NO   | NO         |
12 | PERFORMANCE_SCHEMA | YES     | Performance Schema                                             | NO           | NO   | NO         |
13 | FEDERATED          | NO      | Federated MySQL storage engine                                 | NULL         | NULL | NULL       |
14 +--------------------+---------+----------------------------------------------------------------+--------------+------+------------+
15 9 rows 0.00 sec)
创建用户
1 create user user[@host] [identified by 'password'];
方括号中的内容是可以省略的,比如设置默认主机%,这样允许用户从其他主机登录,比如不设置密码,这样默认无需密码登录。
我们创建一个用户并登录试试,红色字体是关键语句:
 1 mysql> create user user1@localhost identified by '123456';
 2 Query OK,1)">0 rows affected (0.00 sec)
 3
 4 D:\Setup\mysql-5.7.30-winx64\bin>mysql -u user1 -p
 5 Enter password: ******
 6 Welcome to the MySQL monitor.  Commands end with ; or \g.
 7 Your MySQL connection id is 16
 8 Server version: 30 MySQL Community Server (GPL)
 9
10 Copyright (c) 2000,1)">2020,Oracle and/or its affiliates. All rights reserved.
11
12 Oracle is a registered trademark of Oracle Corporation and/or its
affiliates. Other names may be trademarks of their respective
14 owners.
15
16 Type help;' or \h' for help. Type \c' to clear the current input statement.
修改用户密码:4种方式
登录MySQL并修改
格式如下: set password for 用户名@主机 = password('新密码');
set password for root@localhost = password(Helenlyn');
使用 mysqladmin 操作
格式如下:mysqladmin -u 用户名 -p 旧密码 password 新密码
1 mysqladmin -u root -p Helenlyn password Helenlyn1
使用脚本语句修改 user 表
打开mysql数据库,直接更新user表的authentication_string字段。这边localhost可以用%代替。
需要注意:flush privileges是刷新权限,必须执行,才能对用户生效;
我们用的是5.7.30版本,所以密码字段是authentication_string,5.7之前的版本一般来说是password。
 use mysql;
2 mysql> update user set authentication_string=password(1234567') where user=user1' and host=localhost';
3 mysql> flush privileges;
直接设置密码
创建用户的时候同时设置密码,或者登录的用户修改自己的密码,这个在前面部署服务和创建用户的时候都有说明过了:
pwd];
2 或
3 set password = password(');
删除用户:2种方式
直接drop
格式如下:drop user 'username'[@'host']
 drop user user1@localhost;
2 Query OK,1)">0.00 sec)
删除完,用户重启就生效了,可以创建个用户试试。
删除user表的用户
同样的,执行完需要执行 flush privileges刷新权限才会对用户生效,格式如下:
delete from user where user='用户名' and host='主机';
flush privileges;
2 Database changed
3
4 mysql> delete from user ;
5 Query OK,1)">6
7 mysql> flush privileges;
8 Query OK,1)">0.00 sec)
给用户授权
创建用户之后,需要给不同的用户分别授权,这样才能根据不同用户的角色来界定职责和管理范畴。
1 grant privilegesCate on database.table to uname'[@host'] [with grant option]
说明:
1、grant 是授权的关键字。
2、privilegesCate 代表劝降类型,包含:all privileges:所有权限;select:读权限;delete:删除权限;update:更新权限;create:创建权限;drop:删除数据库、数据表权限。
3、on 用来表实授权的范围具体到那些库和表,看示例中,格式为数据库.表名 ,点号前面指的是数据库名,后面指的是表名,如果想要授权所有库表,可以用 *.* 表示。
4、to 表示权限授予的具体用户,格式:uname@host,uname即用户名,host指的是主机,可以是IP、域名等,如果不做host限制,我们之前的文章也说过了,使用%表示。
5、with grant option 这个选项表示该用户可以将自己拥有的权限授权给别人。如果不加这一项,用户只有使用权限的权力,而没有使用grant命令创建并给其它用户授权的。
6、权限取并集,如果对用户授权了 select+ update,后面又对用户授予了 select + delete,那么用户同时拥有 select + update + delete的权限。
1 mysql> create user brand identified by 1234560 rows affected
4 mysql> grant all on *.* to brand@%0 rows affected
说明:这边是创建了一个用户并把所有的权限都授予他。如果要做限制,可以把 *.* 改成具体的数据库或者表,也可以吧%改成具体的host。如果要开放授权能力,可以在末尾加上 with grant option ,这样就基本等同于dba的权限了。
查看用户的权限
1 show grants for ']
这边需注意,主机可以省略,默认值为%,测试下:
1 mysql> show grants for brand;
2 +---------------------------------------------------------------------------------------------------------------+
3 | Grants for brand@%                                                                                            |
4 +---------------------------------------------------------------------------------------------------------------+
5 | GRANT ALL PRIVILEGES ON *.* TO brand'@' IDENTIFIED BY PASSWORD *6BB4837EB74329105EE4568DDA7DC67ED2CA2AD96 +---------------------------------------------------------------------------------------------------------------+
set
当前登录者的权限,如:
 show grants
3 +----------------------------------------------------------------------------------------------------------------------------------------+
4 | Grants for root@localhost                                                                                                              |
5 +----------------------------------------------------------------------------------------------------------------------------------------+
6 | GRANT ALL PRIVILEGES ON *.* TO root' WITH GRANT OPTION |
7 | GRANT PROXY ON ''@'' TO ' WITH GRANT OPTION                                                                           |
8 +----------------------------------------------------------------------------------------------------------------------------------------+
9 2 rows set
取消用户的权限
1 revoke privilegesCate on database.table FROM '];
可以先查show grants,再撤销revoke,再查show grants,来理解整个过程,示例:
 1 mysql> show grants  2 +---------------------------------------------------------------------------------------------------------------+
 3 | Grants  4 +---------------------------------------------------------------------------------------------------------------+
 5 | GRANT ALL PRIVILEGES ON *.* TO  6 +---------------------------------------------------------------------------------------------------------------+
 7 set
 8
 9 mysql> revoke delete on *.* 10 Query OK,1)">12 mysql> show grants 13 +--------------------------------------------------------------------------------------------------------------------------------------------------------------------------------------------------------------------------------------------------------------------------------------------------------------------------------------------------------------------------------------------------------------------+
14 | Grants for brand@%                                                                                                                                                                                                                                                                                                                                                                                                 |
15 +--------------------------------------------------------------------------------------------------------------------------------------------------------------------------------------------------------------------------------------------------------------------------------------------------------------------------------------------------------------------------------------------------------------------+
16 | GRANT SELECT,INSERT,UPDATE,CREATE,DROP,RELOAD,SHUTDOWN,PROCESS,FILE,REFERENCES,INDEX,ALTER,SHOW DATABASES,SUPER,CREATE TEMPORARY TABLES,LOCK TABLES,EXECUTE,REPLICATION SLAVE,REPLICATION CLIENT,CREATE VIEW,SHOW VIEW,CREATE ROUTINE,ALTER ROUTINE,CREATE USER,EVENT,TRIGGER,CREATE TABLESPACE ON *.* TO 17 +--------------------------------------------------------------------------------------------------------------------------------------------------------------------------------------------------------------------------------------------------------------------------------------------------------------------------------------------------------------------------------------------------------------------+
18 set
上面我们先查询用户的权限,是all的权限,然后撤销他的delete的权限,再查询,发现它确实少了delete的选项,这个符合我们的预期,说明授权操作没有问题。
关于授权的一些注意点
1、权限最小化原则,有需要再去开通,如果只有查询,就只开通select权限即可
2、读写用户分离,读用户只需给select权限,不要赋予update、insert、delete甚至drop之类的权限
3、尽量设置复杂密码或者让使用者重置密码
4、没有特定情况,一般不需要授予 WITH GRANT OPTION
5、定期清理垃圾用户,回收权限或者删除用户
总结
还有很多常用的命令操作,后续再融入到他章节 一 一 解读。命令是用户进入正式数据库编程之前应知应会的部分,所以需要熟练掌握。
使用过程中需要注意以下细节:
命令的方式操作用户和权限不需要刷新,下一次登录就会自动生效,在mysql库表进行修改的,需要调用flush privileges; 刷新一下,才会在下次登录生效。
文中所说的host部分可以省略,默认值为%,表示所有机器,这个文中反复说过了。
mysql中用户名、密码和权限的信息存储在库名为mysql的user表中,可以打开看看。
 在正式开始之前,我们先来看下 MySQL 服务器的配置和版本号信...
 物理服务机的CPU、内存、存储设备、连接数等资源有限,某个时...
 navicat查看某个表的所有字段的详细信息 navicat设计表只能一...
 文章浏览阅读4.3k次。转载请把头部出处链接和尾部二维码一起...