MHA:
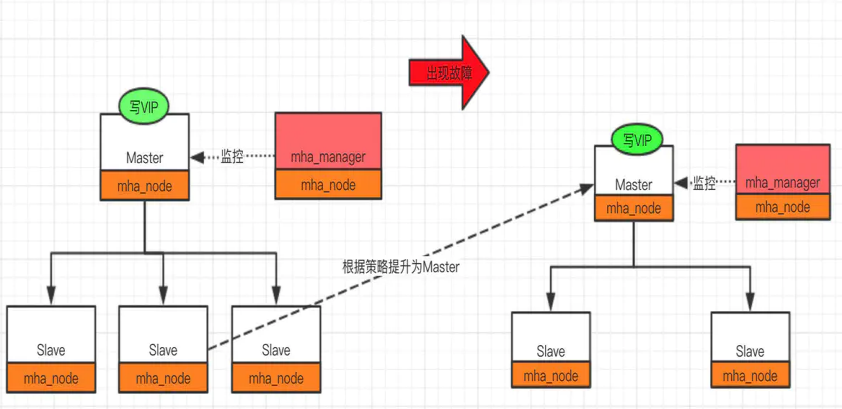
MHA工作原理总结为以下几条:
- 从宕机崩溃的master保存二进制日志事件(binlog events);
- 识别含有最新更新的slave;
- 应用差异的中继日志(relay log)到其他slave;
- 应用从master保存的二进制日志事件(binlog events);
- 提升一个slave为新master;
- 使用其他的slave连接新的master进行复制。
MHA特点:
- 故障切换时间 10-30秒
- 自动监控Master以及故障转移
- 在线切换Master到异机
1.环境介绍
|
服务器角色 |
IP |
节点 |
端口 |
职责 |
|
manager、master |
192.168.163.3 |
mha1 |
3310 |
监控、主master |
|
slave1 |
192.168.163.16 |
mha2 |
3310 |
从slave |
|
slave2 |
192.168.163.20 |
mha3 |
3310 |
从slave |
OS:CentOS7.8
MySQL:Mysql-5.7.23
MHA:mha4mysql-manager-0.58-0.el7.centos.noarch.rpm
mha4mysql-node-0.58-0.el7.centos.noarch.rpm
Keepalived:keepalived-1.3.5-19.el7.x86_64
关闭防火墙
systemctl stop firewalld

systemctl disable firewalld
1.1配置yum源
mha需要很多依赖包,很过国内的网络yum源没有一些依赖,可直接使用下面的yum源,会省去大部分时间
cat > /etc/yum.repos.d/epel.repo << EOF
[epel]
name=Extra Packages for Enterprise Linux 7 - $basearch
failovermethod=priority
enabled=1
gpgcheck=0
mirrorlist=http://mirrors.fedoraproject.org/mirrorlist?repo=epel-7&arch=$basearch
EOF
1.2安装依赖包
三台主机都需要安装依赖包
yum install perl-DBI perl-DBD-MySQL perl-Config-Tiny perl-Log-Dispatch perl-Parallel-ForkManager perl-Time-HiRes perl-Params-Validate perl-DateTime -y

yum install cpan perl-ExtUtils-Embed perl-ExtUtils-CBuilder perl-ExtUtils-MakeMaker -y
1.3安装软件
mha1:
三台主机都选择安装manager,node节点都安装
rpm -ivh mha4mysql-manager-0.58-0.el7.centos.noarch.rpm

rpm -ivh mha4mysql-node-0.58-0.el7.centos.noarch.rpm

mha2:
rpm -ivh mha4mysql-node-0.58-0.el7.centos.noarch.rpm
mha3:
rpm -ivh mha4mysql-node-0.58-0.el7.centos.noarch.rpm
1.4修改主机名和hosts文件
三台主机都修改
[root@mha1 ~]# cat /etc/hosts
127.0.0.1   localhost localhost.localdomain localhost4 localhost4.localdomain4
::1         localhost localhost.localdomain localhost6 localhost6.localdomain6
192.168.163.3 mha1
192.168.163.16 mha2
192.168.163.20 mha3
1.5 ssh 互通环境
mha1:
ssh-keygen
ssh-copy-id -i ~/.ssh/id_rsa.pub root@192.168.163.3
ssh-copy-id -i ~/.ssh/id_rsa.pub root@192.168.163.16
ssh-copy-id -i ~/.ssh/id_rsa.pub root@192.168.163.20
三台主机依次登录测试,直到可以直接登录其他主机
ssh 192.168.163.3
ssh 192.168.16316
ssh 192.168.163.20
2. mysql安装部署
2.1mysql配置文件
注意更改server_id,在同一个集群中,更改为不同的server_id
[root@mha1 ~]# vim /data/3310/my.cnf
[mysqld]
basedir=/application/mysql
datadir=/data/3310/data
socket=/data/3310/mysql.sock
log_error=/data/3310/mysql.log
port=3310
server_id=331003
log_bin=/data/3310/mysql-bin
gtid-mode=on
enforce-gtid-consistency=true
slow_query_log=ON
skip-name-resolve              #  建议加上 非必须项
relay_log_purge = 0            #  关闭自动清理中继日志
log_slave_updates = 1          #  从库通过binlog更新的数据写进从库二进制日志中,必加,否则切换后可能丢失数据
relay-log = relay-log
2.2加入启动服务
[root@mha1 ~]# vim /etc/systemd/system/mysqld3310.service
[Unit]
Description=MySQL Server
Documentation=man:mysqld(8)
Documentation=http://dev.mysql.com/doc/refman/en/using-systemd.html
After=network.target
After=syslog.target

[Install]
WantedBy=multi-user.target
[Service]
User=mysql
Group=mysql
ExecStart=/application/mysql/bin/mysqld --defaults-file=/data/3310/my.cnf
LimitNOFILE = 5000
2.3初始化mysql
/application/mysql/bin/mysqld --initialize-insecure --user=mysql --basedir=/application/mysql --datadir=/data/3310/data
2.4启动mysql
systemctl start mysqld3310
systemctl enable mysqld3310
3.一主两从搭建
3.1 mha1
mysql> create user 'slave'@'192.168.163.%' identified by '123';
mysql> create user  mha@'192.168.163.%' identified by '123';
mysql> grant replication slave on *.* to slave@'192.168.163.%' identified by '123';
mysql> grant all on *.* to   mha@'192.168.163.%';
mysql> flush privileges;
也可以选择用mysqldump的方式来恢复从库,此时是新建的库,并没有数据。
mysqldump -uroot -p123 -S /data/3310/mysql.sock -A --master-data=2 --single-transaction -R -E --triggers >/tmp/full.sql
从库source /tmp/full.sql
查看主库master状态

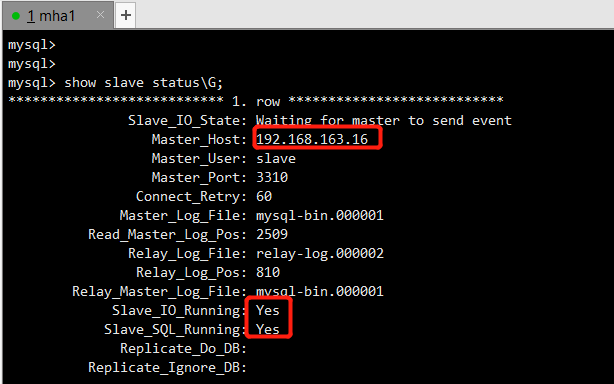
3.2 mha2
mysql> change master to master_host='192.168.163.3',master_user='slave',master_port=3310,master_password='123',master_log_file='master-log.000003',master_log_pos=234;
Last_IO_Error: Got fatal error 1236 from master when reading data from binary log: 'Could not find first log file name in binary log index file'
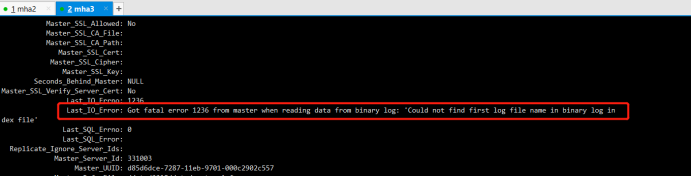
主库添加log-bin-index 参数后,从库报这个错误:Got fatal error 1236 from master when reading data from binary log: 'Could not find first log file name in binary log index file'
mysql> stop slave;
Query OK,0 rows affected (0.00 sec)

mysql> reset slave;
Query OK,0 rows affected (0.01 sec)

mysql> start slave;
Query OK,0 rows affected (0.00 sec)

mysql> show slave status\G;

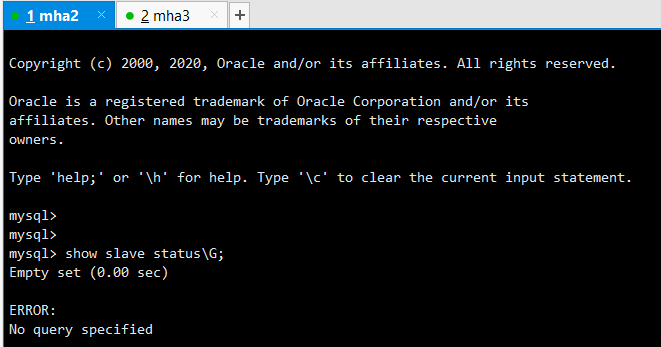
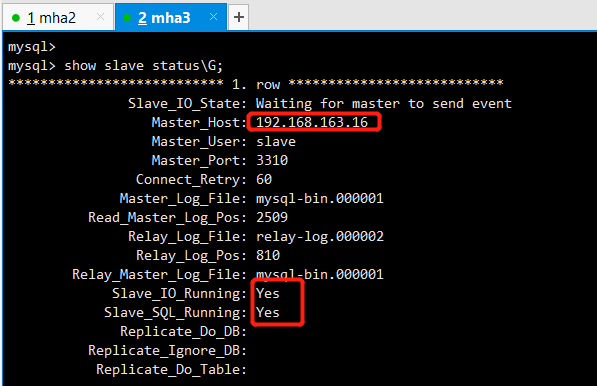
3.3 mha3
mysql> change master to master_host='192.168.163.3',master_log_pos=234;

mysql> stop slave;
Query OK,0 rows affected (0.00 sec)
4.mha搭建
Manager工具
masterha_check_ssh 检查MHA的SSH配置状况
masterha_check_repl 检查MySQL复制状况
masterha_manger 启动MHA
masterha_check_status 检测当前MHA运行状态
masterha_master_monitor 检测master是否宕机
masterha_master_switch 控制故障转移(自动或者手动)
masterha_conf_host 添加或删除配置的server信息
Node工具
save_binary_logs 保存和复制master的二进制日志
apply_diff_relay_logs 识别差异的中继日志事件并应用于其它slave
filter_mysqlbinlog 去除不必要的ROLLBACK事件(MHA已不再使用这个工具)
purge_relay_logs 清除中继日志(不会阻塞SQL线程)
启动mha
nohup masterha_manager --conf=/etc/mha_master/mha.cnf --remove_dead_master --ignore_last_failover < /dev/null > /etc/mha_master/manager.log 2>&1 &
关闭mha
masterha_stop --conf=/etc/mha_master/mha.cnf
集群状态检查
masterha_check_status --conf=/etc/mha_master/mha.cnf
集群连接检查
masterha_check_ssh--conf=/etc/mha_master/mha.cnf
集群复制检查
masterha_check_repl --conf=/etc/mha_master/mha.cnf
集群切换
masterha_master_switch --conf=/etc/mha_master/mha.cnf --master_state=alive --new_master_host=192.168.163.16 --new_master_port=3310 --orig_master_is_new_slave --running_updates_limit=10000
4.1安装软件
见1.3 已安装
4.2配置文件
mha1:
mkdir -p /etc/mha_master/app1
touch /etc/mha_master/manager.log
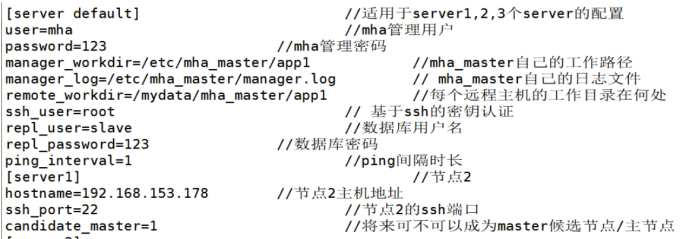
cat > /etc/mha_master/mha.cnf <<EOF
[server default]
manager_log=/etc/mha_master/manager.log
manager_workdir=/etc/mha_master/app1
password=123
ping_interval=1
remote_workdir=/tmp
repl_password=123
repl_user=slave
ssh_user=root
user=mha
[server1]
candidate_master=1
hostname=192.168.163.3
port=3310
ssh_port=22
[server2]
candidate_master=1
hostname=192.168.163.16
port=3310
ssh_port=22
[server3]
candidate_master=1
hostname=192.168.163.20
port=3310
ssh_port=22
EOF
参数详情见网络
4.3集群状态检查
MHA连接检查
[root@mha1 ~]# masterha_check_ssh --conf=/etc/mha_master/mha.cnf

MHA复制检查
[root@mha1 ~]# masterha_check_ssh --conf=/etc/mha_master/mha.cnf
4.4开启集群
[root@mha1 ~]# nohup masterha_manager --conf=/etc/mha_master/mha.cnf --remove_dead_master --ignore_last_failover < /dev/null > /etc/mha_master/manager.log 2>&1 &

集群状态
[root@mha1 ~]# masterha_check_status --conf=/etc/mha_master/mha.cnf

5.手动故障切换
5.1停止mha监控
停止集群
[root@mha1 ~]# masterha_stop --conf=/etc/mha_master/mha.cnf
5.2切换主库为mha2
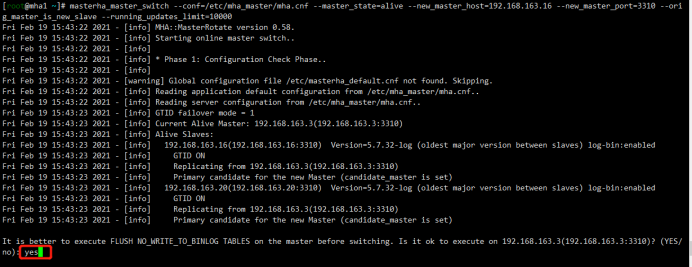
[root@mha1 ~]# masterha_master_switch --conf=/etc/mha_master/mha.cnf --master_state=alive --new_master_host=192.168.163.16 --new_master_port=3310 --orig_master_is_new_slave --running_updates_limit=10000
Sat Feb 20 09:44:43 2021 - [info] MHA::MasterRotate version 0.58.
Sat Feb 20 09:44:43 2021 - [info] Starting online master switch..
Sat Feb 20 09:44:43 2021 - [info]
Sat Feb 20 09:44:43 2021 - [info] * Phase 1: Configuration Check Phase..
Sat Feb 20 09:44:43 2021 - [info]
Sat Feb 20 09:44:43 2021 - [warning] Global configuration file /etc/masterha_default.cnf not found. Skipping.
Sat Feb 20 09:44:43 2021 - [info] Reading application default configuration from /etc/mha_master/mha.cnf..
Sat Feb 20 09:44:43 2021 - [info] Reading server configuration from /etc/mha_master/mha.cnf..
Sat Feb 20 09:44:44 2021 - [info] GTID failover mode = 1
Sat Feb 20 09:44:44 2021 - [info] Current Alive Master: 192.168.163.3(192.168.163.3:3310)
Sat Feb 20 09:44:44 2021 - [info] Alive Slaves:
Sat Feb 20 09:44:44 2021 - [info] 192.168.163.16(192.168.163.16:3310) Version=5.7.32-log (oldest major version between slaves) log-bin:enabled
Sat Feb 20 09:44:44 2021 - [info] GTID ON
Sat Feb 20 09:44:44 2021 - [info] Replicating from 192.168.163.3(192.168.163.3:3310)
Sat Feb 20 09:44:44 2021 - [info] Primary candidate for the new Master (candidate_master is set)
Sat Feb 20 09:44:44 2021 - [info] 192.168.163.20(192.168.163.20:3310) Version=5.7.32-log (oldest major version between slaves) log-bin:enabled
Sat Feb 20 09:44:44 2021 - [info] GTID ON
Sat Feb 20 09:44:44 2021 - [info] Replicating from 192.168.163.3(192.168.163.3:3310)
Sat Feb 20 09:44:44 2021 - [info] Primary candidate for the new Master (candidate_master is set)
It is better to execute FLUSH NO_WRITE_TO_BINLOG TABLES on the master before switching. Is it ok to execute on 192.168.163.3(192.168.163.3:3310)? (YES/no): yes
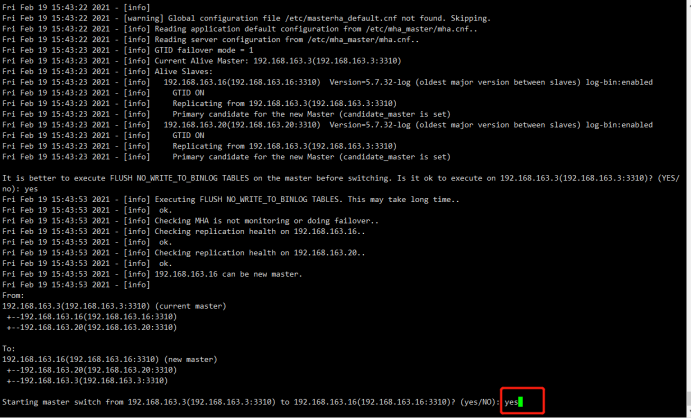
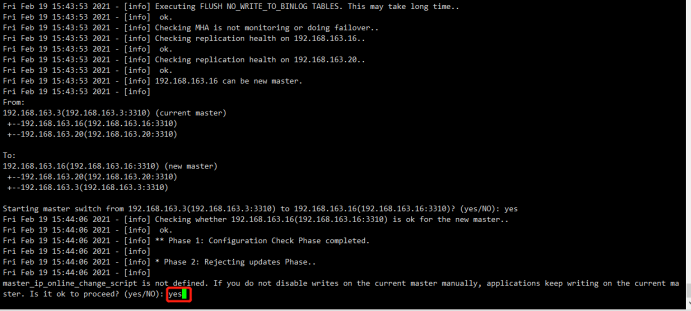
Sat Feb 20 09:44:47 2021 - [info] Executing FLUSH NO_WRITE_TO_BINLOG TABLES. This may take long time..
Sat Feb 20 09:44:47 2021 - [info] ok.
Sat Feb 20 09:44:47 2021 - [info] Checking MHA is not monitoring or doing failover..
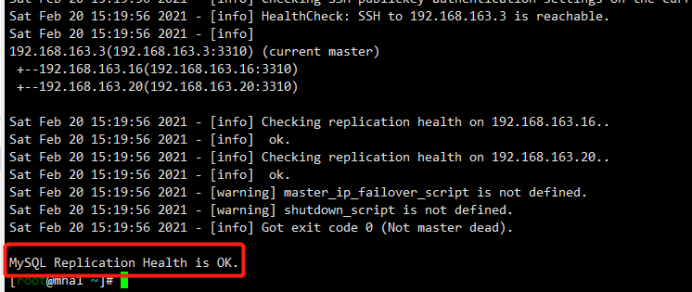
Sat Feb 20 09:44:47 2021 - [info] Checking replication health on 192.168.163.16..
Sat Feb 20 09:44:47 2021 - [info] ok.
Sat Feb 20 09:44:47 2021 - [info] Checking replication health on 192.168.163.20..
Sat Feb 20 09:44:47 2021 - [info] ok.
Sat Feb 20 09:44:47 2021 - [info] 192.168.163.16 can be new master.
Sat Feb 20 09:44:47 2021 - [info]
From:
192.168.163.3(192.168.163.3:3310) (current master)
+--192.168.163.16(192.168.163.16:3310)
+--192.168.163.20(192.168.163.20:3310)
To:
192.168.163.16(192.168.163.16:3310) (new master)
+--192.168.163.20(192.168.163.20:3310)
+--192.168.163.3(192.168.163.3:3310)
Starting master switch from 192.168.163.3(192.168.163.3:3310) to 192.168.163.16(192.168.163.16:3310)? (yes/NO): yes
Sat Feb 20 09:44:49 2021 - [info] Checking whether 192.168.163.16(192.168.163.16:3310) is ok for the new master..
Sat Feb 20 09:44:49 2021 - [info] ok.
Sat Feb 20 09:44:49 2021 - [info] 192.168.163.3(192.168.163.3:3310): SHOW SLAVE STATUS returned empty result. To check replication filtering rules,temporarily executing CHANGE MASTER to a dummy host.
Sat Feb 20 09:44:49 2021 - [info] 192.168.163.3(192.168.163.3:3310): Resetting slave pointing to the dummy host.
Sat Feb 20 09:44:49 2021 - [info] ** Phase 1: Configuration Check Phase completed.
Sat Feb 20 09:44:49 2021 - [info]
Sat Feb 20 09:44:49 2021 - [info] * Phase 2: Rejecting updates Phase..
Sat Feb 20 09:44:49 2021 - [info]
master_ip_online_change_script is not defined. If you do not disable writes on the current master manually,applications keep writing on the current master. Is it ok to proceed? (yes/NO): yes
Sat Feb 20 09:44:50 2021 - [info] Locking all tables on the orig master to reject updates from everybody (including root):
Sat Feb 20 09:44:50 2021 - [info] Executing FLUSH TABLES WITH READ LOCK..
Sat Feb 20 09:44:50 2021 - [info] ok.
Sat Feb 20 09:44:50 2021 - [info] Orig master binlog:pos is mysql-bin.000002:194.
Sat Feb 20 09:44:50 2021 - [info] Waiting to execute all relay logs on 192.168.163.16(192.168.163.16:3310)..
Sat Feb 20 09:44:50 2021 - [info] master_pos_wait(mysql-bin.000002:194) completed on 192.168.163.16(192.168.163.16:3310). Executed 0 events.
Sat Feb 20 09:44:50 2021 - [info] done.
Sat Feb 20 09:44:50 2021 - [info] Getting new master's binlog name and position..
Sat Feb 20 09:44:50 2021 - [info] mysql-bin.000001:2509
Sat Feb 20 09:44:50 2021 - [info] All other slaves should start replication from here. Statement should be: CHANGE MASTER TO MASTER_HOST='192.168.163.16',MASTER_PORT=3310,MASTER_AUTO_POSITION=1,MASTER_USER='slave',MASTER_PASSWORD='xxx';
Sat Feb 20 09:44:50 2021 - [info]
Sat Feb 20 09:44:50 2021 - [info] * Switching slaves in parallel..
Sat Feb 20 09:44:50 2021 - [info]
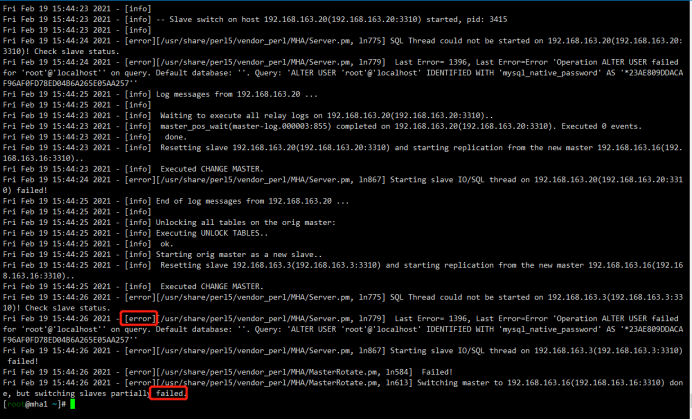
Sat Feb 20 09:44:50 2021 - [info] -- Slave switch on host 192.168.163.20(192.168.163.20:3310) started,pid: 1716
Sat Feb 20 09:44:50 2021 - [info]
Sat Feb 20 09:44:52 2021 - [info] Log messages from 192.168.163.20 ...
Sat Feb 20 09:44:52 2021 - [info]
Sat Feb 20 09:44:50 2021 - [info] Waiting to execute all relay logs on 192.168.163.20(192.168.163.20:3310)..
Sat Feb 20 09:44:50 2021 - [info] master_pos_wait(mysql-bin.000002:194) completed on 192.168.163.20(192.168.163.20:3310). Executed 0 events.
Sat Feb 20 09:44:50 2021 - [info] done.
Sat Feb 20 09:44:50 2021 - [info] Resetting slave 192.168.163.20(192.168.163.20:3310) and starting replication from the new master 192.168.163.16(192.168.163.16:3310)..
Sat Feb 20 09:44:50 2021 - [info] Executed CHANGE MASTER.
Sat Feb 20 09:44:51 2021 - [info] Slave started.
Sat Feb 20 09:44:52 2021 - [info] End of log messages from 192.168.163.20 ...
Sat Feb 20 09:44:52 2021 - [info]
Sat Feb 20 09:44:52 2021 - [info] -- Slave switch on host 192.168.163.20(192.168.163.20:3310) succeeded.
Sat Feb 20 09:44:52 2021 - [info] Unlocking all tables on the orig master:
Sat Feb 20 09:44:52 2021 - [info] Executing UNLOCK TABLES..
Sat Feb 20 09:44:52 2021 - [info] ok.
Sat Feb 20 09:44:52 2021 - [info] Starting orig master as a new slave..
Sat Feb 20 09:44:52 2021 - [info] Resetting slave 192.168.163.3(192.168.163.3:3310) and starting replication from the new master 192.168.163.16(192.168.163.16:3310)..
Sat Feb 20 09:44:52 2021 - [info] Executed CHANGE MASTER.
Sat Feb 20 09:44:53 2021 - [info] Slave started.
Sat Feb 20 09:44:53 2021 - [info] All new slave servers switched successfully.
Sat Feb 20 09:44:53 2021 - [info]
Sat Feb 20 09:44:53 2021 - [info] * Phase 5: New master cleanup phase..
Sat Feb 20 09:44:53 2021 - [info]
Sat Feb 20 09:44:53 2021 - [info] 192.168.163.16: Resetting slave info succeeded.
Sat Feb 20 09:44:53 2021 - [info] Switching master to 192.168.163.16(192.168.163.16:3310) completed successfully.

如果失败:
5.3启动mha
[root@mha1 ~]# nohup masterha_manager --conf=/etc/mha_master/mha.cnf  --remove_dead_master --ignore_last_failover < /dev/null > /etc/mha_master/manager.log 2>&1 &
[1]1733

5.4查看目前集群状态
状态检查已经显示master节点切换到mha2上
[root@mha1 ~]# masterha_check_status --conf=/etc/mha_master/mha.cnf
mha (pid:1733) is running(0:PING_OK),master:192.168.163.16

mha1:原master
mha2:现在的master主库 192.168.163.16
可以看到现在集群软件仍然部署在192.168.163.3上,只不过主节点现在切换到了mha2上

mha3: 192.168.163.20
6.自动故障切换
根据手动切换的方法可以将master从mha2切换为mha1
6.1安装keepalived
[root@mha3 ~ 10:21:01]# yum install keepalived -y
6.2配置文件
[root@mha1 ~]# vim /etc/keepalived/keepalived.conf

! Configuration File for keepalived

global_defs {
   notification_email {
     admin@test.com
   }
   notification_email_from admin@test.com
   smtp_server 127.0.0.1
   smtp_connect_timeout 30
   router_id MYSQL_HA
}
vrrp_script chk_mysql {
    script "killall -0 mysql"         # 监控mysql健康性脚本
    insterval 1
    weight -10
}

vrrp_instance VI_1 {
    state BACKUP
    interface ens33             #根据实际网络接口进行更改
    virtual_router_id 51
    priority 100               #优先级,mha1设置100,mha2设置99,mha3设置98
    advert_int 1
    nopreempt                  #不主动抢占资源,只在master上设置
    authentication {
        auth_type PASS
        auth_pass 1111
    }
    virtual_ipaddress {
        192.168.163.23
    }
    track_script {
    chk_mysql
    }
}
6.3传输配置文件
[root@mha1 ~]# scp /etc/keepalived/keepalived.conf root@192.168.163.16:/etc/keepalived/keepalived.conf
keepalived.conf                                                                                                                                                                 100% 1290   836.2KB/s   00:00
[root@mha1 ~]# scp /etc/keepalived/keepalived.conf root@192.168.163.20:/etc/keepalived/keepalived.conf
keepalived.conf
6.4修改keepalived.conf
mha2:
priority 99 #优先级,mha1设置100,mha2设置99,mha3设置98
mha3:
priority 98 #优先级,mha1设置100,mha2设置99,mha3设置98
6.5启动keepalived
[root@mha1 ~]# systemctl start keepalived
[root@mha1 ~]# systemctl status keepalived
[root@mha1 ~]# systemctl enable keepalived

6.6模拟故障
关闭mha1的主节点
mha1:
[root@mha1 ~]# systemctl stop mysqld3310
[1]+  Done                    nohup masterha_manager --conf=/etc/mha_master/mha.cnf --remove_dead_master --ignore_last_failover < /dev/null > /etc/mha_master/manager.log 2>&1

查看集群状态
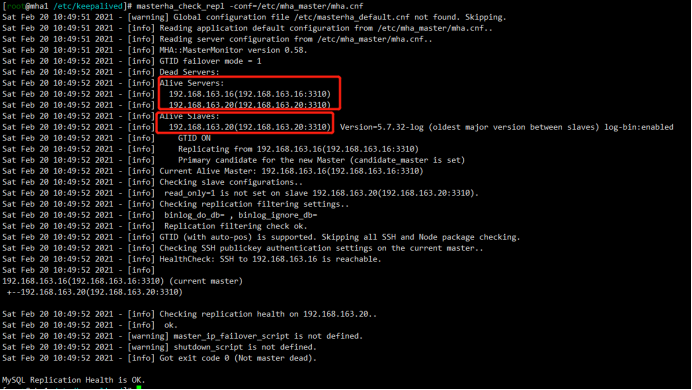
[root@mha1 /etc/keepalived]# masterha_check_repl -conf=/etc/mha_master/mha.cnf
mha2:
mysql> show slave status\G;
Empty set (0.00 sec)

ERROR:
No query specified

mysql> show master status;
+------------------+----------+--------------+------------------+------------------------------------------------------------------------------------+
| File             | Position | Binlog_Do_DB | Binlog_Ignore_DB | Executed_Gtid_Set                                                                  |
+------------------+----------+--------------+------------------+------------------------------------------------------------------------------------+
| mysql-bin.000002 |      234 |              |                  | b883ad36-731c-11eb-8f2b-000c297b5e9b:1-3,d85d6dce-7287-11eb-9701-000c2902c557:1-8 |
+------------------+----------+--------------+------------------+------------------------------------------------------------------------------------+
1 row in set (0.00 sec)

mysql> show processlist;
+----+-------+----------------------+------+------------------+------+---------------------------------------------------------------+------------------+
| Id | User  | Host                 | db   | Command          | Time | State                                                         | Info             |
+----+-------+----------------------+------+------------------+------+---------------------------------------------------------------+------------------+
| 11 | slave | 192.168.163.20:58982 | NULL | Binlog Dump GTID |  598 | Master has sent all binlog to slave; waiting for more updates | NULL             |
| 15 | root  | localhost            | NULL | Query            |    0 | starting                                                      | show processlist |
+----+-------+----------------------+------+------------------+------+---------------------------------------------------------------+------------------+
2 rows in set (0.00 sec)
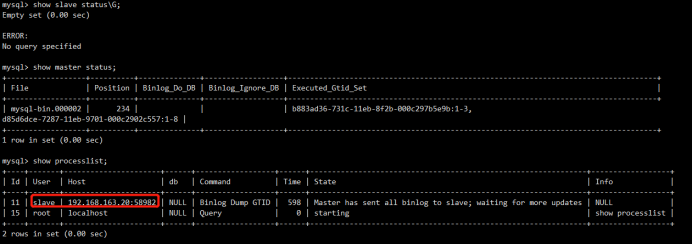
mha3:
mysql> show slave status\G;

6.7恢复故障节点
要先恢复mha1和mha2的主从关系,此时mha2是主库,mha1作为一个备库来恢复
mha2:

mha1:
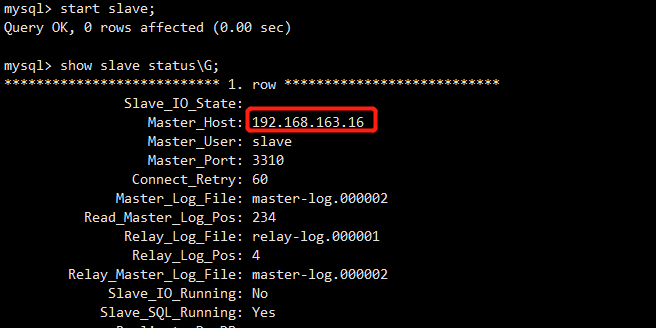
mysql> change master to master_host='192.168.163.16',master_log_file='master-log.000002',master_log_pos=234;
Query OK,0 rows affected,2 warnings (0.01 sec)

mysql> stop slave;
Query OK,0 rows affected (0.01 sec)

mysql> show slave status\G;
检查集群状态,发现活着的节点并没有mha1
[root@mha1 /etc/keepalived]# masterha_check_repl -conf=/etc/mha_master/mha.cnf

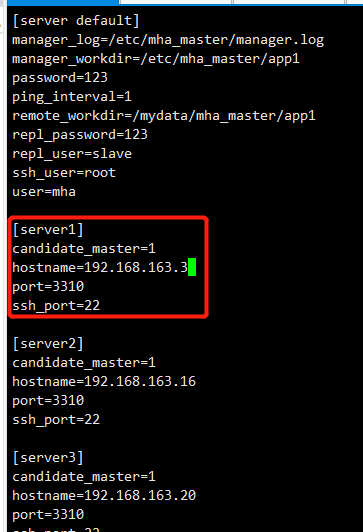
此时需要重新添加mha1进配置文件,mha1已经被集群剔除,需要重新添加。mha1打开的一个过程是需要读取配置文件的,现在mha1已经不在控制文件里,需要手动添加一下
[server1]
candidate_master=1
hostname=192.168.163.3
port=3310
ssh_port=22
重新启动
[root@mha1 /etc/keepalived]# nohup masterha_manager --conf=/etc/mha_master/mha.cnf  --remove_dead_master --ignore_last_failover < /dev/null > /etc/mha_master/manager.log 2>&1 &
[1] 5023
6.8重新检查集群状态
[root@mha1 /etc/keepalived]# masterha_check_status --conf=/etc/mha_master/mha.cnf

 在正式开始之前,我们先来看下 MySQL 服务器的配置和版本号信...
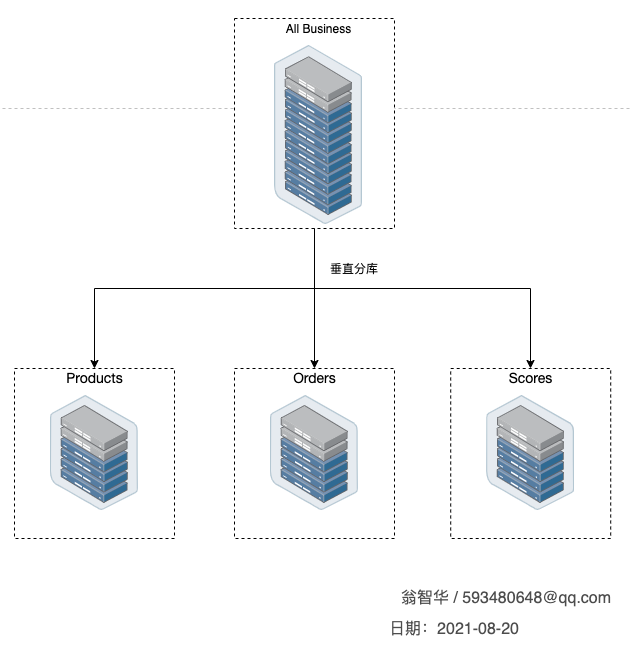 物理服务机的CPU、内存、存储设备、连接数等资源有限,某个时...
 navicat查看某个表的所有字段的详细信息 navicat设计表只能一...
 文章浏览阅读4.3k次。转载请把头部出处链接和尾部二维码一起...