前文我们了解了k8s上的hpa资源的使用,回顾请参考:https://www.cnblogs.com/qiuhom-1874/p/14293237.html;今天我们来聊一下k8s包管理器helm的相关话题;
helm是什么?
如果我们把k8s的资源清单类比成centos上的rpm包,那么helm的作用就如同yum;简单讲helm就是类似yum这样的包管理器,它能够让我们在k8s上部署应用变得简单,我们需要部署某些应用到k8s上,我们直接使用helm就可以完成一键部署;有了helm工具,我们甚至都不需要再写什么资源清单了;对于helm来说,它只是把对应应用需要的资源清单通过模板引擎,将对应资模板源清单赋值以后,发送给k8s进行应用,从而实现把应用部署到k8s上;我们把部署到k8s上的应用称为release;即把模板资源清单通过模板引擎渲染以后,部署到k8s上的就称为一个release;模板文件是从哪里来呢?如同rpm仓库,这里的模板文件也是从仓库来,简单讲helm仓库就是用来存放各种应用的模板清单打包文件,我们把这个打包文件称为chart,即helm仓库也叫chart仓库,主要用来存放各种应用的打包文件;一个打包文件最主要的有chart.yaml,README.md,templates目录,values.yaml;其中chart.yaml文件主要用来对应应用的元数据信息;README.md主要是用来自述该chart怎么使用,部署等等说明;templates目录使用来存放各种资源模板文件;templates目录中有一个比较重要的文件NOTES.txt,该文件也是一个模板文件,主要作用是把对应chart安装成功的信息通过模板引擎渲染以后输出给用户,告诉用户如何使用对应chart;vlues.yaml文件主要用来存放该chart的模板的默认值,用户不指定,其内部模板中的值就是对应values.yaml的值;正是因为chart中存放的都是模板资源清单,使得用户可以自定义value.yaml文件,通过指定自定义value.yaml来实现自定义chart的目的;
helm的工具安装
helm 2的部署稍微有点麻烦,早期helm2是由两个组件组成,第一个是命令行工具helm,第二个是k8s上的tiller Pod;tiller是服务端,主要接受helm发送到chart,然后由tiller联系apiserver进行对应chart的部署;现在helm的版本是3.0+,对于之前helm2的方式,helm3进行了简化,即helm不再依赖tiller这个组件,它可以直接同apiserver进行交互,将对应chart部署到k8s上;使用helm3的前提是对应主机能够正常连接k8s的apiserver,并且对应主机上有kubectl命令,即对应主机必须能使用kubectl命令来管理对应k8s集群;这其中的原因是helm它会使用kubectl工具的认证信息到apiserver进行交互;
一、helm3的安装
下载二进制包
[root@master01 ~]# mkdir helm
[root@master01 ~]# cd helm/
[root@master01 helm]# wget https://get.helm.sh/helm-v3.5.0-linux-amd64.tar.gz
--2021-01-20 21:10:33--  https://get.helm.sh/helm-v3.5.0-linux-amd64.tar.gz
Resolving get.helm.sh (get.helm.sh)... 152.195.19.97,2606:2800:11f:1cb7:261b:1f9c:2074:3c
Connecting to get.helm.sh (get.helm.sh)|152.195.19.97|:443... connected.
HTTP request sent,awaiting response... 200 OK
Length: 12327633 (12M) [application/x-tar]
Saving to: ‘helm-v3.5.0-linux-amd64.tar.gz’

100%[==================================================================================================================================>] 12,327,633  9.17MB/s   in 1.3s

2021-01-20 21:10:35 (9.17 MB/s) - ‘helm-v3.5.0-linux-amd64.tar.gz’ saved [12327633/12327633]
[root@master01 helm]#ls
helm-v3.5.0-linux-amd64.tar.gz
[root@master01 helm]
解压包
[root@master01 helm]# tar xf helm-v3.5.0-linux-amd64.tar.gz
[root@master01 helm]# ls
helm-v3.5.0-linux-amd64.tar.gz  linux-amd64
[root@master01 helm]# cd linux-amd64/
[root@master01 linux-amd64]# ls
helm  LICENSE  README.md
[root@master01 linux-amd64]#
复制helm二进制文件到path环境变量目录下
[root@master01 linux-amd64]# cp helm /usr/bin/
[root@master01 linux-amd64]# hel
helm  help
[root@master01 linux-amd64]# hel
二、helm的使用
查看helm版本
[root@master01 ~]# helm version
version.BuildInfo{Version:"v3.5.0",GitCommit:"32c22239423b3b4ba6706d450bd044baffdcf9e6",GitTreeState:"clean",GoVersion:"go1.15.6"}
[root@master01 ~]#
查看helm帮助
[root@master01 ~]# helm -h
The Kubernetes package manager

Common actions for Helm:

- helm search:    search for charts
- helm pull:      download a chart to your local directory to view
- helm install:   upload the chart to Kubernetes
- helm list:      list releases of charts

Environment variables:

| Name                               | Description                                                                       |
|------------------------------------|-----------------------------------------------------------------------------------|
| $HELM_CACHE_HOME                   | set an alternative location for storing cached files.                             |
| $HELM_CONFIG_HOME                  | set an alternative location for storing Helm configuration.                       |
| $HELM_DATA_HOME                    | set an alternative location for storing Helm data.                                |
| $HELM_DEBUG                        | indicate whether or not Helm is running in Debug mode                             |
| $HELM_DRIVER                       | set the backend storage driver. Values are: configmap,secret,memory,postgres   |
| $HELM_DRIVER_SQL_CONNECTION_STRING | set the connection string the SQL storage driver should use.                      |
| $HELM_MAX_HISTORY                  | set the maximum number of helm release history.                                   |
| $HELM_NAMESPACE                    | set the namespace used for the helm operations.                                   |
| $HELM_NO_PLUGINS                   | disable plugins. Set HELM_NO_PLUGINS=1 to disable plugins.                        |
| $HELM_PLUGINS                      | set the path to the plugins directory                                             |
| $HELM_REGISTRY_CONFIG              | set the path to the registry config file.                                         |
| $HELM_REPOSITORY_CACHE             | set the path to the repository cache directory                                    |
| $HELM_REPOSITORY_CONFIG            | set the path to the repositories file.                                            |
| $KUBECONFIG                        | set an alternative Kubernetes configuration file (default "~/.kube/config")       |
| $HELM_KUBEAPISERVER                | set the Kubernetes API Server Endpoint for authentication                         |
| $HELM_KUBECAFILE                   | set the Kubernetes certificate authority file.                                    |
| $HELM_KUBEASGROUPS                 | set the Groups to use for impersonation using a comma-separated list.             |
| $HELM_KUBEASUSER                   | set the Username to impersonate for the operation.                                |
| $HELM_KUBECONTEXT                  | set the name of the kubeconfig context.                                           |
| $HELM_KUBETOKEN                    | set the Bearer KubeToken used for authentication.                                 |

Helm stores cache,configuration,and data based on the following configuration order:

- If a HELM_*_HOME environment variable is set,it will be used
- Otherwise,on systems supporting the XDG base directory specification,the XDG variables will be used
- When no other location is set a default location will be used based on the operating system

By default,the default directories depend on the Operating System. The defaults are listed below:

| Operating System | Cache Path                | Configuration Path             | Data Path               |
|------------------|---------------------------|--------------------------------|-------------------------|
| Linux            | $HOME/.cache/helm         | $HOME/.config/helm             | $HOME/.local/share/helm |
| macOS            | $HOME/Library/Caches/helm | $HOME/Library/Preferences/helm | $HOME/Library/helm      |
| Windows          | %TEMP%\helm               | %APPDATA%\helm                 | %APPDATA%\helm          |

Usage:
  helm [command]

Available Commands:
  completion  generate autocompletion scripts for the specified shell
  create      create a new chart with the given name
  dependency  manage a chart's dependencies
  env         helm client environment information
  get         download extended information of a named release
  help        Help about any command
  history     fetch release history
  install     install a chart
  lint        examine a chart for possible issues
  list        list releases
  package     package a chart directory into a chart archive
  plugin      install,list,or uninstall Helm plugins
  pull        download a chart from a repository and (optionally) unpack it in local directory
  repo        add,remove,update,and index chart repositories
  rollback    roll back a release to a previous revision
  search      search for a keyword in charts
  show        show information of a chart
  status      display the status of the named release
  template    locally render templates
  test        run tests for a release
  uninstall   uninstall a release
  upgrade     upgrade a release
  verify      verify that a chart at the given path has been signed and is valid
  version     print the client version information

Flags:
      --debug                       enable verbose output
  -h,--help                        help for helm
      --kube-apiserver string       the address and the port for the Kubernetes API server
      --kube-as-group stringArray   group to impersonate for the operation,this flag can be repeated to specify multiple groups.
      --kube-as-user string         username to impersonate for the operation
      --kube-ca-file string         the certificate authority file for the Kubernetes API server connection
      --kube-context string         name of the kubeconfig context to use
      --kube-token string           bearer token used for authentication
      --kubeconfig string           path to the kubeconfig file
  -n,--namespace string            namespace scope for this request
      --registry-config string      path to the registry config file (default "/root/.config/helm/registry.json")
      --repository-cache string     path to the file containing cached repository indexes (default "/root/.cache/helm/repository")
      --repository-config string    path to the file containing repository names and URLs (default "/root/.config/helm/repositories.yaml")

Use "helm [command] --help" for more information about a command.
[root@master01 ~]#
查看仓库列表
[root@master01 ~]# helm repo -h

This command consists of multiple subcommands to interact with chart repositories.

It can be used to add,and index chart repositories.

Usage:
  helm repo [command]

Available Commands:
  add         add a chart repository
  index       generate an index file given a directory containing packaged charts
  list        list chart repositories
  remove      remove one or more chart repositories
  update      update information of available charts locally from chart repositories

Flags:
  -h,--help   help for repo

Global Flags:
      --debug                       enable verbose output
      --kube-apiserver string       the address and the port for the Kubernetes API server
      --kube-as-group stringArray   group to impersonate for the operation,--namespace string            namespace scope for this request
      --registry-config string      path to the registry config file (default "/root/.config/helm/registry.json")
      --repository-cache string     path to the file containing cached repository indexes (default "/root/.cache/helm/repository")
      --repository-config string    path to the file containing repository names and URLs (default "/root/.config/helm/repositories.yaml")

Use "helm repo [command] --help" for more information about a command.
[root@master01 ~]# helm repo list
Error: no repositories to show
[root@master01 ~]#
提示:这里提示我们没有仓库;
添加仓库
[root@master01 ~]# helm repo add stable https://charts.helm.sh/stable
"stable" has been added to your repositories
[root@master01 ~]# helm repo list
NAME    URL
stable  https://charts.helm.sh/stable
[root@master01 ~]#
提示:添加仓库需要连接到对应仓库,如果你的服务器无法正常连接到对应仓库,请使用代理,具体代理方式就是在对应shell终端使用HTTPS_PROXY环境变量赋予一个可以用的代理地址;如HTTPS_PROXY="http://www.ik8s.io:10080",使用代理环境变量的同时需要注意把对应不需要代理的地址给出来,比如本地地址不需要代理可以使用NO_PROXY="127.0.0.0/8,192.168.0.0/24";否则我们使用kubectl它都会代理到我们给定的代理地址上;
搜索chart
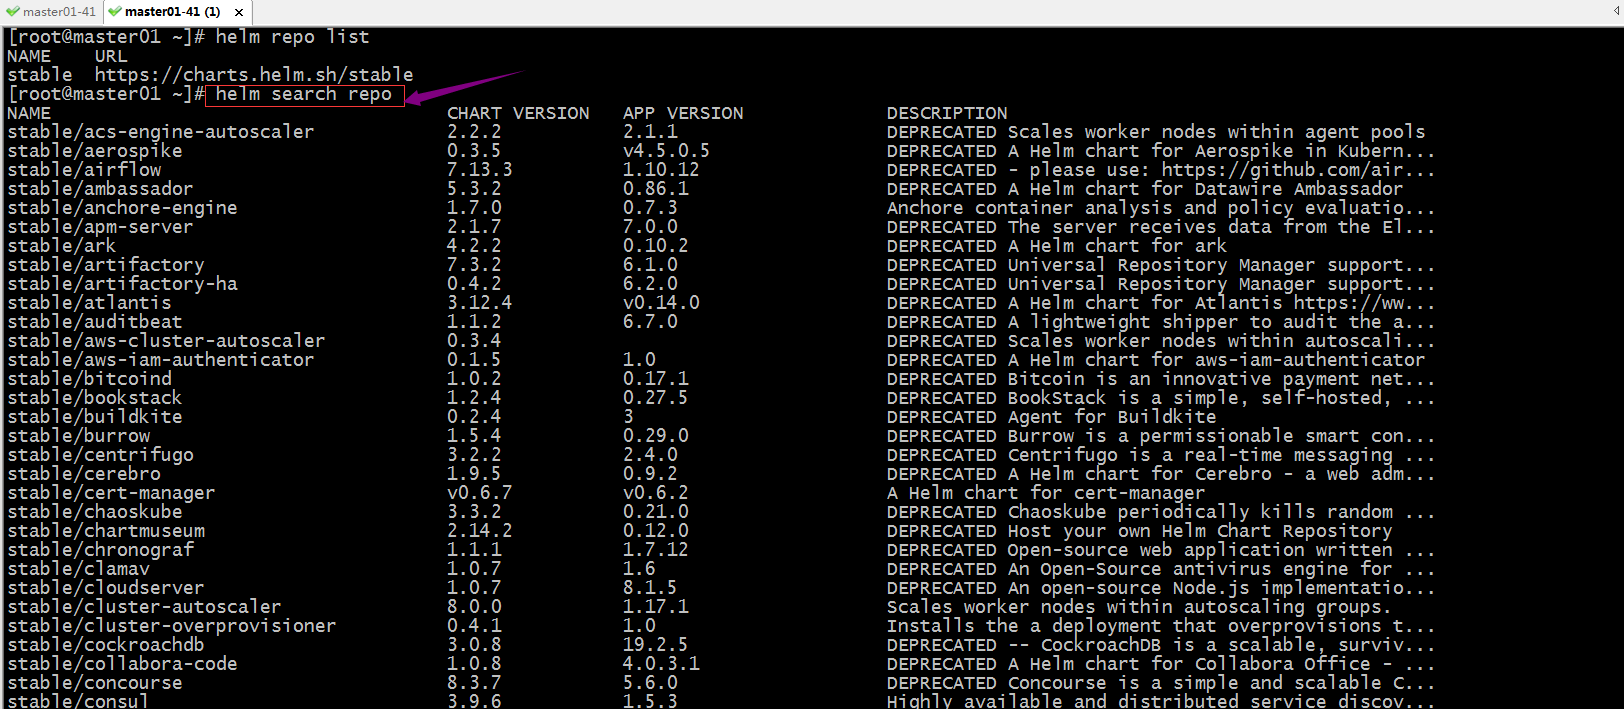
提示:helm search repo表示列出已经添加的仓库中所有chart;
在仓库中搜索redis
[root@master01 ~]# helm search repo redis
NAME                                    CHART VERSION   APP VERSION     DESCRIPTION
stable/prometheus-redis-exporter        3.5.1           1.3.4           DEPRECATED Prometheus exporter for Redis metrics
stable/redis                            10.5.7          5.0.7           DEPRECATED Open source,advanced key-value stor...
stable/redis-ha                         4.4.6           5.0.6           DEPRECATED - Highly available Kubernetes implem...
stable/sensu                            0.2.5           0.28            DEPRECATED Sensu monitoring framework backed by...
[root@master01 ~]#
安装stable/redis
[root@master01 ~]# helm install redis-demo stable/redis
WARNING: This chart is deprecated
NAME: redis-demo
LAST DEPLOYED: Wed Jan 20 22:27:18 2021
NAMESPACE: default
STATUS: deployed
REVISION: 1
TEST SUITE: None
NOTES:
This Helm chart is deprecated

Given the `stable` deprecation timeline (https://github.com/helm/charts#deprecation-timeline),the Bitnami maintained Redis Helm chart is now located at bitnami/charts (https://github.com/bitnami/charts/).

The Bitnami repository is already included in the Hubs and we will continue providing the same cadence of updates,support,etc that we've been keeping here these years. Installation instructions are very similar,just adding the _bitnami_ repo and using it during the installation (`bitnami/<chart>` instead of `stable/<chart>`)

```bash
$ helm repo add bitnami https://charts.bitnami.com/bitnami
$ helm install my-release bitnami/<chart>           # Helm 3
$ helm install --name my-release bitnami/<chart>    # Helm 2
```

To update an exisiting _stable_ deployment with a chart hosted in the bitnami repository you can execute
 ```bash                                                                                                                                                                                                                                                                                                                                                                    $ helm
 repo add bitnami https://charts.bitnami.com/bitnami
  $ helm upgrade my-release bitnami/<chart>
  ```

  Issues and PRs related to the chart itself will be redirected to `bitnami/charts` GitHub repository. In the same way,we'll be happy to answer questions related to this migration process in this issue (https://github.com/helm/charts/issues/20969) created as a common place for discussion.

** Please be patient while the chart is being deployed **
Redis can be accessed via port 6379 on the following DNS names from within your cluster:

redis-demo-master.default.svc.cluster.local for read/write operations
redis-demo-slave.default.svc.cluster.local for read-only operations


To get your password run:

    export REDIS_PASSWORD=$(kubectl get secret --namespace default redis-demo -o jsonpath="{.data.redis-password}" | base64 --decode)

To connect to your Redis server:

1. Run a Redis pod that you can use as a client:

   kubectl run --namespace default redis-demo-client --rm --tty -i --restart='Never' \
    --env REDIS_PASSWORD=$REDIS_PASSWORD \
   --image docker.io/bitnami/redis:5.0.7-debian-10-r32 -- bash

2. Connect using the Redis CLI:
   redis-cli -h redis-demo-master -a $REDIS_PASSWORD
   redis-cli -h redis-demo-slave -a $REDIS_PASSWORD

To connect to your database from outside the cluster execute the following commands:

    kubectl port-forward --namespace default svc/redis-demo-master 6379:6379 &
    redis-cli -h 127.0.0.1 -p 6379 -a $REDIS_PASSWORD
[root@master01 ~]#
查看release
[root@master01 ~]# helm list
NAME            NAMESPACE       REVISION        UPDATED                                 STATUS          CHART           APP VERSION
redis-demo      default         1               2021-01-20 22:27:18.635916075 +0800 CST deployed        redis-10.5.7    5.0.7
[root@master01 ~]#
验证:用kubectl工具查看k8s集群上对应的redis-demo 是否运行?
[root@master01 ~]# kubectl get pods
NAME                       READY   STATUS    RESTARTS   AGE
myapp-779867bcfc-57zw7     1/1     Running   1          2d7h
myapp-779867bcfc-657qr     1/1     Running   1          2d7h
podinfo-56874dc7f8-5rb9q   1/1     Running   1          2d2h
podinfo-56874dc7f8-t6jgn   1/1     Running   1          2d2h
[root@master01 ~]# kubectl get svc
NAME                  TYPE        CLUSTER-IP      EXTERNAL-IP   PORT(S)          AGE
kubernetes            ClusterIP   10.96.0.1       <none>        443/TCP          11d
myapp-svc             NodePort    10.111.14.219   <none>        80:31154/TCP     2d7h
podinfo               NodePort    10.111.10.211   <none>        9898:31198/TCP   2d2h
redis-demo-headless   ClusterIP   None            <none>        6379/TCP         18m
redis-demo-master     ClusterIP   10.100.228.32   <none>        6379/TCP         18m
redis-demo-slave      ClusterIP   10.109.46.121   <none>        6379/TCP         18m
[root@master01 ~]# kubectl get sts
NAME                READY   AGE
redis-demo-master   0/1     18m
redis-demo-slave    0/2     18m
[root@master01 ~]#
提示:用kubectl工具查看pod列表,并没有发现对应pod运行,但是对应的svc和sts都正常创建;
查看pod没有创建的原因
[root@master01 ~]# kubectl describe sts/redis-demo-master|grep -A 10 Events
Events:
  Type     Reason        Age                   From                    Message
  ----     ------        ----                  ----                    -------
  Warning  FailedCreate  14m (x12 over 14m)    statefulset-controller  create Pod redis-demo-master-0 in StatefulSet redis-demo-master failed error: failed to create PVC redis-data-redis-demo-master-0: persistentvolumeclaims "redis-data-redis-demo-master-0" is forbidden: exceeded quota: quota-storage-demo,requested: requests.storage=8Gi,used: requests.storage=0,limited: requests.storage=5Gi
  Warning  FailedCreate  3m40s (x18 over 14m)  statefulset-controller  create Claim redis-data-redis-demo-master-0 for Pod redis-demo-master-0 in StatefulSet redis-demo-master failed error: persistentvolumeclaims "redis-data-redis-demo-master-0" is forbidden: exceeded quota: quota-storage-demo,limited: requests.storage=5Gi
[root@master01 ~]# kubectl describe sts/redis-demo-slave|grep -A 10 Events
Events:
  Type     Reason        Age                   From                    Message
  ----     ------        ----                  ----                    -------
  Warning  FailedCreate  14m (x12 over 14m)    statefulset-controller  create Pod redis-demo-slave-0 in StatefulSet redis-demo-slave failed error: failed to create PVC redis-data-redis-demo-slave-0: persistentvolumeclaims "redis-data-redis-demo-slave-0" is forbidden: exceeded quota: quota-storage-demo,limited: requests.storage=5Gi
  Warning  FailedCreate  3m41s (x18 over 14m)  statefulset-controller  create Claim redis-data-redis-demo-slave-0 for Pod redis-demo-slave-0 in StatefulSet redis-demo-slave failed error: persistentvolumeclaims "redis-data-redis-demo-slave-0" is forbidden: exceeded quota: quota-storage-demo,limited: requests.storage=5Gi
[root@master01 ~]#
提示:这里提示我们没有权限创建,原因是quota-storage-demo禁止了;
查看resourcequota准入控制规则
[root@master01 ~]# kubectl get resourcequota
NAME                 AGE   REQUEST                                                                                   LIMIT
quota-storage-demo   19d   persistentvolumeclaims: 0/5,requests.ephemeral-storage: 0/1Gi,requests.storage: 0/5Gi   limits.ephemeral-storage: 0/2Gi
[root@master01 ~]# kubectl describe resourcequota quota-storage-demo
Name:                       quota-storage-demo
Namespace:                  default
Resource                    Used  Hard
--------                    ----  ----
limits.ephemeral-storage    0     2Gi
persistentvolumeclaims      0     5
requests.ephemeral-storage  0     1Gi
requests.storage            0     5Gi
[root@master01 ~]#
提示:resourcequota准入控制明确限制了创建pvc最低下限总和是5G,上面创建redis需要8G所以不满足对应准入控制规则所以创建pvc就被拒绝了,导致pod没能正常创建;
卸载redis-demo
[root@master01 ~]# helm list
NAME            NAMESPACE       REVISION        UPDATED                                 STATUS          CHART           APP VERSION
redis-demo      default         1               2021-01-20 22:27:18.635916075 +0800 CST deployed        redis-10.5.7    5.0.7
[root@master01 ~]# helm uninstall redis-demo
release "redis-demo" uninstalled
[root@master01 ~]# helm list
NAME    NAMESPACE       REVISION        UPDATED STATUS  CHART   APP VERSION
[root@master01 ~]#
删除resourcequota准入控制
[root@master01 ~]# kubectl get resourcequota
NAME                 AGE   REQUEST                                                                                   LIMIT
quota-storage-demo   19d   persistentvolumeclaims: 0/5,requests.storage: 0/5Gi   limits.ephemeral-storage: 0/2Gi
[root@master01 ~]# kubectl delete resourcequota/quota-storage-demo
resourcequota "quota-storage-demo" deleted
[root@master01 ~]# kubectl get resourcequota
No resources found in default namespace.
[root@master01 ~]#
检查pv,是否有足量的pv?
[root@master01 ~]# kubectl get pv
NAME        CAPACITY   ACCESS MODES   RECLAIM POLICY   STATUS      CLAIM                                      STORAGECLASS   REASON   AGE
nfs-pv-v1   5Gi        RWO,ROX,RWX    Retain           Bound       kube-system/alertmanager                                           3d22h
nfs-pv-v2   5Gi        RWO,RWX    Retain           Bound       kube-system/prometheus-data-prometheus-0                           3d22h
nfs-pv-v3   5Gi        RWO,RWX    Retain           Available                                                                      3d22h
[root@master01 ~]#
提示:上述还有一个pv没有使用,但大小只有5g不够redis使用;
创建pv
[root@master01 ~]# cat pv-demo.yaml
apiVersion: v1
kind: PersistentVolume
metadata:
  name: nfs-pv-v4
spec:
  capacity:
    storage: 10Gi
  volumeMode: Filesystem
  accessModes: ["ReadWriteOnce","ReadWriteMany","ReadOnlyMany"]
  persistentVolumeReclaimPolicy: Retain
  mountOptions:
  - hard
  - nfsvers=4.1
  nfs:
    path: /data/v4
    server: 192.168.0.99
---
apiVersion: v1
kind: PersistentVolume
metadata:
  name: nfs-pv-v5
spec:
  capacity:
    storage: 10Gi
  volumeMode: Filesystem
  accessModes: ["ReadWriteOnce","ReadOnlyMany"]
  persistentVolumeReclaimPolicy: Retain
  mountOptions:
  - hard
  - nfsvers=4.1
  nfs:
    path: /data/v5
    server: 192.168.0.99
---

apiVersion: v1
kind: PersistentVolume
metadata:
  name: nfs-pv-v6
spec:
  capacity:
    storage: 10Gi
  volumeMode: Filesystem
  accessModes: ["ReadWriteOnce","ReadOnlyMany"]
  persistentVolumeReclaimPolicy: Retain
  mountOptions:
  - hard
  - nfsvers=4.1
  nfs:
    path: /data/v6
    server: 192.168.0.99
[root@master01 ~]# kubectl apply -f pv-demo.yaml
persistentvolume/nfs-pv-v4 created
persistentvolume/nfs-pv-v5 created
persistentvolume/nfs-pv-v6 created
[root@master01 ~]# kubectl get pv
NAME        CAPACITY   ACCESS MODES   RECLAIM POLICY   STATUS      CLAIM                                      STORAGECLASS   REASON   AGE
nfs-pv-v1   5Gi        RWO,RWX    Retain           Available                                                                      3d22h
nfs-pv-v4   10Gi       RWO,RWX    Retain           Available                                                                      3s
nfs-pv-v5   10Gi       RWO,RWX    Retain           Available                                                                      3s
nfs-pv-v6   10Gi       RWO,RWX    Retain           Available                                                                      3s
[root@master01 ~]#
重新安装redis
[root@master01 ~]# helm install redis-demo stable/redis
WARNING: This chart is deprecated
NAME: redis-demo
LAST DEPLOYED: Wed Jan 20 22:54:30 2021
NAMESPACE: default
STATUS: deployed
REVISION: 1
TEST SUITE: None
NOTES:
This Helm chart is deprecated

Given the `stable` deprecation timeline (https://github.com/helm/charts#deprecation-timeline),we'll be happy to answer questions related to this migration process in this issue (https://github.com/helm/charts/issues/20969) created as a common place for discussion.

** Please be patient while the chart is being deployed **
Redis can be accessed via port 6379 on the following DNS names from within your cluster:

redis-demo-master.default.svc.cluster.local for read/write operations
redis-demo-slave.default.svc.cluster.local for read-only operations


To get your password run:

    export REDIS_PASSWORD=$(kubectl get secret --namespace default redis-demo -o jsonpath="{.data.redis-password}" | base64 --decode)

To connect to your Redis server:

1. Run a Redis pod that you can use as a client:

   kubectl run --namespace default redis-demo-client --rm --tty -i --restart='Never' \
    --env REDIS_PASSWORD=$REDIS_PASSWORD \
   --image docker.io/bitnami/redis:5.0.7-debian-10-r32 -- bash

2. Connect using the Redis CLI:
   redis-cli -h redis-demo-master -a $REDIS_PASSWORD
   redis-cli -h redis-demo-slave -a $REDIS_PASSWORD

To connect to your database from outside the cluster execute the following commands:

    kubectl port-forward --namespace default svc/redis-demo-master 6379:6379 &
    redis-cli -h 127.0.0.1 -p 6379 -a $REDIS_PASSWORD
[root@master01 ~]#
再次使用kubectl工具查看对应pod是否正常运行?
[root@master01 ~]# kubectl get pods
NAME                       READY   STATUS             RESTARTS   AGE
myapp-779867bcfc-57zw7     1/1     Running            1          2d7h
myapp-779867bcfc-657qr     1/1     Running            1          2d7h
podinfo-56874dc7f8-5rb9q   1/1     Running            1          2d2h
podinfo-56874dc7f8-t6jgn   1/1     Running            1          2d2h
redis-demo-master-0        0/1     CrashLoopBackOff   4          2m33s
redis-demo-slave-0         0/1     CrashLoopBackOff   4          2m33s
[root@master01 ~]# kubectl get pvc
NAME                             STATUS   VOLUME      CAPACITY   ACCESS MODES   STORAGECLASS   AGE
redis-data-redis-demo-master-0   Bound    nfs-pv-v4   10Gi       RWO,RWX                   2m39s
redis-data-redis-demo-slave-0    Bound    nfs-pv-v6   10Gi       RWO,RWX                   2m39s
[root@master01 ~]#
提示:这里pvc自动创建成功,但是对应pod能正常启动;
查看pod详情
[root@master01 ~]# kubectl describe pod/redis-demo-master-0|grep -A 10 Events
Events:
  Type     Reason     Age                    From               Message
  ----     ------     ----                   ----               -------
  Normal   Scheduled  6m53s                  default-scheduler  Successfully assigned default/redis-demo-master-0 to node01.k8s.org
  Normal   Pulling    6m51s                  kubelet            Pulling image "docker.io/bitnami/redis:5.0.7-debian-10-r32"
  Normal   Pulled     6m33s                  kubelet            Successfully pulled image "docker.io/bitnami/redis:5.0.7-debian-10-r32" in 18.056248477s
  Normal   Started    5m47s (x4 over 6m33s)  kubelet            Started container redis-demo
  Normal   Created    5m1s (x5 over 6m33s)   kubelet            Created container redis-demo
  Normal   Pulled     5m1s (x4 over 6m32s)   kubelet            Container image "docker.io/bitnami/redis:5.0.7-debian-10-r32" already present on machine
  Warning  BackOff    100s (x28 over 6m31s)  kubelet            Back-off restarting failed container
[root@master01 ~]# kubectl describe pod/redis-demo-slave-0|grep -A 10 Events
Events:
  Type     Reason            Age                    From               Message
  ----     ------            ----                   ----               -------
  Warning  FailedScheduling  6m58s (x2 over 6m58s)  default-scheduler  0/5 nodes are available: 5 pod has unbound immediate PersistentVolumeClaims.
  Normal   Scheduled         6m55s                  default-scheduler  Successfully assigned default/redis-demo-slave-0 to node01.k8s.org
  Normal   Pulling           6m55s                  kubelet            Pulling image "docker.io/bitnami/redis:5.0.7-debian-10-r32"
  Normal   Pulled            6m37s                  kubelet            Successfully pulled image "docker.io/bitnami/redis:5.0.7-debian-10-r32" in 17.603521415s
  Normal   Created           5m12s (x5 over 6m37s)  kubelet            Created container redis-demo
  Normal   Started           5m12s (x5 over 6m37s)  kubelet            Started container redis-demo
  Normal   Pulled            5m12s (x4 over 6m36s)  kubelet            Container image "docker.io/bitnami/redis:5.0.7-debian-10-r32" already present on machine
  Warning  BackOff           106s (x27 over 6m35s)  kubelet            Back-off restarting failed container
[root@master01 ~]#
提示:这里查看对应pod详细信息也没有明确提示什么错误;总之pod没能正常运行(估计和对应的镜像启动有关系);通过上述实验虽然pod没能正常运行起来,但是helm能够将对应的chart提交给k8s运行;helm的使命是成功的;
卸载redis-demo,重新找chart安装试试

提示:这里搜索stable仓库中的redis,该仓库中redis的chart都是废弃的版本;
删除仓库,重新添加仓库
[root@master01 ~]# helm repo list
NAME    URL
stable  https://charts.helm.sh/stable
[root@master01 ~]# helm repo remove stable
"stable" has been removed from your repositories
[root@master01 ~]# helm repo add bitnami https://charts.bitnami.com/bitnami
"bitnami" has been added to your repositories
[root@master01 ~]# helm repo list
NAME    URL
bitnami https://charts.bitnami.com/bitnami
[root@master01 ~]#
搜索redis chart
[root@master01 ~]# helm search repo redis
NAME                    CHART VERSION   APP VERSION     DESCRIPTION
bitnami/redis           12.6.2          6.0.10          Open source,advanced key-value store. It is of...
bitnami/redis-cluster   4.2.6           6.0.10          Open source,advanced key-value store. It is of...
[root@master01 ~]#
安装bitnami/redis
[root@master01 ~]# helm install redis-demo bitnami/redis
NAME: redis-demo
LAST DEPLOYED: Thu Jan 21 01:58:18 2021
NAMESPACE: default
STATUS: deployed
REVISION: 1
TEST SUITE: None
NOTES:
** Please be patient while the chart is being deployed **
Redis can be accessed via port 6379 on the following DNS names from within your cluster:

redis-demo-master.default.svc.cluster.local for read/write operations
redis-demo-slave.default.svc.cluster.local for read-only operations


To get your password run:

    export REDIS_PASSWORD=$(kubectl get secret --namespace default redis-demo -o jsonpath="{.data.redis-password}" | base64 --decode)

To connect to your Redis(TM) server:

1. Run a Redis(TM) pod that you can use as a client:
   kubectl run --namespace default redis-demo-client --rm --tty -i --restart='Never' \
    --env REDIS_PASSWORD=$REDIS_PASSWORD \
   --image docker.io/bitnami/redis:6.0.10-debian-10-r1 -- bash

2. Connect using the Redis(TM) CLI:
   redis-cli -h redis-demo-master -a $REDIS_PASSWORD
   redis-cli -h redis-demo-slave -a $REDIS_PASSWORD

To connect to your database from outside the cluster execute the following commands:

    kubectl port-forward --namespace default svc/redis-demo-master 6379:6379 &
    redis-cli -h 127.0.0.1 -p 6379 -a $REDIS_PASSWORD
[root@master01 ~]#
查看pod运行情况

提示:这里提示我们append-only file 没有打开的权限,说明我们挂载的对应存储没有写权限;
在后端存储上加上写权限
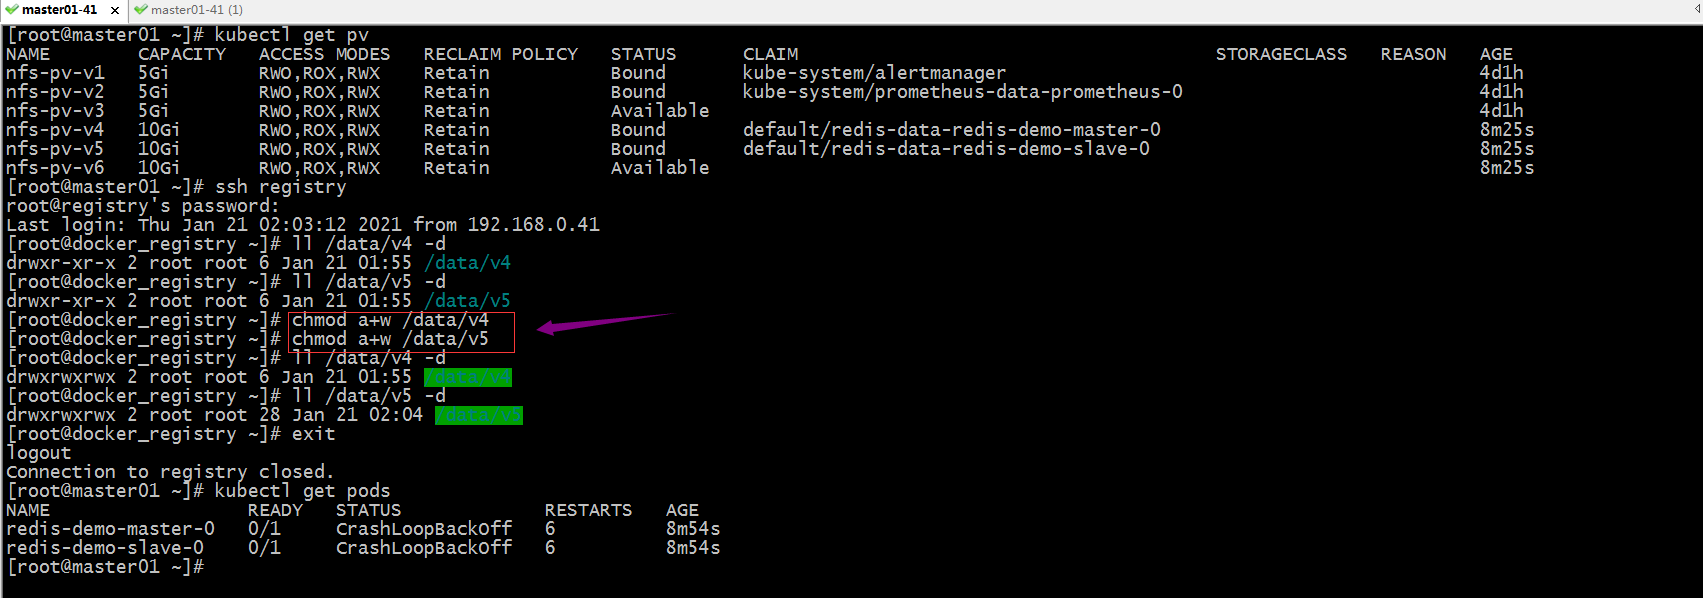
提示:这里加上写的权限对应pod还是没能正常跑起来;删除pod试试,看看对应pod重建以后是否会正常运行?
[root@master01 ~]# kubectl delete pod --all
pod "redis-demo-master-0" deleted
pod "redis-demo-slave-0" deleted
[root@master01 ~]# kubectl get pods
NAME                  READY   STATUS              RESTARTS   AGE
redis-demo-master-0   0/1     ContainerCreating   0          3s
redis-demo-slave-0    0/1     Running             0          3s
[root@master01 ~]# kubectl get pods
NAME                  READY   STATUS    RESTARTS   AGE
redis-demo-master-0   0/1     Running   0          5s
redis-demo-slave-0    0/1     Running   0          5s
[root@master01 ~]# kubectl get pods
NAME                  READY   STATUS             RESTARTS   AGE
redis-demo-master-0   1/1     Running            0          62s
redis-demo-slave-0    1/1     Running            0          62s
redis-demo-slave-1    0/1     CrashLoopBackOff   2          26s
[root@master01 ~]#
提示:这里删除pod以后,新建的pod就能够正常运行;但是还有一个slave运行失败,应该是后端存储没有写权限造成的;
再次给后端存储加写权限

提示:可以看到给对应目录加上写权限,对应pod正常启动了;
进入redis主从复制集群

提示:可以看到在master节点上,能够看到对应两个从节点的信息;
验证:在主节点上写数据,看看对应从节点上是否能够同步数据?

提示:可以看到在master端写数据,slave端能够正常将对应数据同步过来,在slave端能够正常对取到对应数据,说明主从复制集群工作是正常的;
更新仓库
[root@master01 ~]# helm repo update
Hang tight while we grab the latest from your chart repositories...
...Successfully got an update from the "bitnami" chart repository
Update Complete. ⎈Happy Helming!⎈
[root@master01 ~]#
提示:建议每次部署新的应用都先更新下仓库,然后在部署应用;
使用自定义信息部署应用
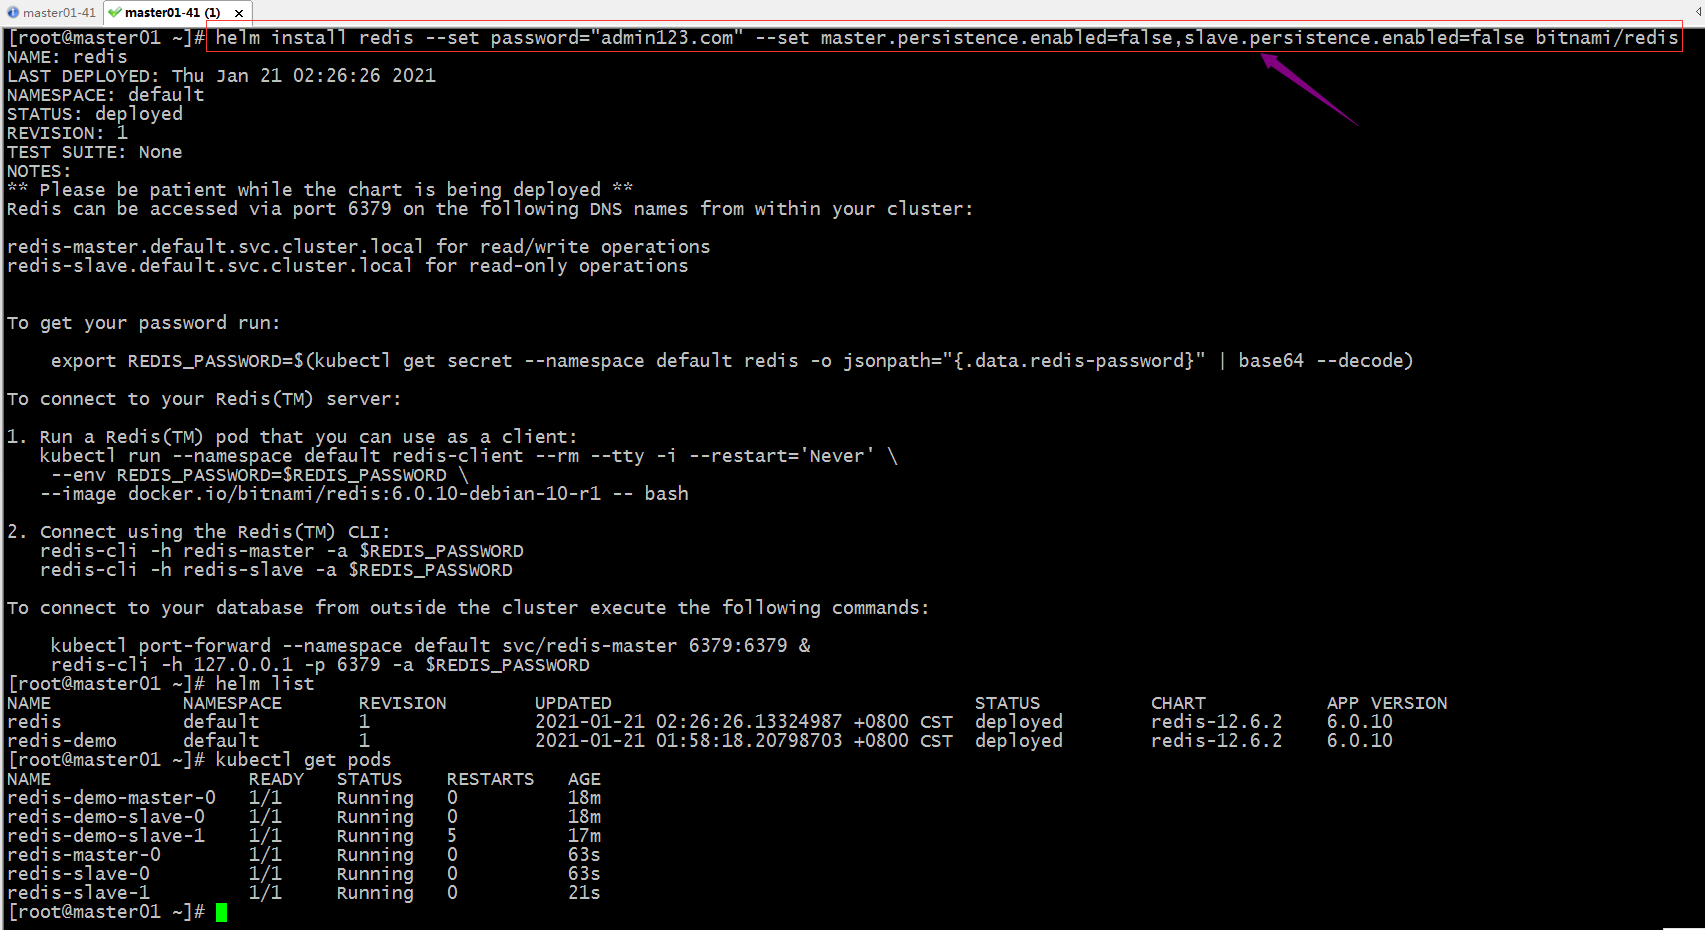
提示:上述命令用--set选项可以将自定义信息传入对应的chart中,用于替换对应模板文件中的值;上述命令表示设置redis密码为admin123.com,master和slave都不开启持久存储功能(生产环境不建议);当然简单的设置个别参数可以使用--set来指定,如果过于复杂的参数,建议使用value.yaml文件来替换,使用--value选项来指定对应的值文件即可;
 文章浏览阅读3.8k次。上篇文章详细介绍了弹性云混部的落地历...
 文章浏览阅读897次。对于cpu来说,这种分配方式并不会有太大...
 文章浏览阅读763次。但是此时如果配置成 NONE, 租户创建成功...