Android Studio 使用JDBC连接mysql数据库
1.下载mysql-connector-java-5.1.7
(有可能不能用,如果不能用就自己在官网下载吧)
链接:https://pan.baidu.com/s/1j5Qh7p3Y346O1ctOjthZMQ
提取码:04w2
复制这段内容后打开百度网盘手机App,操作更方便哦–来自百度网盘超级会员V1的分享
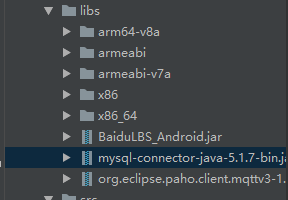
2.将jar包导入到Android Studio
3.创建数据库连接帮助类
//mysql数据库的连接辅助类:生成连接、生成数据库操作对象
public class DbOpenHelper {
    private static  final String driver = "com.mysql.jdbc.Driver";// MySql驱动
    //192.168.43.65为我电脑的ip,这里要用自己电脑的ip,transportation为我电脑的数据库名,也要换。
    private static  final String url = "jdbc:mysql://192.168.43.65:3306/transportation?serverTimezone=UTC&useUnicode=true&characterEncoding=utf8";
    private static  final String user = "root";// 用户名
    private static  final String password = "123456";// 密码

    public static Connection conn;//连接对象
    public  static Statement stmt;//命令集
    public  static PreparedStatement pStmt;//预编译命令集
    public  static ResultSet rs;//结果集


    //取得连接的方法
    public  static void getConnection(){
        try {
           Class.forName(driver);
            try {
                conn = DriverManager.getConnection(url,user,password);
            } catch (SQLException e) {
                e.printStackTrace();
            }
        } catch (ClassNotFoundException e) {
            e.printStackTrace();
        }


    }

    //关闭数据库
    public static  void closeAll(){
        if(rs!=null){
            try {
                rs.close();
            } catch (SQLException e) {
                e.printStackTrace();
            }
            rs = null;
        }
        if(stmt!=null){
            try {
                stmt.close();
            } catch (SQLException e) {
                e.printStackTrace();
            }
            stmt = null;
        }
        if(pStmt!=null){
            try {
                pStmt.close();
            } catch (SQLException e) {
                e.printStackTrace();
            }
            pStmt = null;
        }

        if(conn!=null){
            try {
                conn.close();
            } catch (SQLException e) {
                e.printStackTrace();
            }
            conn = null;
        }

    }

}
其中ip要换成自己电脑的IP,打开cmd,执行ipconfig,IPv4地址为此处的IP,数据库名称也要换,以及登录数据库的用户名、密码也要换成自己的。
PS:这里还要打开cmd登录数据库,对数据库允许访问的IP权限进行设置,具体设置方法:
grant all privileges on *.* to 'root'@'ip'identified by '密码'; #授权某个ip的用户可以通过密码访问数据库
此时Android studio就连接上了mysql数据库了。
 JDBCRequest 使用VariableNamesmysql:数据库连接池对象var...
 1.JDBCDBC(JavaDataBaseConnectivity):Java数据库连接技术...
 1.简介Activiti是一个业务流程管理(BPM)框架,它是覆盖了业务...