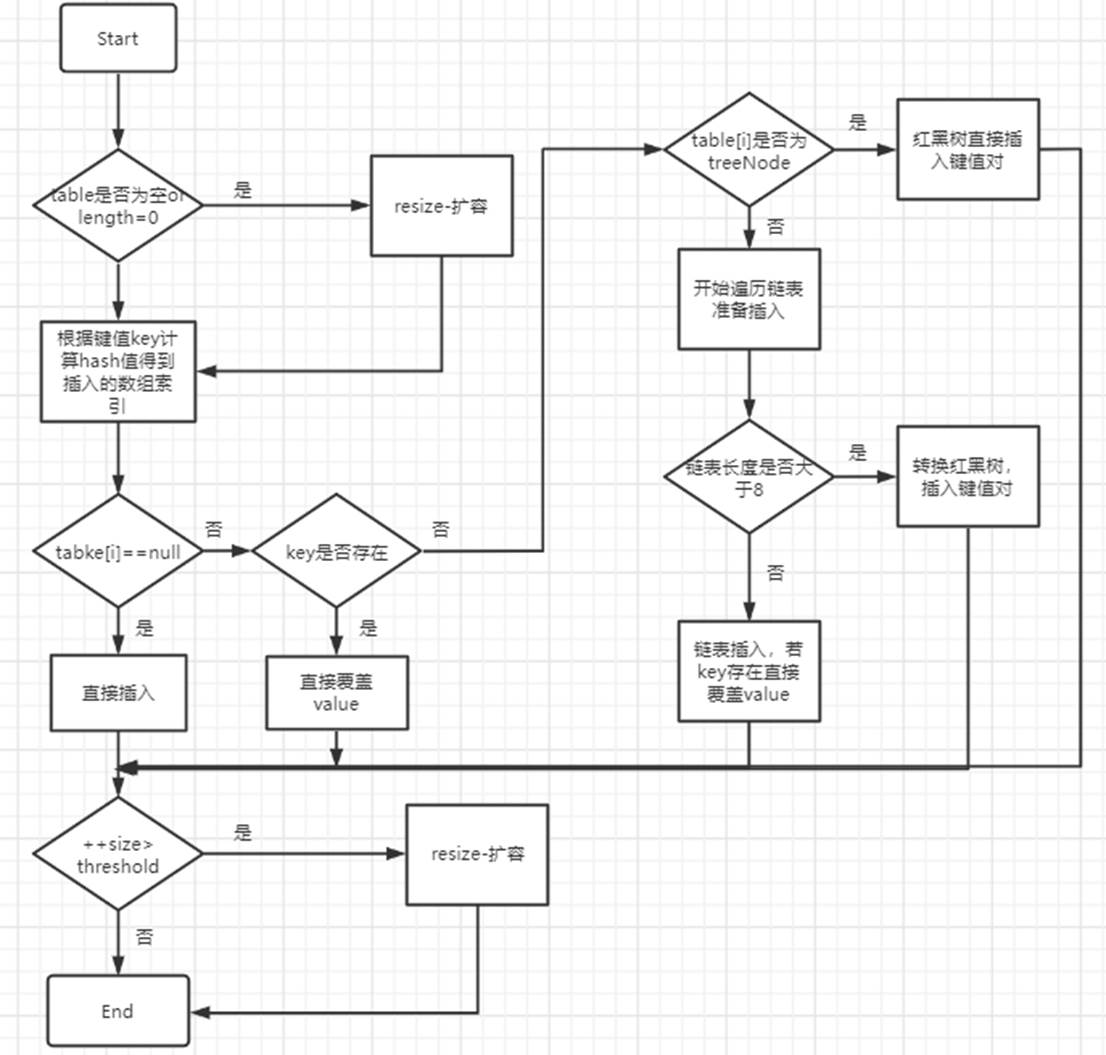
Spring Boot提供的监控接口,例如:/health、/info等等,实际上除了之前提到的信息,还有其他信息业需要监控:当前处于活跃状态的会话数量、当前应用的并发数、延迟以及其他度量信息。下面我们来了解如何使用spring-boot-admin来监控我们的系统。
一、创建spring-boot-admin服务
首先使用Spring Tool Suite(简称STS)创建一个简单的admin工程:
New > Spring Starter Project,按下面步骤填写各项,一步步完成项目创建:


    <dependency>
      <groupId>de.codecentric</groupId>
      <artifactId>spring-boot-admin-server</artifactId>
      <version>1.3.2</version>
    </dependency>
    <dependency>
      <groupId>de.codecentric</groupId>
      <artifactId>spring-boot-admin-server-ui</artifactId>
      <version>1.3.2</version>
    </dependency>

在SpringBootAdminWebApplication上面添加注解“@EnableAdminServer”

server.port=8090
spring.application.name=Spring Boot Admin Web
spring.boot.admin.url=http://localhost:${server.port}
spring.jackson.serialization.indent_output=true
endpoints.health.sensitive=false

运行该应用,然后在浏览器中输入:http://localhost:8090/ 如下图所示表示成功。

二、添加其他项目被监控
我们找到我们需要被监控的一个spring-boot项目
打开pom.xml,添加依赖:
    <dependency>
      <groupId>de.codecentric</groupId>
      <artifactId>spring-boot-admin-starter-client</artifactId>
      <version>1.3.2</version>
    </dependency>
然后在application.properties中添加:
spring.application.name=@project.description@
server.port=8080
spring.boot.admin.url=http://localhost:8090
此时启动要被监控的Spring-Boot项目,然后在浏览器中访问我们上面的admin项目地址 http://localhost:8090/
便可看到如下图所示的结果,表示已被加入管理。点击Detail可以查看其详细信息。