这篇文章主要介绍了Spring Cache和EhCache实现缓存管理方式,具有很好的参考价值,希望对大家有所帮助。如有错误或未考虑完全的地方,望不吝赐教
目录
2、认识 EhCache
3、创建SpringBoot与MyBatis的整合项目
3.1 创建数据表
3.2 创建项目
4、配置EhCache缓存管理器
4.1 创建 ehcache.xml 配置文件
4.2 配置缓存管理器
4.3 开启缓存功能
5、使用EhCache实现缓存管理
5.1 创建实体类(Entity层)
5.2 数据库映射层(Mapper层)
5.3 业务逻辑层(Service层)
5.4 控制器方法(Controller层)
1、认识 Spring Cache
Spring Cache是Spring提供的一整套缓存解决方案。它本身并不提供缓存实现,而是提供统一的接口和代码规范、配置、注解等,以便整合各种Cache方案,使用户不用关心Cache的细节。
Spring支持“透明”地向应用程序添加缓存,将缓存应用于方法,在方法执行前检查缓存中是否有可用的数据。这样可以减少方法执行的次数,同时提高响应的速度。缓存的应用方式“透明”,不会对调用者造成任何干扰。只要通过注解@EnableCaching启用了缓存支持,Spring Boot就会自动处理好缓存的基础配置。
Spring Cache作用在方法上。当调用一个缓存方法时,会把该方法参数和返回结果作为一个“键值对”(key / value)存放在缓存中,下次用同样的参数来调用该方法时将不再执行该方法,而是直接从缓存中获取结果进行返回。所以在使用Spring Cache时,要保证在缓存的方法和方法参数相同时返回相同的结果。
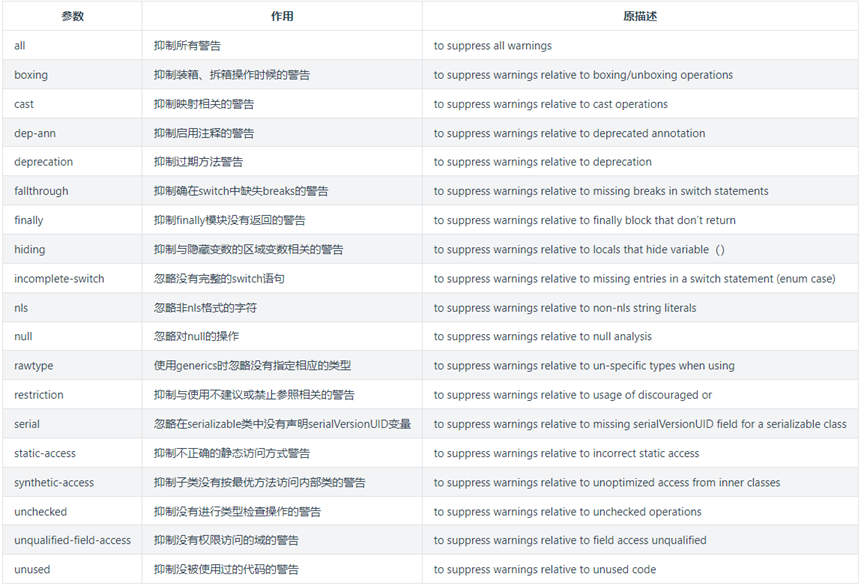
Spring Boot提供的声明式缓存(cache)注解,如下表:
注解
说明
@EnableCaching
开启缓存。
@Cacheable
@CachePut
@Cacheevict
清空缓存。
@Caching
用来组合多个注解标签。
2、认识 EhCache
Spring Boot支持多种不同的缓存产品。在默认情况下使用的是简单缓存,不建议在正式环境中使用。我们可以配置一些更加强大的缓存,比如Ehcache。
Ehcache是一种广泛使用的开源Java分布式缓存,它具有内存和磁盘存储、缓存加载器、缓存扩展、缓存异常处理、GZIP缓存、Servlet 过滤器,以及支持 REST 和 SOAP API 等特点。
3、创建SpringBoot与MyBatis的整合项目
【实例】创建SpringBoot与MyBatis的整合项目,实现用户信息的查询、新增、修改、删除功能。并使用 Spring Cache 和 EhCache 实现缓存管理,执行结果如下图:

3.1 创建数据表
在MysqL数据库中创建用户信息表(tb_user),并添加数据。
-- 判断数据表是否存在,存在则删除 DROP TABLE IF EXISTS tb_user; -- 创建“用户信息”数据表 CREATE TABLE IF NOT EXISTS tb_user ( user_id INT AUTO_INCREMENT PRIMARY KEY COMMENT '用户编号', user_name VARCHAR(50) NOT NULL COMMENT '用户姓名', age INT DEFAULT(0) NOT NULL COMMENT '年龄', blog_url VARCHAR(50) NOT NULL COMMENT '博客地址', blog_remark VARCHAR(50) COMMENT '博客信息' ) COMMENT = '用户信息表'; -- 添加数据 INSERT INTO tb_user(user_name,age,blog_url,blog_remark) VALUES('pan_junbiao的博客',32,'https://blog.csdn.net/pan_junbiao','您好,欢迎访问 pan_junbiao的博客');
3.2 创建项目
(1)创建SpringBoot项目,项目结构如下图:

(2)添加pom.xml配置信息
在pom.xml配置文件中添加MyBatis、 MysqL的JDBC数据库驱动、Spring Boot 缓存支持启动器、Ehcache 缓存等。
org.mybatis.spring.bootmybatis-spring-boot-starter2.1.3MysqLmysql-connector-java8.0.20org.springframework.bootspring-boot-starter-thymeleaforg.springframework.bootspring-boot-starter-cache2.3.2.RELEASEnet.sf.ehcacheehcache
(3)配置相关信息
将默认的application.properties文件的后缀修改为“.yml”,即配置文件名称为:application.yml,并配置以下信息:
#Spring配置 spring: #缓存管理器 cache: type: ehcache ehcache: config: classpath:ehcache.xml #缓存加载配置文件 #使用Thymeleaf模板引擎 thymeleaf: mode: HTML5 encoding: UTF-8 cache: false #使用Thymeleaf模板引擎,关闭缓存 servlet: content-type: text/html #DataSource数据源 datasource: url: jdbc:MysqL://localhost:3306/db_admin?useSSL=false& username: root password: 123456 driver-class-name: com.MysqL.cj.jdbc.Driver #MyBatis配置 mybatis: type-aliases-package: com.pjb.entity #别名定义 configuration: log-impl: org.apache.ibatis.logging.stdout.StdOutImpl #指定 MyBatis 所用日志的具体实现,未指定时将自动查找 map-underscore-to-camel-case: true #开启自动驼峰命名规则(camel case)映射 lazy-loading-enabled: true #开启延时加载开关 aggressive-lazy-loading: false #将积极加载改为消极加载(即按需加载),默认值就是false #lazy-load-trigger-methods: "" #阻挡不相干的操作触发,实现懒加载 cache-enabled: true #打开全局缓存开关(二级环境),默认值就是true
4、配置EhCache缓存管理器
4.1 创建 ehcache.xml 配置文件
在 resources (资源目录)下,创建 ehcache.xml 配置文件,配置信息如下:
配置属性说明:
说明
这个是磁盘存储路径,当内存缓存满了的时候,就会往这里面放,java.io.tmdir是操作系统缓存的临时目录,不同操作系统缓存目录不一样。
maxElementsInMemory
内存缓存中最多可以存放的元素数量,若放入Cache中的元素超过这个数值,则有以下两种情况: (1)若 overflowTodisk=true,则会将Cache中多出的元素放入磁盘文件中。 (2)若 overflowTodisk=false,则根据memoryStoreevictionPolicy策略替换Cache中原有的元素。
overflowTodisk
内存不足时,是否启用磁盘缓存。
eternal
缓存中对象是否永久有效。
timetoIdleSeconds
缓存数据在失效前的允许闲置时间(单位:秒),仅当 eternal=false 时使用,默认值是0表示可闲置时间无穷大,若超过这个时间没有访问此Cache中的某个元素,那么此元素将被从Cache中清除。
timetoLiveSeconds
缓存数据的总的存活时间(单位:秒),仅当 eternal=false 时使用,从创建开始计时,失效结束。
maxElementsOndisk
磁盘缓存中最多可以存放的元素数量,0表示无穷大。
diskExpiryThreadIntervalSeconds
磁盘缓存的清理线程运行间隔,默认是120秒。
memoryStoreevictionPolicy
内存存储与释放策略,即达到 maxElementsInMemory 限制时,Ehcache会根据指定策略清理内存,共有三种策略,分别为LRU(最近最少使用)、LFU(最常用的)、FIFO(先进先出)。
defaultCache
默认缓存方式。
cache
自定义的缓存方式,自行设置 name。
4.2 配置缓存管理器
在 application.yml 配置文件中配置目标缓存管理器,支持 Ehcache、Generic、Redis、jcache等。这里配置使用Ehcache。
#Spring配置 spring: #缓存管理器 cache: type: ehcache ehcache: config: classpath:ehcache.xml #缓存加载配置文件
4.3 开启缓存功能
在SpringBoot项目启动入口类中添加注解@EnableCaching,开启缓存功能。
import org.springframework.boot.SpringApplication; import org.springframework.boot.autoconfigure.SpringBootApplication; import org.springframework.cache.annotation.EnableCaching; @SpringBootApplication @EnableCaching public class SpringcacheDemoApplication { public static void main(String[] args) { SpringApplication.run(SpringcacheDemoApplication.class, args); } }
5、使用EhCache实现缓存管理
5.1 创建实体类(Entity层)
在com.pjb.entity包中,创建UserInfo类(用户信息实体类)。
package com.pjb.entity; import java.io.Serializable; /** * 用户信息实体类 * @author pan_junbiao **/ public class UserInfo implements Serializable { private int userId; //用户编号 private String userName; //用户姓名 private int age; //年龄 private String blogUrl; //博客地址 private String blogRemark; //博客信息 //省略getter与setter方法... }
注意:实体类必须实现 Serializable 接口,否则无法实现缓存功能。
5.2 数据库映射层(Mapper层)
在com.pjb.mapper包中,创建UserMapper接口(用户信息Mapper动态代理接口)。
package com.pjb.mapper; import com.pjb.entity.UserInfo; import org.apache.ibatis.annotations.*; import org.springframework.stereotype.Repository; /** * 用户信息Mapper动态代理接口 * @author pan_junbiao **/ @Mapper @Repository public interface UserMapper { /** * 根据用户ID,获取用户信息 */ @Select("SELECT * FROM tb_user WHERE user_id = #{userId}") public UserInfo getUserById(int userId); /** * 新增用户,并获取自增主键 */ @Insert("INSERT INTO tb_user(user_name,age,blog_url,blog_remark) VALUES(#{userName},#{age},#{blogUrl},#{blogRemark});") @Options(useGeneratedKeys = true, keyColumn = "user_id", keyProperty = "userId") public int insertUser(UserInfo userInfo); /** * 修改用户 */ @Update("UPDATE tb_user SET user_name = #{userName} ,age = #{age} ,blog_url = #{blogUrl} ,blog_remark = #{blogRemark} WHERE user_id = #{userId}") public int updateUser(UserInfo userInfo); /** * 删除用户 */ @Delete("DELETE FROM tb_user WHERE user_id = #{userId}") public int deleteUser(int userId); }
5.3 业务逻辑层(Service层)
在com.pjb.service包下,创建UserService接口(用户信息业务逻辑接口)。
package com.pjb.service; import com.pjb.entity.UserInfo; /** * 用户信息业务逻辑接口 * @author pan_junbiao **/ public interface UserService { /** * 根据用户ID,获取用户信息 */ public UserInfo getUserById(int userId); /** * 新增用户,并获取自增主键 */ public UserInfo insertUser(UserInfo userInfo); /** * 修改用户 */ public UserInfo updateUser(UserInfo userInfo); /** * 删除用户 */ public int deleteUser(int userId); }
在com.pjb.service.impl包下,创建UserServiceImpl类(用户信息业务逻辑类)。
package com.pjb.service.impl; import com.pjb.entity.UserInfo; import com.pjb.mapper.UserMapper; import com.pjb.service.UserService; import org.springframework.beans.factory.annotation.Autowired; import org.springframework.cache.annotation.CacheConfig; import org.springframework.cache.annotation.Cacheevict; import org.springframework.cache.annotation.CachePut; import org.springframework.cache.annotation.Cacheable; import org.springframework.stereotype.Service; /** * 用户信息业务逻辑类 * @author pan_junbiao **/ //注意:必须对应配置文件ehcache.xml中cache节点的name属性值 //@CacheConfig(cacheNames = "userCache") @Service public class UserServiceImpl implements UserService { @Autowired private UserMapper userMapper; //注意:必须对应配置文件ehcache.xml中cache节点的name属性值 private static final String CACHE_NAME = "userCache"; /** * 根据用户ID,获取用户信息 */ @Override @Cacheable(value = CACHE_NAME, key = "#userId") public UserInfo getUserById(int userId) { return userMapper.getUserById(userId); } /** * 新增用户,并获取自增主键 */ @Override @CachePut(value = CACHE_NAME, key = "#userInfo.userId") public UserInfo insertUser(UserInfo userInfo) { userMapper.insertUser(userInfo); return userInfo; } /** * 修改用户 */ @Override @CachePut(value = CACHE_NAME, key = "#userInfo.userId") public UserInfo updateUser(UserInfo userInfo) { userMapper.updateUser(userInfo); return userInfo; } /** * 删除用户 */ @Override @Cacheevict(value = CACHE_NAME, key = "#userId") public int deleteUser(int userId) { return userMapper.deleteUser(userId); } }
从上述代码可以看出,查询用户的方法使用了 @Cacheable 注解来开启缓存。添加和修改方法使用了 @CachePut 注解,它是先处理方法,然后把结果进行缓存的。要想删除数据,则需要使用 @Cacheevict 注解来清空缓存。
@CacheConfig注解:如果所有的 @Cacheable() 里面都有一个 value=“xxx” 的属性,这显然如果方法多了,写起来也是挺累的,如果可以一次性声明完 那就省事了,所以有了 @CacheConfig 这个配置,@CacheConfig is a class-level annotation that allows to share the cache names,如果你在方法写别的名字,那么依然以方法的名字为准。
5.4 控制器方法(Controller层)
在com.pjb.controller包中,创建UserController类(用户控制器),实现用户数据的查询、新增、修改、删除,并实现数据的返回。
package com.pjb.controller; import com.pjb.entity.UserInfo; import com.pjb.service.UserService; import org.springframework.beans.factory.annotation.Autowired; import org.springframework.stereotype.Controller; import org.springframework.web.bind.annotation.RequestMapping; import org.springframework.web.bind.annotation.ResponseBody; import org.springframework.web.servlet.ModelAndView; /** * 用户信息控制器 * @author pan_junbiao **/ @Controller @RequestMapping("/user") public class UserController { @Autowired private UserService userService; /** * 获取用户信息 */ @RequestMapping("getUserById") public ModelAndView getUserById(int userId) { //根据用户ID,获取用户信息 UserInfo userInfo = userService.getUserById(userId); if(userInfo==null) { userInfo = new UserInfo(); } //返回结果 ModelAndView modelAndView = new ModelAndView(); modelAndView.addobject("userInfo",userInfo); modelAndView.setViewName("/user-info.html"); return modelAndView; } /** * 新增用户 */ @ResponseBody @RequestMapping("insertUser") public boolean insertUser() { //创建新用户 UserInfo userInfo = new UserInfo(); userInfo.setUserName("pan_junbiao的博客"); userInfo.setAge(32); userInfo.setBlogUrl("https://blog.csdn.net/pan_junbiao"); userInfo.setBlogRemark("您好,欢迎访问 pan_junbiao的博客"); //执行新增方法 userService.insertUser(userInfo); //返回结果 return userInfo.getUserId() > 0 ? true : false; } /** * 修改用户 */ @ResponseBody @RequestMapping("updateUser") public boolean updateUser(int userId) { UserInfo userInfo = new UserInfo(); userInfo.setUserId(userId); userInfo.setUserName("pan_junbiao的博客_02"); userInfo.setAge(35); userInfo.setBlogUrl("https://blog.csdn.net/pan_junbiao"); userInfo.setBlogRemark("您好,欢迎访问 pan_junbiao的博客"); //执行修改方法 userService.updateUser(userInfo); //返回结果 return true; } /** * 删除用户 */ @ResponseBody @RequestMapping("deleteUser") public boolean deleteUser(int userId) { //执行新增方法 int result = userService.deleteUser(userId); //返回结果 return result > 0 ? true : false; } }
5.5 显示页面(View层)
在 resources/templates 目录下,创建 user-info.html 用户信息显示页面。
用户信息
用户信息
用户ID:
用户名称:
年龄:
博客地址:
备注信息:
至此,项目已经编写完成,执行结果如下图:
接着运行项目的其他方法,然后多次访问查询方法的URL,体验缓存效果。主要观察数据库是否进行了操作,如果数据库没有操作数据而正常返回数据,则代表缓存成功。