问题描述
第一次尝试解决方案,所以我再次发布更多信息。预先感谢您的反馈。
目前,我正在建立的网站上将2张背景图像设置为2个不同的div,但它们需要在所有设备上完美对齐。
目前,背景图像以1920像素宽和较小的像素排列,但是一旦您开始放大,图像就会开始偏移。
请有人帮忙吗?
请查看图像here,该图像应类似于
.productTopSection {
  background: url("http://mcauliffe.testcre8.co.uk/assets/images/home/mcauliffe-brownfield-experts-homepage-about-image.jpg") no-repeat center;
  min-height: 895px;
  background-size: auto 100%,cover;
}

.mc-key-points {
  background: url("http://mcauliffe.testcre8.co.uk/assets/images/home/mcauliffe-brownfield-experts-homepage-key-points-image.jpg") no-repeat center;
  min-height: 895px;
  background-size: auto 100%,cover;
}

@media only screen and (min-width: 1921px) {
  .productTopSection {
    background: url("http://mcauliffe.testcre8.co.uk/assets/images/home/mcauliffe-brownfield-experts-homepage-about-image.jpg") no-repeat center center;
    min-height: 895px;
    background-size: cover;
  }

  .mc-key-points {
    background: url("http://mcauliffe.testcre8.co.uk/assets/images/home/mcauliffe-brownfield-experts-homepage-key-points-image.jpg") no-repeat center center;
    min-height: 895px;
    background-size: cover;
  }
}

@media only screen and (max-width: 1200px) {
  .productTopSection {
    background: url("http://mcauliffe.testcre8.co.uk/assets/images/home/mcauliffe-brownfield-experts-homepage-about-image-mobile.jpg") no-repeat center center;
    background-size: cover;
  }

  .mc-key-points {
    background: none;
  }
}
<div class="productTopSection g-py-200">
<!-- Content Goes Here -->
</div>
<div class="mc-key-points g-py-200">
<!-- Content Goes Here -->
</div>解决方法
@media only screen and (max-width: 767px)
.productTopSection {
    background-size: cover;
    height: 200px;
    min-height: auto;
}
因为没有内容,我认为以上是方法。如果我错了,请纠正我
,您的示例不起作用,没关系,我会尽力了解您
- 首先他吹小号以了解其工作原理

蓝框是您在全屏模式下的div(整个页面一个元素) 由于div没有高度,因此您可以为它指定最小高度或固定高度(height属性),只有在有背景的情况下它才能起作用,直到您在div中放了东西
在此阶段,您需要了解指定的高度不会影响图像本身的高度,也就是说,最小高度不会改变,除非您在其中放置了很多文本(这只是一个例如,您可以将任何想要的高度都放在上面)
- 在图像中,我演示了背景尺寸属性,该属性具有 100%自动值。 从documentation中我们看到我们设置了100%的宽度并将高度保留为自动,默认情况下,bakcground图像的位置相同(背景强度:0%0%)
如果您都这样写:
background-size: 100% auto;
background-position: 0 0; // this is not required as this is the default,I am just using this as an example
我们将获得如上图所示的结果,其中图片将在宽度上相对于屏幕进行拉伸
现在,我们减小屏幕的宽度(div自动开始更改宽度并获取屏幕的宽度)

我们看到了什么?下面有一个空白空间!您可以将高度自动设置为100%,宽度自动设置
background-size: auto 100%;
是的,在这种情况下,您不应使用多种背景图片语法
background-size: auto 100%,cover; // you have one background image
这是您无效的结果:

注意,我可以看到您正在使用中心定位,所以您有两个孔!用我的祝贺你!
您应该怎么做?您必须使用图片(html img 标签)而不是背景
示例:
<img aria-hidden="true" class="bg-fix" src="https://i.picsum.photos/id/767/1200/800.jpg?hmac=lGBpi_Bt_UPPi17TX-TUBQitEe14QlbeSJ-GYhwZBvw" alt="">
<style>
    img {
        display: block; // Remove inline native space
        width: 100%;
    }
</style>
或使用媒体控制div的高度(使用vh代替像素或CSS媒体查询)
<style>
    div {
        /*.....*/
        -webkit-background-size: 100% auto;
        background-size: 100% auto;
        min-height: 60vh;
    }

    /* OR */

    div {
        /*....*/
        min-height: 875px;
    }
    @media screen and (max-width: 1024px) {
        div {
            min-height: 500px;
        }
    }
</style>
虽然我不清楚您是否打算在移动设备上裁剪图像的一面,但我认为这至少可以有所帮助-对于这样的事情,我认为您可以使用<img>来简化操作标记为HTML,而不是CSS中的background-image。
问题是要使高度与宽度成比例地缩放,以使图像保持其纵横比。代码中发生的事情是,min-height的有效高度已有效设置为895px,除非您向div添加足够的内容,否则高度不会升高。
因此,从移动屏幕开始,您的高度仍然是895px,并且图像的侧面将被越来越少地裁剪,直到宽度达到1920px(图像宽度)为止。一旦您查看了该图像,图像将开始拉宽以覆盖,并且顶部/底部将开始被裁剪。在图像居中时进行顶部/底部裁剪是导致图像边缘未对齐的原因。因为您现在正在排队,所以当您计划将0%对齐时,顶部的图像要向上倾斜20%,底部的图像要向下倾斜20%。
那么<img>标签如何使这更容易?
它为容器增加了内容的宽度/高度,并允许容器扩展以适合内容,或强制内容收缩以适合其中。如果您只是将img放入div中,则会看到它将div扩展到img的尺寸。
但是,如果在容器和img上都将宽度设置为100%,它将填充容器的宽度。关键是高度将按比例设置以保持长宽比,并且div的高度将扩展以适合所需的img高度,并且您将不会进行任何顶部/底部裁剪,因此边缘会对齐。
然后,您只需要在img上放置一个绝对定位的容器,即可将文本内容放置在所需的位置。
如果您试图在小屏幕上裁剪图像大小(我认为看起来会更好)。我建议您在那里使用媒体查询只是为了设置一些断点,其中图像在手机和中心的宽度可能为120%-您仍然会拥有该高度,因此如果它太高,则需要裁剪以降低高度,对此我确实有个主意,但是不想让范围变小太多...
这是一个<img>的示例-此处进行的操作少得多,而IMO更直接。而且您获得了更多的控制权-您可以对其进行大量调整,以根据需要在不同的媒体查询中进行调整。
.productTopSection,.mc-key-points {
  position: relative;
  width: 100%;
}

.responsive-img {
  width: 100%;
}

.overlay-content {
  position: absolute;

  /* just to get started with the content positioning */
  top: 50%;
  transform: translateY(-50%)
}
<div class="productTopSection g-py-200">
<img class="responsive-img" src="http://mcauliffe.testcre8.co.uk/assets/images/home/mcauliffe-brownfield-experts-homepage-about-image.jpg">
<div class="overlay-content">
Content Goes Here!
</div>
</div>
<div class="mc-key-points g-py-200">
<img class="responsive-img" src="http://mcauliffe.testcre8.co.uk/assets/images/home/mcauliffe-brownfield-experts-homepage-key-points-image.jpg">
<div class="overlay-content">
Content Goes Here!
</div>
</div>
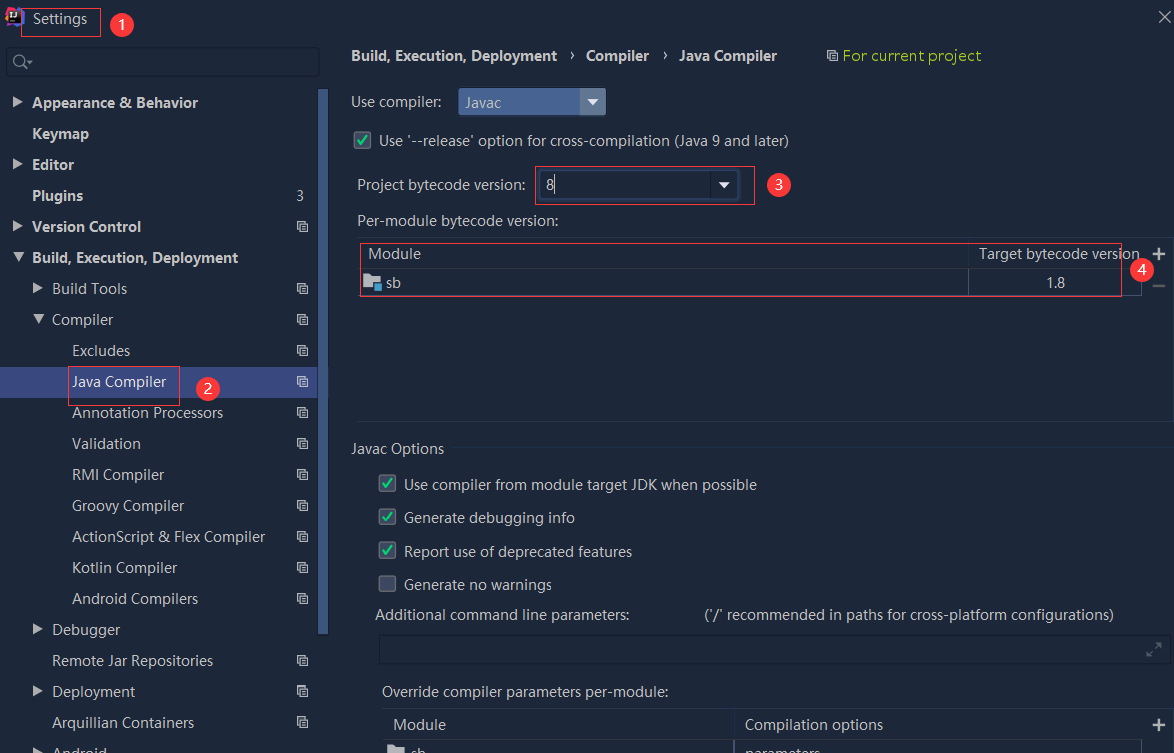 依赖报错 idea导入项目后依赖报错,解决方案:https://blog....
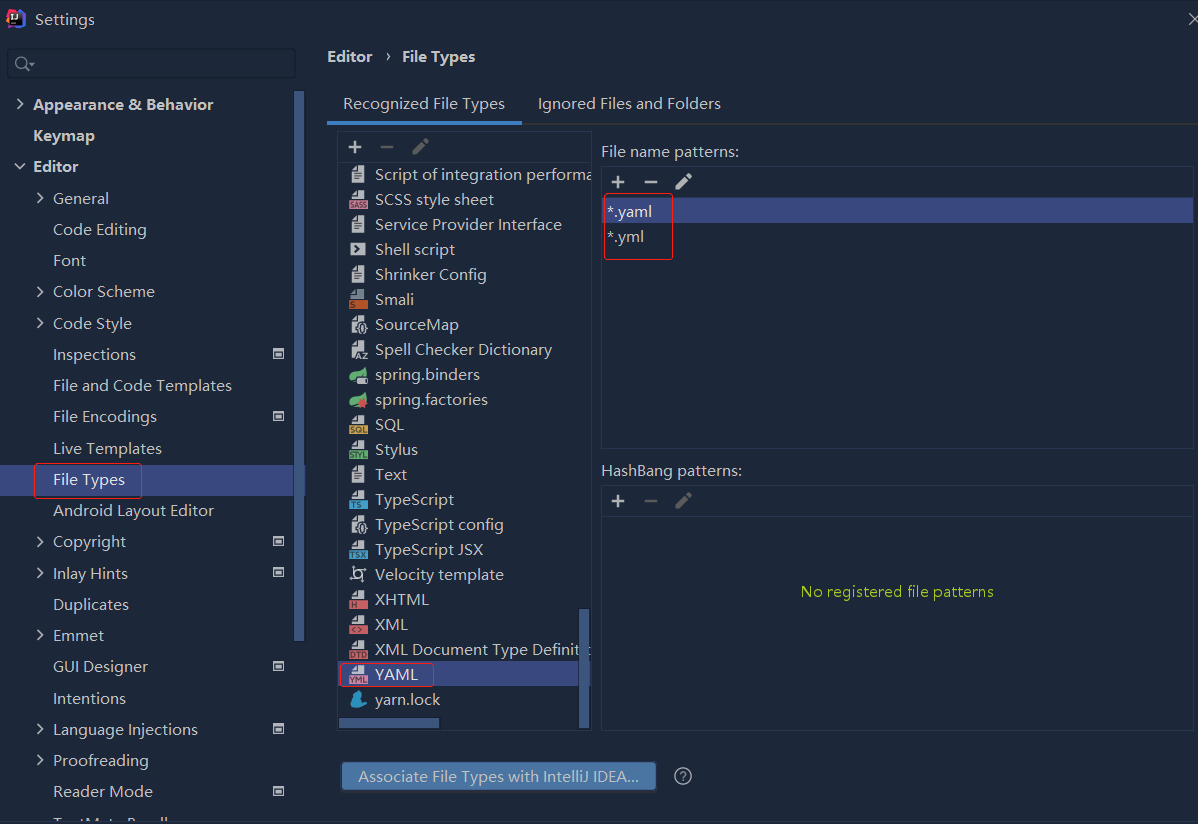
 错误1:gradle项目控制台输出为乱码 # 解决方案:https://bl...
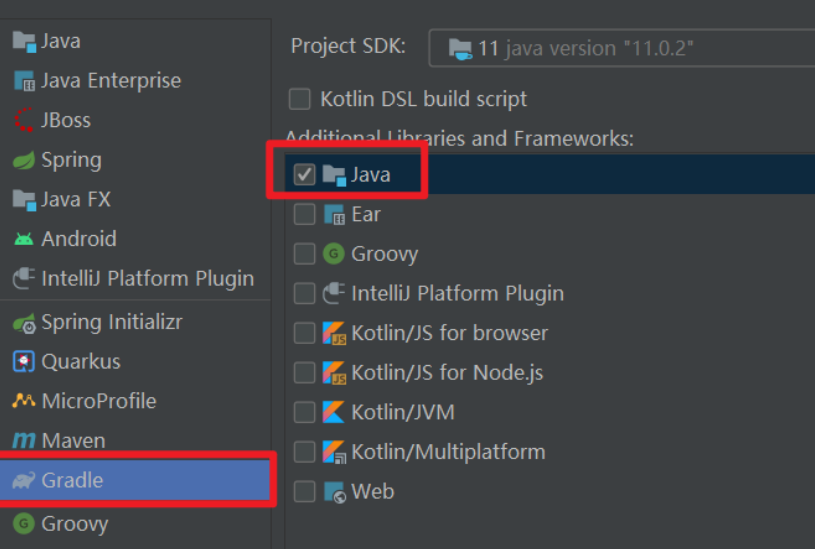