问题描述
我想从我的登录屏幕导航到主屏幕而不显示视图。我正在尝试做的是,如果从启动画面如果它从异步存储中获取用户名,然后移动到登录页面...其中登录页面如果用户名与登录屏幕中的 POST 方法匹配,则直接登录,如果不是,则显示登录屏幕视图 这是我的代码
import React,{useState} from 'react';
import {
    View,Text,TouchableOpacity,TextInput,Platform,StyleSheet,StatusBar,Alert
} from 'react-native';
import * as Animatable from 'react-native-animatable';
import LinearGradient from 'react-native-linear-gradient';
import FontAwesome from 'react-native-vector-icons/FontAwesome';
import Feather from 'react-native-vector-icons/Feather';

import { useTheme } from 'react-native-paper';


const asdf = ({navigation}) => {

    const STORAGE_KEY = 'username';

    const [userName,setUserName ] = useState('');
    const [errortext,setErrortext] = useState('');

            const retrieveData = async () => {
             try {
               const value = await AsyncStorage.getItem(STORAGE_KEY);
              if (value !== null) {
                var str = value;
                // str = str.replace(/^"|"$/g,'');
                str = str.replace(/"/g,'');
                fetchData(str);

               }

          } catch (error) {
            // Error retrieving data
          }
        };
        retrieveData();

        const handleSubmitPress = () => {

            if (!userName){
              setUserName('')
            //   onChangeText();
              return
            } else{
              fetchData(userName);
            }


            setUserName('')
            //onChangeText();

            }

        const fetchData = (userName) => {
          if(userName){
            let dataToSend = {search :userName}
            let formBody = [];
            for (let search in dataToSend) {
                let encodeKey = encodeURIComponent(search);
                let encodeValue = encodeURIComponent(dataToSend[search]);
                formBody.push(encodeKey + '=' + encodeValue);
            }
            formBody = formBody.join('&');
            fetch('https://qwert/work/rest/apiofficeapp.php',{
                method: 'POST',//Request Type
                body: formBody,//post body
                headers: {
                  //Header Defination
                  'Content-Type':
                    'application/x-www-form-urlencoded;charset=UTF-8',},})
            .then((response) => response.json())
            .then((responseJson) => {
              if (responseJson[0] != ''){
                //alert(JSON.stringify(responseJson[0]));
                 const saveData = async () => {
                    try {
                      await AsyncStorage.setItem(STORAGE_KEY,responseJson[0][0]['username'])
                      //await AsyncStorage.setItem(STORAGE_KEY,JSON.stringify(responseJson[0][0]['username']))
                      //alert('Data successfully saved login page')

                    } catch (e) {
                      //alert('Failed to save the data to the storage')
                    }

                  }

                  saveData();
                  navigation.navigate('HomeApp');


                 setErrortext('');


                  }else {

                      setErrortext(userName + 'user not found')
                    }
            })
            .catch((error) => {
              console.error(error);
            });
          } }
          // const onChangeText = userName => setUserName(userName)


    const onChangeText = userName => setUserName(userName)

    const { colors } = useTheme();


    // const onChangeText = (val) => {
    //     if( val.length !== 0 ) {
    //         setUserName({
    //             ...userName,//             userName: val,//         });
    //     } else {
    //         setUserName({
    //             ...userName,//         });
    //     }
    // }


    return (
      <View style={styles.container}>
          <StatusBar backgroundColor='#009387' barStyle="light-content"/>
        <View style={styles.header}>
            <Text style={styles.text_header}>Welcome!</Text>
        </View>
        <Animatable.View
            animation="fadeInUpBig"
            style={[styles.footer,{
                backgroundColor: colors.background
            }]}
        >
            <Text style={[styles.text_footer,{
                color: colors.text
            }]}>Username</Text>
            <View style={styles.action}>
                <FontAwesome
                    name="user-o"
                    color={colors.text}
                    size={20}
                />
                <TextInput
                    placeholder="Your Username"
                    placeholderTextColor="#666666"
                    style={[styles.textInput,{
                        color: colors.text
                    }]}
                    autoCapitalize="none"
                    onChangeText={(userName) => onChangeText(userName)}
                    onSubmitEditing={handleSubmitPress}
                />
                </View>
                {/* {data.check_textInputChange ?
                <Animatable.View
                    animation="bounceIn"
                >
                    <Feather
                        name="check-circle"
                        color="red"
                        size={20}
                    />
                </Animatable.View>
                : null}
            </View> */}

            <View>
                  {errortext != '' ? (
                    <Text style={styles.errorMsg}>
                      {errortext}
                    </Text>
                  ) : null}
                  </View>

            <View style={styles.button}>
                <TouchableOpacity
                    style={styles.signIn}
                    onPress={() => {handleSubmitPress()}}
                >
                <LinearGradient
                    colors={['#eb0c00','#A80900']}
                    style={styles.signIn}
                >
                    <Text style={[styles.textSign,{
                        color:'#fff'
                    }]}> Sign In </Text>
                </LinearGradient>
                </TouchableOpacity>

                <TouchableOpacity
                    onPress={() => navigation.navigate('Register')}
                    style={[styles.signIn,{
                        borderColor: '#A80900',borderWidth: 1,marginTop: 15
                    }]}
                >
                    <Text style={[styles.textSign,{
                        color: '#A80900'
                    }]}> Register </Text>
                </TouchableOpacity>
            </View>
        </Animatable.View>
      </View>
    );
};

export default asdf;

const styles = StyleSheet.create({
    container: {
      flex: 1,backgroundColor: '#A80900'
    },header: {
        flex: 1,justifyContent: 'flex-end',paddingHorizontal: 20,paddingBottom: 50
    },footer: {
        flex: 3,backgroundColor: '#fff',borderTopLeftRadius: 30,borderTopRightRadius: 30,paddingVertical: 30
    },text_header: {
        color: '#fff',fontWeight: 'bold',fontSize: 30
    },text_footer: {
        color: '#05375a',fontSize: 18
    },action: {
        flexDirection: 'row',marginTop: 10,borderBottomWidth: 1,borderBottomColor: '#f2f2f2',paddingBottom: 5
    },actionError: {
        flexDirection: 'row',borderBottomColor: '#FF0000',textInput: {
        flex: 1,marginTop: Platform.OS === 'ios' ? 0 : -12,paddingLeft: 10,color: '#05375a',errorMsg: {
        color: '#FF0000',fontSize: 14,button: {
        alignItems: 'center',marginTop: 50
    },signIn: {
        width: '100%',height: 50,justifyContent: 'center',alignItems: 'center',borderRadius: 10
    },textSign: {
        fontSize: 18,fontWeight: 'bold'
    }
  });
如果不直接显示登录屏幕,我就无法导航到主应用程序
解决方法
您可以尝试的一件事是使用 Splash 库,它会为启动画面创建一个实际的本机屏幕,而您只需在登录屏幕或主屏幕上关闭启动画面。
您可以使用的一个库:
https://github.com/crazycodeboy/react-native-splash-screen
安装相当简单,您只需要在安装时在登录或 Mais 屏幕上调用它即可:
import SplashScreen from 'react-native-splash-screen'

export default class MainPage extends Component {

    componentDidMount() {
        SplashScreen.hide();
    }
}
您的项目取得成功。
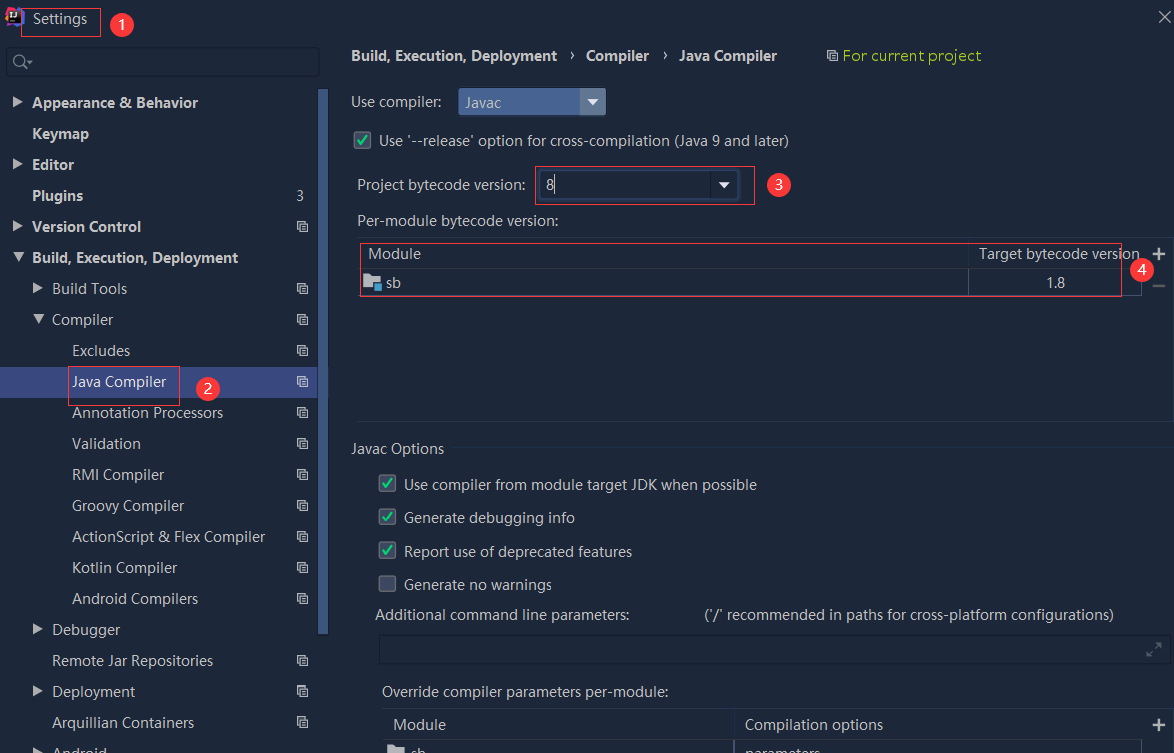 依赖报错 idea导入项目后依赖报错,解决方案:https://blog....
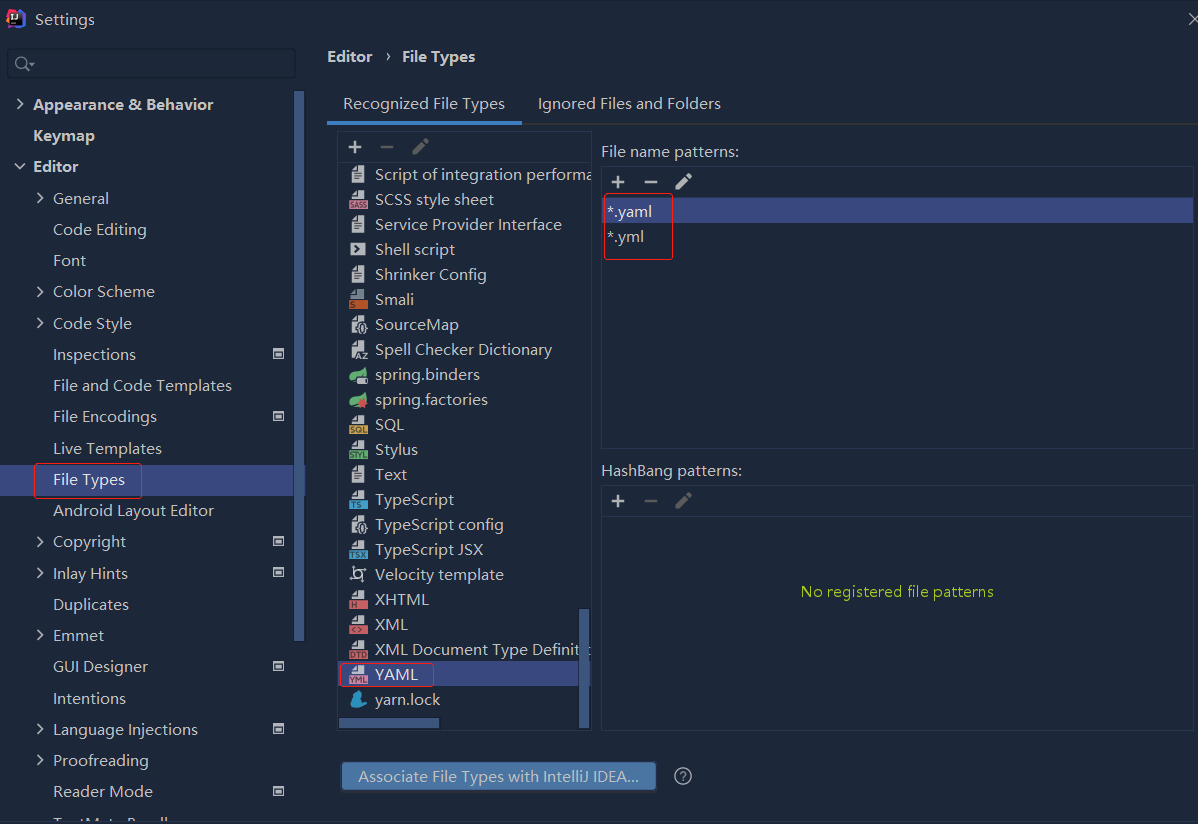
 错误1:gradle项目控制台输出为乱码 # 解决方案:https://bl...