问题描述
我想复制 Watson-scott 测试中显示的效果,文本似乎在发光。 示例链接:https://www.youtube.com/watch?v=2ySNm4gltkE
跳到 11:17,文字似乎在发光;我如何用 pygame 复制这种效果?我尝试在文本的背景中添加一个灰色矩形,但它看起来很糟糕。我也试过像 this example 这样的文字阴影,但没有任何效果。
我也在使用 Python 3.7.4。感谢您的帮助,我真的很需要它!!
解决方法
有时我们可以说这是不可能的,但通常这不是该软件包的主要目标。尽管如此,让我们看看我们是否能解决问题。
我冒昧地假设允许除 pygame 之外的其他包,但最终结果应该在 pygame 中可见。为了创建绽放/发光效果,我使用了 opencv-python (cv2) 和 numpy (np) 包。
解决方案的第一部分将讨论创建发光边框和一些发光文本。第二部分将讨论如何将其呈现在 pygame 表面上。
TL;博士;跳到下面的摘要部分并将代码复制到各自的文件中。
第 1 部分
盛开
为了获得一些漂亮的发光边框和文本,我们可以使用 opencv 的 blurring 功能,也称为平滑。由于我们想要创建不同强度的发光,我们首先应用 GaussianBlur,在图像周围创建一些随机模糊,然后使用正常的 blur 扩展该模糊。
def apply_blooming(image: np.ndarray) -> np.ndarray:
    # Provide some blurring to image,to create some bloom.
    cv2.GaussianBlur(image,ksize=(9,9),sigmaX=10,sigmaY=10,dst=image)
    cv2.blur(image,ksize=(5,5),dst=image)
    return image
注意:内核大小 (ksize) 和西格玛 (sigmaX 和 sigmaY) 的值是根据经验选择的,您可以尝试使用这些值,直到你得到你想要的。
颜色
一个小的intermezzo,因为我们需要提供一些非常漂亮的可怕的颜色,下面的类包含一些(可怕的)颜色。
class Colors:
    WHITE_ISH = (246,246,246)
    YELLOW_ISH = (214,198,136)
    RED_ISH = (156,60,60)
发光边框
为了获得发光的边框,制作了一个辅助函数,它将绘制一个具有一些预定义属性的矩形。选择的属性是:
- margin:边框将被绘制成远离图像边。
- 厚度:边框将由这么多像素组成。
- color:边框的颜色,以便于更改。
def create_border(image: np.ndarray,margin: int,thickness: int,color: Colors) -> np.ndarray:
    """
    Create a normal border around an image,with specified colors.

    Args:
        image: The image,that requires a border.
        margin: The border distance from the sides of the image.
        thickness: The thickness of the border.
        color: The border color,by default a slightly yellow color.

    Modifies:
        The input image,will be modified with a border.

    Returns:
        The same image,with a border inserted.

    """

    # Numpy uses the convention `rows,columns`,instead of `x,y`.
    # Therefore height,has to be before width.
    height,width = image.shape[:2]
    cv2.rectangle(image,(margin,margin),(width - margin,height - margin),color,thickness=thickness)
    return image
然后可以使用 apply_blooming 和 create_border 函数绘制最终边框。
def glowing_border(image: np.ndarray,margin=20,thickness=10,color: Colors = Colors.WHITE_ISH):
    """

    Create a glowing border around an image.

    Args:
        image: The image,will be modified with a blooming border.

    Returns:
        The same image,with a blooming border inserted.
    """

    # Generate yellowish colored box
    image = create_border(image,margin,thickness,color)

    # Apply the blooming.
    image = apply_blooming(image)

    # Reassert the original border,to get a clear outline.
    # Similar to the Watson-Scott test,two borders were added here.
    image = create_border(image,margin - 1,1,color)
    image = create_border(image,margin + 1,color)
    return image
测试代码
为了测试发光边框,我们可以使用cv2.imshow,来显示图像。由于我们稍后将使用此功能,因此创建了一个小功能。此函数将输入图像和显示时间(代码继续执行前的等待时间)。
def show(image,delay=0):
    """
    Display an image using cv2.

    Notes:
        By default cv2 uses the BGR coloring,instead RGB.
        Hence image shown by cv2,which are meant to be RGB,has to be transformed using `cvtColor`.

    Args:
        image: Input image to be displayed
        delay: Time delay before continuing running.
            When 0,The program will wait until a key stroke or window is closed.
            When 1,The program will continue as quickly as possible.

    Returns:
        Nothing,it displays the image.

    """
    cv2.imshow('Test',cv2.cvtColor(image,cv2.COLOR_RGB2BGR))
    cv2.waitKey(delay)
实际测试代码:
image = np.zeros((480,640,3),dtype=np.uint8)
border = glowing_border(image.copy(),color=Colors.YELLOW_ISH)
show(border,delay=0)
发光文本
通过使用 cv2.putText,可以对发光文本使用类似的方法。
def glowing_text(image: np.ndarray,text: str,org: Tuple[int,int],color: Colors) -> np.ndarray:
    """

    Args:
        image: The image,that requires a border.
        text: The text to be placed on the image.
        org: The starting location of the text.
        color: The color of the text.


    Modifies:
        The input image,will be modified with a blooming text.

    Returns:
        The same image,with a blooming text inserted.
    """

    image = cv2.putText(image,text,org,cv2.FONT_HERSHEY_COMPLEX_SMALL,fontScale=.7,color=color,thickness=1)
    image = apply_blooming(image)
    image = cv2.putText(image,thickness=1)
    return image
带有测试代码
image = np.zeros((480,dtype=np.uint8)
text = glowing_text(image.copy(),text="Welcome to this game",org=(50,70),color=Colors.YELLOW_ISH)
show(text,delay=0)
间奏曲
在我继续展示如何在 pygame 中显示它之前,我将抛出一个奖励并展示文本如何出现在屏幕上,就好像人类正在慢慢输入一样。下面的代码之所以有效,是因为我们分别绘制了边框和文本,然后使用np.bitwise_or将结果组合起来。
image = np.zeros((480,dtype=np.uint8)

# Create the glowing border,and a copy of the image,for the text,that will be placed on it later.
border = glowing_border(image.copy(),color=Colors.YELLOW_ISH)
text = image.copy()

# This message will be incrementally written
message = "Welcome to this game. Don't be scared :)."

for idx in range(len(message) + 1):
    text = glowing_text(image.copy(),text=message[:idx],color=Colors.YELLOW_ISH)

    # We use a random time delay between keystrokes,to simulate a human.
    show(np.bitwise_or(border,text),delay=np.random.randint(1,250))

# Pause the screen after the full message.
show(np.bitwise_or(border,delay=0)
注意:或者,我们可以先在同一图像上生成边框和文本,然后应用布隆过滤器。请记住,我们必须再次重新绘制边框和文本,为它们提供坚实的基础。
第 2 部分
现在我们可以生成带有正确泛光边框和文本的画布,必须将其插入到 pygame 中。让我们把前面所有的函数放到一个名为 blooming.py 的文件中,并在新文件 game.py 中引用它。
以下代码是如何将 numpy 数组放入 pygame 的最小工作示例。
import contextlib
from typing import Tuple

# This suppresses the `Hello from pygame` message.
with contextlib.redirect_stdout(None):
    import pygame

import numpy as np
import blooming


def image_generator(size: Tuple[int,color: blooming.Colors):
    image = np.zeros((*size[::-1],dtype=np.uint8)

    # Create the glowing border,that will be placed on it later.
    border = blooming.glowing_border(image.copy(),color=color)
    text = image.copy()

    # This message will be incrementally written
    message = "Welcome to this game. Don't be scared :)."

    for idx in range(len(message) + 1):
        text = blooming.glowing_text(image.copy(),color=color)
        yield np.bitwise_or(border,text)
    return np.bitwise_or(border,text)


if __name__ == '__main__':
    pygame.init()
    screen = pygame.display.set_mode((640,480))
    clock = pygame.time.Clock()
    running = True

    while running:
        for image in image_generator(screen.get_size(),color=blooming.Colors.YELLOW_ISH):
            screen.fill((0,0))

            for event in pygame.event.get():
                if event.type == pygame.QUIT:
                    running = False

                if event.type == pygame.KEYDOWN:
                    if event.key == pygame.K_ESCAPE:
                        running = False

            # This is where we insert the numpy array.
            # Because pygame and numpy use different coordinate systems,# the numpy image has to be flipped and rotated,before being blit.
            img = pygame.surfarray.make_surface(np.fliplr(np.rot90(image,k=-1)))
            screen.blit(img,(0,0))

            pygame.display.flip()
            clock.tick(np.random.randint(10,30))

    pygame.quit()
摘要 (TL;DR;)
blooming.py
from typing import Tuple

import cv2
import numpy as np


class Colors:
    WHITE_ISH = (246,60)


def create_border(image: np.ndarray,thickness=thickness)
    return image


def apply_blooming(image: np.ndarray) -> np.ndarray:
    # Provide some blurring to image,dst=image)
    return image


def glowing_border(image: np.ndarray,color)
    return image


def glowing_text(image: np.ndarray,thickness=1)
    return image


def show(image,cv2.COLOR_RGB2BGR))
    cv2.waitKey(delay)


if __name__ == '__main__':
    image = np.zeros((480,that will be placed on it later.
    border = glowing_border(image.copy(),color=Colors.YELLOW_ISH)
    text = image.copy()

    # This message will be incrementally written
    message = "Welcome to this game. Don't be scared :)." + " " * 10

    for idx in range(len(message) + 1):
        text = glowing_text(image.copy(),color=Colors.YELLOW_ISH)

        # We use a random time delay between keystrokes,to simulate a human.
        show(np.bitwise_or(border,250))

    # Pause the screen after the full message.
    show(np.bitwise_or(border,delay=0)
game.py
import contextlib
from typing import Tuple

# This suppresses the `Hello from pygame` message.
with contextlib.redirect_stdout(None):
    import pygame

import numpy as np
import blooming


def image_generator(size: Tuple[int,color=color)
    text = image.copy()

    # This message will be incrementally written
    message = "Welcome to this game. Don't be scared :)." + " " * 10

    for idx in range(len(message) + 1):
        text = blooming.glowing_text(image.copy(),30))

    pygame.quit()
结果
请注意,实物看起来比这张图片清晰很多。同时调整文本的粗细和模糊过滤器的大小也会对结果产生相当大的影响。对于此图像,ksize 的 GaussianBlur 已增加到 (17,17),而 sigmaX 和 sigmaY 均已设置为 100。

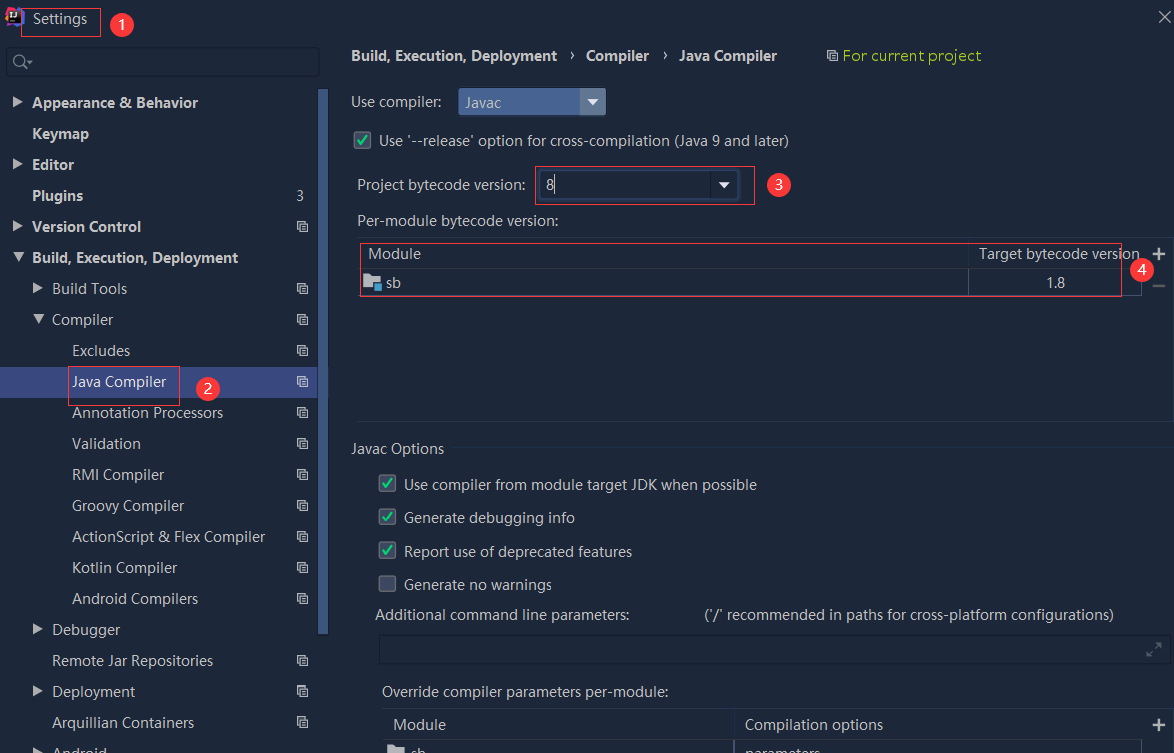 依赖报错 idea导入项目后依赖报错,解决方案:https://blog....
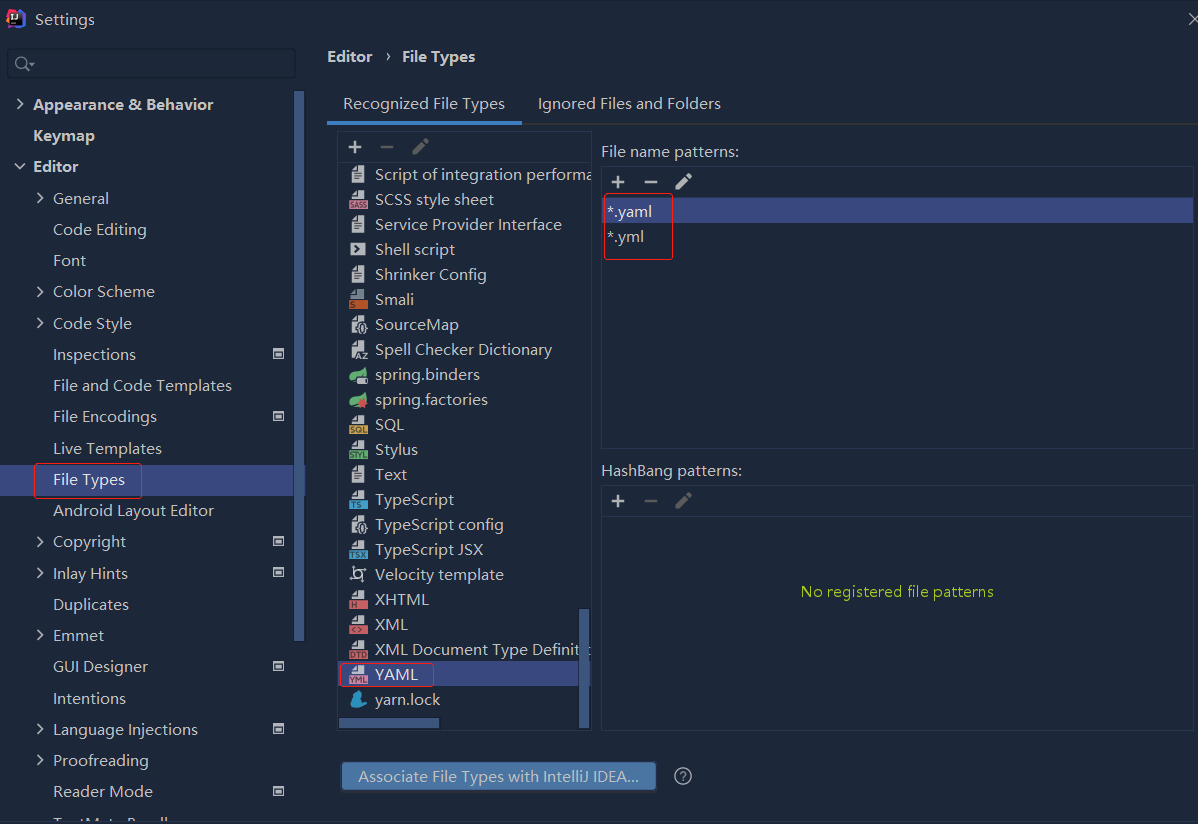
 错误1:gradle项目控制台输出为乱码 # 解决方案:https://bl...