问题描述
我是 Python 和 PyQt5 的新手。我正在尝试使用来自虚拟端口(pyserial)的值动态绘制条形图。我能够读取所有值,并使用 self.set0.replace(0,int(dia)) 将值更新到集合中。我看到该值超出了 Y 轴限制,即使它更新到低于限制。而且它很少低于限制,因此图表看起来没有更新。
请注意,我使用了两个单独的线程,一个用于视频捕获(工作正常),另一个用于从端口读取值(如果线程部分也出错,请告诉我)
import random
import sys
import serial
import cv2
import numpy as np

from PyQt5 import QtGui,QtWidgets,QtSerialPort
from PyQt5.QtChart import QValueAxis,QChartView,QBarCategoryAxis,QChart,QBarSeries,QBarSet
from PyQt5.QtCore import pyqtSignal,Qt,QThread,QTimer,pyqtSlot
from PyQt5.QtGui import QPixmap
from PyQt5.QtMultimedia import QCameraInfo
from PyQt5.QtWidgets import *
from PyQt5.QtWidgets import QWidget,QLabel,QVBoxLayout


class VideoThread(QThread):
    change_pixmap_signal = pyqtSignal(np.ndarray)

    def __init__(self,i,path):
        super().__init__()
        self._run_flag = True
        self.saveImg = False
        self.save_path = path
        self.cam_id = i
        print(self.cam_id)

    def run(self):
        # capture from web cam
        self._run_flag = True
        count = 0
        self.cap = cv2.VideoCapture(self.cam_id - 2)
        while self._run_flag:
            ret,cv_img = self.cap.read()
            if ret:
                self.change_pixmap_signal.emit(cv_img)
            if self.saveImg:
                cv2.imwrite("/home/ign/Pictures/frame%d.jpg" % count,cv_img)
                cv2.imwrite(os.path.join(self.save_path,"%04d.jpg" % count),cv_img)
                count += 1
        # shut down capture system
        self.cap.release()

    def stop(self):
        """Sets run flag to False and waits for thread to finish"""
        self.saveImg = False

    def proceed(self):
        self.saveImg = True


class GraphThread(QThread):
    set_data = pyqtSignal(int,int,int)

    def __init__(self):
        super(GraphThread,self).__init__()
        self._run_flag = True
        self.s = serial.Serial('/dev/pts/2',9600,timeout=None,parity=serial.PARITY_NONE,stopbits=serial.STOPBITS_ONE,bytesize=serial.EIGHTBITS)

    def run(self):
        self._run_flag = True

        while self._run_flag:
            cc = self.s.read(15)
            ccread = cc.decode("utf-8")
            print(ccread)
            diamond = ccread[1:4]
            hexa = ccread[6:9]
            trep = ccread[11:14]

            self.set_data.emit(int(diamond),int(hexa),int(trep))


class MyWindow(QMainWindow):
    def __init__(self):
        super(MyWindow,self).__init__()
        self.available_cameras = QCameraInfo.availableCameras()  # Getting available cameras

        cent = QDesktopWidget().availableGeometry().center()  # Finds the center of the screen
        self.setStyleSheet("background-color: white;")
        self.resize(1400,800)
        self.frameGeometry().moveCenter(cent)
        self.setWindowTitle('Lattice Object Detection Demo Dashboard')
        self.barThread = GraphThread()
        self.initWindow()

    def initWindow(self):
        widget = QWidget()
        self.setCentralWidget(widget)

        # self.s = serial.Serial('/dev/pts/2',#                        stopbits=serial.STOPBITS_ONE,#                        bytesize=serial.EIGHTBITS)

        # creating a tool bar
        toolbar = QToolBar("Camera Tool Bar")

        # adding tool bar to main window
        self.addToolBar(toolbar)

        mainLayout = QHBoxLayout()
        leftLayout = QVBoxLayout()
        mainLayout.addLayout(leftLayout)
        leftLayout.addStretch()

        # Button to start video
        self.ss_video = QtWidgets.QPushButton(self)
        self.ss_video.setText('Start Capture')
        self.ss_video.resize(100,30)
        self.ss_video.clicked.connect(self.ClickStartVideo)

        # path to save
        self.save_path = ""

        # Status bar
        self.status = QStatusBar()
        self.status.setStyleSheet("background : lightblue;")  # Setting style sheet to the status bar
        self.setStatusBar(self.status)  # Adding status bar to the main window
        self.status.showMessage('Ready to start')

        self.image_label = QLabel(self)
        self.disply_width = 669
        self.display_height = 501
        self.image_label.resize(self.disply_width,self.display_height)
        self.image_label.setStyleSheet("background : black;")
        self.image_label.move(50,50)

        leftLayout.addWidget(self.image_label,Qt.AlignCenter)
        leftLayout.addWidget(self.ss_video)
        rightLayout = QVBoxLayout()
        rightLayout.addStretch()

        self.set0 = QBarSet('Count')

        self.set0.append([random.randint(0,10) for i in range(3)])

        self.series = QBarSeries()
        self.series.append(self.set0)

        self.chart = QChart()
        self.chart.addSeries(self.series)
        self.chart.setTitle('Bar Chart Demo')
        self.chart.setAnimationOptions(QChart.SeriesAnimations)

        months = ('Diamond','Hexagon','Trapezium')

        axisX = QBarCategoryAxis()
        axisX.append(months)

        axisY = QValueAxis()
        axisY.setRange(0,10000)
        # axisY.setLabelFormat("%d")

        self.chart.addAxis(axisX,Qt.AlignBottom)
        self.chart.addAxis(axisY,Qt.AlignLeft)

        self.chart.legend().setVisible(True)
        self.chart.legend().setAlignment(Qt.AlignBottom)

        self.chartView = QChartView(self.chart)
        rightLayout.addWidget(self.chartView,Qt.AlignCenter)

        mainLayout.addLayout(leftLayout)
        mainLayout.addLayout(rightLayout)

        # self.timer = QTimer()
        # self.timer.timeout.connect(self.drawGraph)
        # self.timer.start(1000)

        self.drawGraph()

        # similarly creating action for changing save folder
        change_folder_action = QAction("Change save location",self)

        # adding status tip
        change_folder_action.setStatusTip("Change folder where picture will be saved saved.")

        # adding tool tip to it
        change_folder_action.setToolTip("Change save location")

        # setting calling method to the change folder action
        # when triggered signal is emitted
        change_folder_action.triggered.connect(self.change_folder)

        # adding this to the tool bar
        toolbar.addAction(change_folder_action)

        # creating a combo box for selecting camera
        self.camera_selector = QComboBox()

        # adding status tip to it
        self.camera_selector.setStatusTip("Choose camera to take pictures")

        # adding tool tip to it
        self.camera_selector.setToolTip("Select Camera")
        self.camera_selector.setToolTipDuration(2500)

        # adding items to the combo box
        self.camera_selector.addItem("Select Camera")
        self.camera_selector.addItems([camera.description()
                                       for camera in self.available_cameras])

        # create the video capture thread
        self.i = self.camera_selector.currentIndex()
        self.thread = VideoThread(self.i,self.save_path)

        # adding action to the combo box
        # calling the select camera method
        self.camera_selector.currentIndexChanged.connect(self.select_camera)

        # adding this to tool bar
        toolbar.addWidget(self.camera_selector)

        # setting tool bar stylesheet
        toolbar.setStyleSheet("background : white;")

        # comport selection
        comport = QComboBox()
        comport.setStatusTip("Select Comport")
        for info in QtSerialPort.QSerialPortInfo.availablePorts():
            comport.addItem(info.portName())
        toolbar.addSeparator()
        toolbar.addWidget(comport)

        widget.setLayout(mainLayout)

    # Buttons

    # Activates when Start/Stop video button is clicked to Start (ss_video
    def ClickStartVideo(self):
        # Change label color to light blue
        self.ss_video.clicked.disconnect(self.ClickStartVideo)
        self.status.showMessage('Video Running...')
        # Change button to stop
        self.ss_video.setText('Hold capture')
        self.thread.saveImg = True
        self.thread.change_pixmap_signal.connect(self.update_image)
        self.ss_video.clicked.connect(self.thread.stop)  # Stop the video if button clicked
        self.ss_video.clicked.connect(self.ClickStopVideo)

    # Activates when Start/Stop video button is clicked to Stop (ss_video)
    def ClickStopVideo(self):
        self.thread.change_pixmap_signal.disconnect()
        self.ss_video.setText('Resume capture')
        self.status.showMessage('Ready to start')
        self.ss_video.clicked.disconnect(self.ClickStopVideo)
        self.ss_video.clicked.disconnect(self.thread.stop)
        self.ss_video.clicked.connect(self.thread.proceed)
        self.ss_video.clicked.connect(self.ClickStartVideo)

    # method to select camera
    def select_camera(self,i):
        self.i = self.camera_selector.currentIndex()
        self.thread = VideoThread(self.i,self.save_path)
        self.thread.change_pixmap_signal.connect(self.update_image)

        # start the thread
        self.thread.start()

    def closeEvent(self,event):
        self.thread._run_flag = False
        self.thread.stop()
        self.barThread._run_flag = False
        event.accept()

    # Actions

    def update_image(self,cv_img):
        """Updates the image_label with a new opencv image"""
        qt_img = self.convert_cv_qt(cv_img)
        self.image_label.setPixmap(qt_img)

    def convert_cv_qt(self,cv_img):
        """Convert from an opencv image to QPixmap"""
        rgb_image = cv2.cvtColor(cv_img,cv2.COLOR_BGR2RGB)
        h,w,ch = rgb_image.shape
        bytes_per_line = ch * w
        convert_to_Qt_format = QtGui.QImage(rgb_image.data,h,bytes_per_line,QtGui.QImage.Format_RGB888)
        p = convert_to_Qt_format.scaled(self.disply_width,self.display_height,Qt.KeepAspectRatio)
        # p = convert_to_Qt_format.scaled(801,801,Qt.KeepAspectRatio)
        return QPixmap.fromImage(p)

    # change folder method
    def change_folder(self):

        # open the dialog to select path
        path = QFileDialog.getExistingDirectory(self,"Picture Location","")

        # if path is selected
        if path:
            # update the path
            self.save_path = path

            # update the sequence
            self.save_seq = 0

    # method for alerts

    @pyqtSlot()
    def drawGraph(self):
        # cc = self.s.read(15)
        # ccread = cc.decode("utf-8")
        # print(ccread)
        # diamond = ccread[1:4]
        # hexa = ccread[6:9]
        # trep = ccread[11:14]
        # self.set0.replace(0,int(diamond))
        # self.set0.replace(1,int(hexa))
        # self.set0.replace(2,int(trep))

        self.barThread.set_data.connect(self.onDataFromThread)
        print("thread starting")
        self.barThread.start()

    def onDataFromThread(self,dia,hexa,trep):
        print(dia,trep)
        self.set0.replace(0,dia)
        self.set0.replace(1,hexa)
        self.set0.replace(2,trep)
        self.chartView.update()


if __name__ == '__main__':
    app = QApplication(sys.argv)
    win = MyWindow()
    win.show()
    sys.exit(app.exec())
我能够读取 pyserial 值,如下所示。但是,当我更新图表时,它总是超出窗口,而且我看到这些值也与图表不匹配。不确定我在这里做错了什么。我也没有看到很多关于此的文档或教程。任何帮助将不胜感激。


这是初始图(使用 0-999 之间的随机值)

使用收到的值第一次更新后的图表
解决方法
在这个帮助下
Qt Adjusting axes does not adjust the chart itself
回答,我能够成功更新图表。根据链接,
series 不附加到任何轴,默认情况下它会缩放以利用图表的整个绘图区域。
您应该将系列附加到创建为的轴:
# self.chart.addAxis(axisX,Qt.AlignBottom)
# self.chart.addAxis(axisY,Qt.AlignLeft) // Instead of this,do the below.

self.chart.setAxisX(axisX)
self.chart.setAxisY(axisY)
self.series.attachAxis(axisX)
self.series.attachAxis(axisY)
 设置时间 控制面板
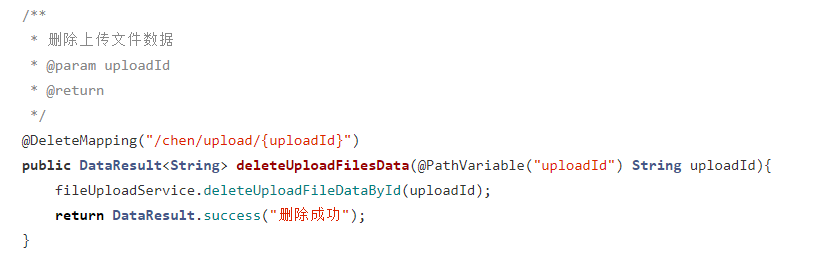 错误1:Request method ‘DELETE‘ not supported 错误还原:...