上一篇我们聊到了容器,现在大家应该也知道了,没有镜像就没有容器,所以镜像对docker来说是非常重要的,关于镜像的特性和原理作为入门系列就不阐
述了,我还是通过aspnetcore的小sample去熟悉镜像的操控。
一:镜像在哪里
这个问题问到点子上了,就好像说肉好吃,那你告诉我哪里才能买的到?
1. docker官方渠道
docker官方有一个 https://hub.docker.com/ 网址,你能想到和想不到的镜像这上面都有,比如web开发者熟悉的nginx,redis,mongodb等等,而且还告诉
你怎么去下载,如下图:
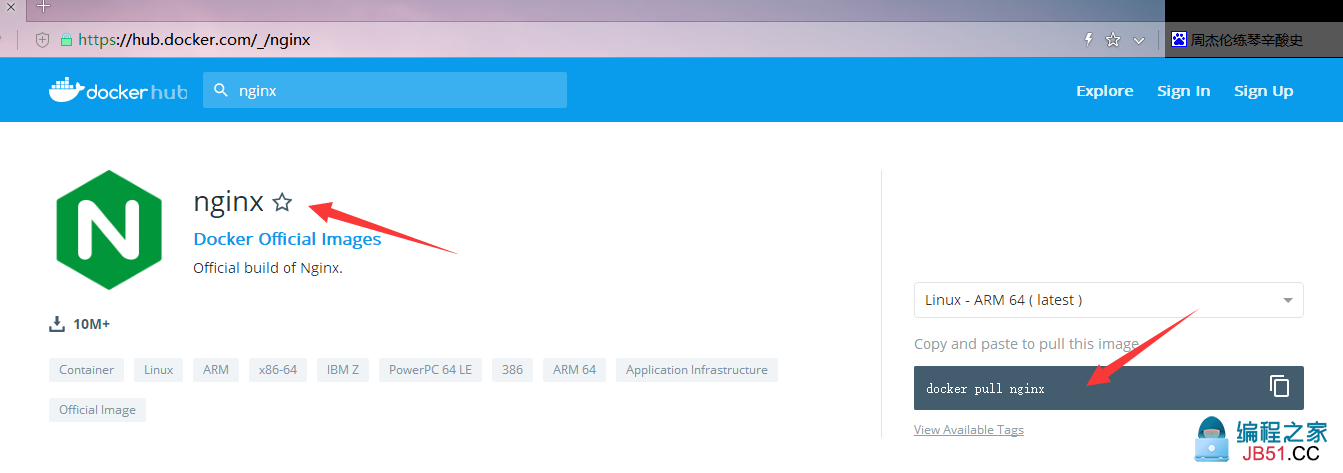
接下来你可以通过docker pull nginx 来获取docker hub 上最新的镜像了。
[root@localhost ~]# docker pull nginx
Using default tag: latest
latest: Pulling from library/nginx
6ae821421a7d: Pull complete
da4474e5966c: Pull complete
eb2aec2b9c9f: Pull complete
Digest: sha256:dd2d0ac3fff2f007d99e033b64854be0941e19a2ad51f174d9240dda20d9f534
Status: Downloaded newer image for nginx:latest
那怎么去验证images是否真的pull到本地了呢,可以通过 docker images 查看一下,如下所示,确实下载到本地了。
[root@localhost ~]# docker images
REPOSITORY          TAG                 IMAGE ID            CREATED             SIZE
nginx               latest              f09fe80eb0e7        12 days ago         109MB
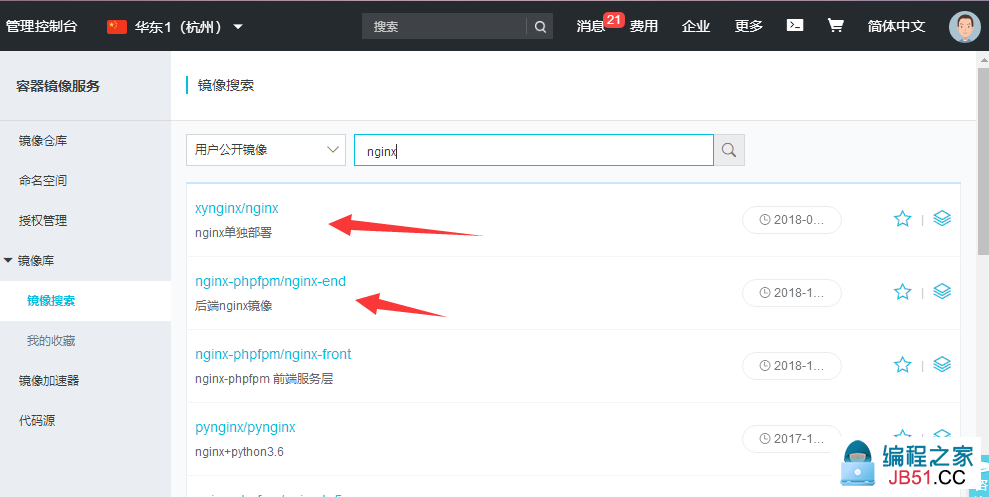
2. 阿里云渠道
官方渠道之外,有很多第三方机构都搭建了自己的docker hub服务器,比如阿里云,灵雀云等,进入这个:https://cr.console.aliyun.com/cn-hangzhou/images
如果没有登录的话自己登录一下。
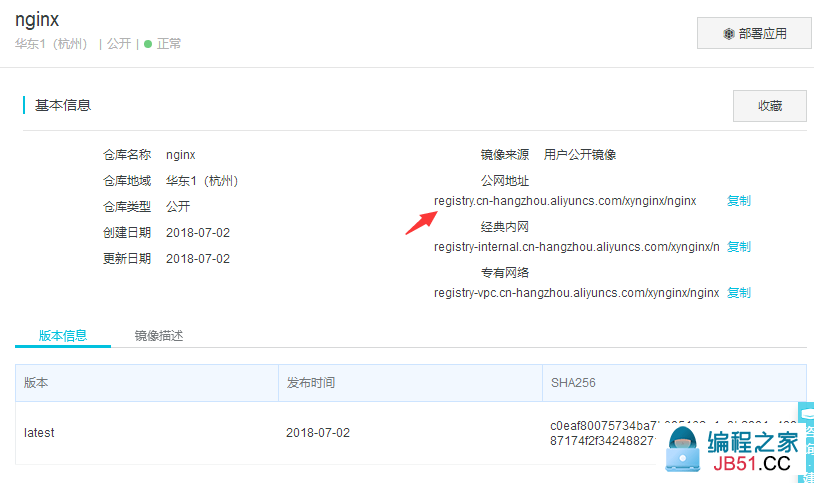
关于这些镜像质量怎么样,需要你自己鉴别啦,接下来就可以 docker pull 咯。
[root@localhost ~]# docker pull registry.cn-hangzhou.aliyuncs.com/xynginx/nginx
Using default tag: latest
latest: Pulling from xynginx/nginx
7dc0dca2b151: Pull complete
c4757245bbef: Pull complete
0a46433073b6: Pull complete
Digest: sha256:c0eaf80075734ba7b095162a1a9b2991a48987174f2f3424882714ba7b3c4033
Status: Downloaded newer image for registry.cn-hangzhou.aliyuncs.com/xynginx/nginx:latest
[root@localhost ~]# docker images
REPOSITORY                                        TAG                 IMAGE ID            CREATED             SIZE
nginx                                             latest              f09fe80eb0e7        12 days ago         109MB
registry.cn-hangzhou.aliyuncs.com/xynginx/nginx   latest              3966d32f8bd8        7 months ago        347MB
[root@localhost ~]#
上面标红的地方大家要注意一下,Repository的构成是这样的: ip+namespace+imagename,也就是ip地址+命令空间+镜像名,那第一行的nginx为什么就
没有ip和命名空间呢? 这是因为如果没有ip地址,默认就是官方的docker hub地址,没有namespace是因为nginx在dockerhub上是官方的顶级空间上,不需
要特别的namespace,命名空间主要还是区别各自的开发者,比如你看的“xynginx”就是一个namespace,还记得上一篇我给images 打标的tag吗?
huangxincheng/webnotebook:v1 , 前面的“huangxincheng”就是namespace,“v1” 表示(webnotebook)镜像的版本号,方便我后期做回滚啥的,如果没
有就是上面你看到的默认的 TAG=latest,表示最新版。
二: 自己动手做镜像
镜像的来源是找到了,但对于我的这个webnotebook程序来说用处不是特别大,我自己的程序还得我自己打包成镜像,那些现成的只能作为webnotebook的
基础镜像, 那问题来了,自己做镜像怎么做呢?通常来说用dockerfile这个小文件来实现。
1. dockerfile
dockerfile的本质就是把一些安装操作通过一个文本形式展示出来,这样docker引擎就会按照你的安装步骤进行自动化执行,听起来很牛逼,但到底该怎么写
呢,官网上有一个比较全的文档:https://docs.docker.com/engine/reference/builder/ 有兴趣的话大家可以看一看。
《1》 上一篇容器运行采用的是这个镜像,如下图。
FROM microsoft/dotnet:2.2-aspnetcore-runtime
LABEL author="hxc@qq.com"
RUN mkdir /data
COPY ./ /data
WORKDIR /data
EXPOSE 80
CMD [ "dotnet",WebNotebook.dll" ]
FROM: 这个后面定义的是一个镜像名,表示我后面的所有操作都是基于这个镜像来的,如果好奇这个基础镜像写了什么,可以去hub上找一下。
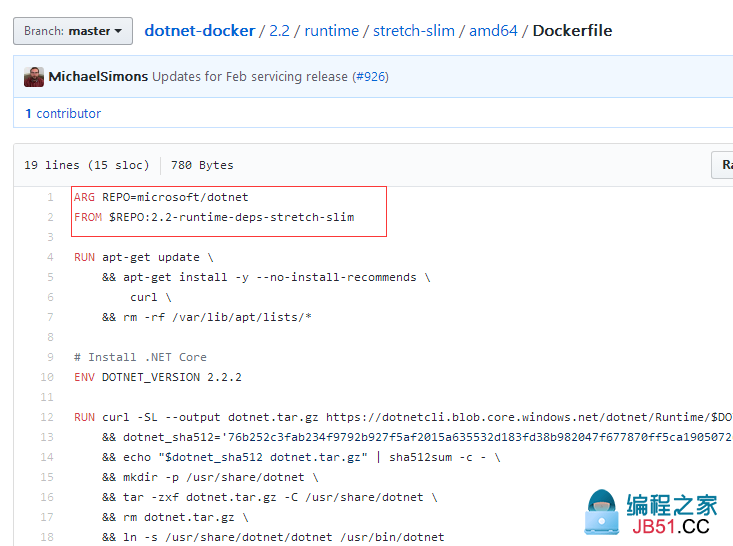
Label: 可以用来定义一些标签数据,比如镜像的作者,镜像的版本等。。
RUN: 这个标签后面,就可以执行一些Shell 命令,比如我创建了一个data目录。
COPY:将dockerfile所在目录的内容copy到容器的/data目录, dockerfile所在的目录就是上一篇说到的publish文件夹哦,这是你在docker build的时候指定
的 . 确定的路径。
WORKDIR : 这个和cd 命令是一个意思,切换到 指定的目录,后续的操作都是在这个切换后的目录上进行操作的。
EXPOSE : 表示容器在运行后监听你指定的端口号。
CMD: 这个是容器起来后,在shell上执行的命令参数,比如启动webnotebook.dll 。
2. 进一步改造dockerfile
在上一篇也说到了,microsoft/dotnet:2.2-aspnetcore-runtime 镜像不是采用centos作为基础镜像的,所以你熟悉的yum 命令就玩不下去了,既然都是
命令的自动化执行,那何不我自己动手下载安装netcore环境呢? 把下面的安装命令写到dockerfile即可。

有了上面的想法之后,改造后的dockerfile如下:
FROM centos
LABEL author=hxc
USER root

RUN rpm -Uvh https://packages.microsoft.com/config/rhel/7/packages-microsoft-prod.rpm
RUN yum install -y dotnet-sdk-2.2

RUN 5000" ]
然后就可以通过 docker build 构建镜像啦,后面的 . 表示把当前publish文件夹作为docker构建过程中的根目录哦。
[root@localhost publish]# docker build -t huangxincheng520/webnotebook:v1 -f ./Dockerfile .
Sending build context to Docker daemon  4.201MB
================================================================================
 Package                 Arch   Version       Repository                   Size
================================================================================
Installing:
 dotnet-sdk-2.2          x86_64 2.2.104-1     packages-microsoft-com-prod 111 M
Installing for dependencies:
 aspnetcore-runtime-2.2  x86_64 2-1       packages-microsoft-com-prod  30 M
 dotnet-host             x86_64 45 k
 dotnet-hostfxr-2.2      x86_64 1       packages-microsoft-com-prod 196 k
 dotnet-runtime-27 M
 dotnet-runtime-deps-2.2 x86_64 2.8 k
 libicu                  x86_64 50.1.17.el7 base                        6.9 M

Transaction Summary
================================================================================
Install  1 Package (+6 Dependent packages)

Total download size: 175 M
Installed size: 192 M
Downloading packages:
warning: /var/cache/yum/x86_64/7/packages-microsoft-com-prod/packages/dotnet-host-2-x64.rpm: Header V4 RSA/SHA256 Signature,key ID be1229cf: NOKEY
Public key for dotnet-host-2-x64.rpm is not installed
warning: /var/cache/7/base/packages/libicu-17.el7.x86_64.rpm: Header V3 RSA/for libicu-17.el7.x86_64.rpm is not installed
--------------------------------------------------------------------------------
Total                                              394 kB/s | 175 MB  07:34
Retrieving key from https:packages.microsoft.com/keys/microsoft.asc
Importing GPG key 0xBE1229CF:
 Userid     : Microsoft (Release signing) <gpgsecurity@microsoft.com>"
 Fingerprint: bc52 8686 b50d 79e3 39d3 721c eb3e 94ad be12 29cf
 From       : https:packages.microsoft.com/keys/microsoft.asc
Retrieving key from file:///etc/pki/rpm-gpg/RPM-GPG-KEY-CentOS-7
Importing GPG key 0xF4A80EB5CentOS-7 Key (CentOS 7 Official Signing Key) <security@centos.org>
 Fingerprint: 6341 ab27 53d7 8a78 a7c2 7bb1 24c6 a8a7 f4a8 0eb5
 Package    : centos-release-7-6.1810.2.el7.centos.x86_64 (@CentOS)
 From       : /etc/pki/rpm-gpg/RPM-GPG-KEY-CentOS-
Running transaction check
Running transaction test
Transaction test succeeded
Running transaction
Warning: RPMDB altered outside of yum.
  Installing : libicu-17.el7.x86_64                                  1/
  Installing : dotnet-runtime-deps-2.2-1.x86_64                       2/
  Installing : dotnet-host-1.x86_64                                   3/
Creating dotnet host symbolic link: /usr/bin/dotnet
  Installing : dotnet-hostfxr-1.x86_64                            4/
  Installing : dotnet-runtime-5/
  Installing : aspnetcore-runtime-1.x86_64                        6/
  Installing : dotnet-sdk-1.x86_64                              7/
This software may collect information about you and your use of the software,and send that to Microsoft.
Please visit http:aka.ms/dotnet-cli-eula for more information.
Welcome to .NET Core!
---------------------
Learn more about .NET Core: https:aka.ms/dotnet-docs
Use 'dotnet --help' to see available commands or visit: https:aka.ms/dotnet-cli-docs

Dependency Installed:
  aspnetcore-runtime-2.2.x86_64 0:1   dotnet-host.x86_64 1
  dotnet-hostfxr-1       dotnet-runtime-
  dotnet-runtime-deps-1  libicu.x86_64 .el7
Complete!
Successfully tagged huangxincheng520/webnotebook:v1
最后用docker run 把容器跑起来,然后到容器里面用curl看一看,可以正常看到html内容的。
[root@localhost publish]# docker run --name webnotebook -d huangxincheng520/webnotebook:v1
c4f6fcf41bb7f16a5d071670b9715f29930769bce4dfdc332f729421ea758adf
[root@localhost publish]# docker logs webnotebook
warn: Microsoft.AspNetCore.DataProtection.KeyManagement.XmlKeyManager[35]
      No XML encryptor configured. Key {89febb45-379d-434c-8d6f-519982cf7dd3} may be persisted to storage in unencrypted form.
warn: Microsoft.AspNetCore.Server.Kestrel[0]
      Unable to bind to http:localhost:5000 on the IPv6 loopback interface: 'Cannot assign requested address'.
Hosting environment: Production
Content root path: /data
Now listening on: http:localhost:5000
Application started. Press Ctrl+C to shut down.
[root@localhost publish]# docker exec -it webnotebook /bin/bash
[root@c4f6fcf41bb7 data]# curl http:localhost:5000
<!DOCTYPE html>
<html>
<head>
    <meta charset=utf-8" />
    <meta name=viewport" content=width=device-width,initial-scale=1.0" />
    <title>Home Page - WebNotebook</title>
3. 删除(批量)镜像
删除镜像之前先把容器给删除了,使用 docker rm 即可,加 " -f " 表示force模式的删除。
[root@localhost ~]# docker ps
CONTAINER ID        IMAGE               COMMAND                  CREATED             STATUS              PORTS               NAMES
c4f6fcf41bb7        370bac31a610        dotnet WebNotebook.…"   25 minutes ago      Up 25 minutes       5000/tcp            webnotebook
[root@localhost ~]#
[root@localhost ~]# docker rm -f webnotebook
webnotebook
然后再删除镜像,可以用镜像名或者ID都可以。
[root@localhost ~]# docker rmi -f 370bac31a610
Deleted: sha256:370bac31a610d019d1fe587f458cfa250761d2cb71921f55aa2e49593fa0f770
Deleted: sha256:a6a145a4e99324415d9f55135d428df0fb1c92c4c7cd0f738d7ccf0b456a6cff
Deleted: sha256:be8c2b370bb62edb20f0388afd767b5ae7a3b0f7b7c579b03d9ab0600d12c708
Deleted: sha256:01cb9ef8025421c112567a7a183b71264d2c960c5b032d4a0460752ef1609315
Deleted: sha256:73ebb899a30a18bbfdac2d275eb7817eaccde799841f049c08328e8e2d25c20e
Deleted: sha256:f0d3b80f85fc35efe302aeac376404f093a19443d5c8cd0cbd5ffd5dc3273c80
Deleted: sha256:aba79a0d1eb6d51fbcc7835842118054a29aa638f5a5f6e9d64052ebc989b807
Deleted: sha256:6cb7a3cb0c1b3a61f9776b1f0458a45c8833fa48adce58e0dceed54dafc92c57
Deleted: sha256:759696abeffa01d0c698aa29eb88bf48e6c11896d473597487d401d1b32bb118
Deleted: sha256:9c9cc8dd7605f836736bfeb72b9672635c37dc923ff5e39da68773f14497a3ab
Deleted: sha256:a0ceb44bdbaf4b654cd4dd623756b4d0e439561e6e2c53f58dd3f7ed35ec0ee0
Deleted: sha256:d6c422802c9c39bf7ffee0495205f434bd679e25cad1d188d1d1d561490980ae
Deleted: sha256:76c79033917b2a75b2b624aa3b3e0936bef76e3322f62508153fb6d9cf825e76
[root@localhost ~]# docker images
REPOSITORY          TAG                 IMAGE ID            CREATED             SIZE
centos              latest              1e1148e4cc2c         months ago        202MB
[root@localhost ~]#
也可以使用批量命令,一次性删除容器或者镜像。
docker rm -f `docker ps -a -q`        # 删除所有容器
docker rmi -f `docker images -q`    # 删除所有的镜像
好了,本篇就先说到这里,希望对你有帮助。
 最近一直在开发Apworks框架的案例代码,同时也在一起修复Apw...
 最近每天都在空闲时间努力编写Apworks框架的案例代码WeText。...
 在《Kubernetes中分布式存储Rook-Ceph部署快速演练》文章中,...
 CentOS下Docker与.netcore(一) 之 安装 CentOS下Docker与.ne...
 CentOS下Docker与.netcore(一) 之 安装 CentOS下Docker与.ne...