目录
1. 安装需求
在使用 python 框架 Django 需要注意下面事项
- Pycharm 版本是专业版而不是社区版本
- Pycharm 配置好了 python 解释器 (一般我们现在用的都是python3)
- 我自己使用的是 Pycharm 版本是2020.1.2
2. 准备工作
2.1 新建项目
首先我们打开 Pycharm 如下所示

可能有些小伙伴到这个界面怎么打开,你可以这样做,打开你的Pycharm编译器,然后点击左上角的 File -> Close Project
2.2 输入相关配置
按照下面我图中提示的做就行了,配置完成之后 点击Create

2.3 项目创建完成
这是在安装Django 框架, 等待一下即可
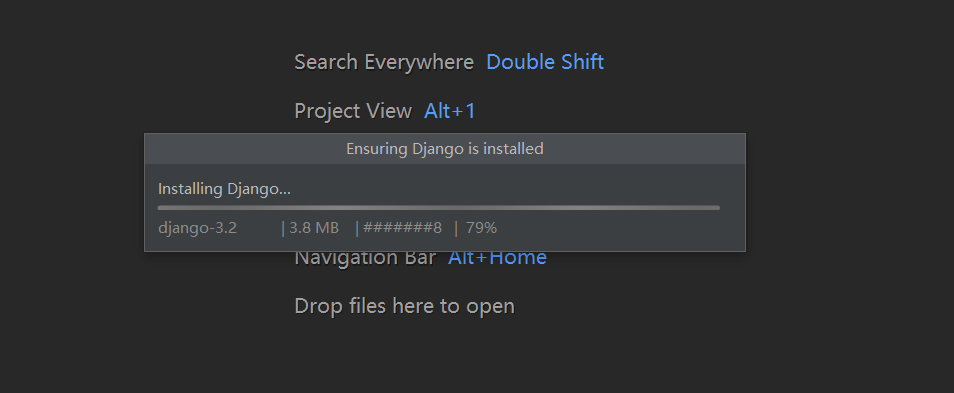
安装完成如下所示
2.4 查看安装 Django 版本
在 Pycharm 底部选择 Terminal 然后在里面输入:python -m django --version
(pytorch_gpu) D:\python-workspace\tutorial>python -m django --version
3.2
2.5 启动项目
在 Terminal 里面输入: python manage.py runserver
然后出现下面一个小错误
Traceback (most recent call last):
File "manage.py",line 22,in <module>
main()
File "manage.py",line 18,in main
execute_from_command_line(sys.argv)
File "D:\Python\Anaconda\envs\pytorch_gpu\lib\site-packages\django\core\management\__init__.py",line 419,in execute_from_command_line
utility.execute()
File "D:\Python\Anaconda\envs\pytorch_gpu\lib\site-packages\django\core\management\__init__.py",line 363,in execute
settings.INSTALLED_APPS
File "D:\Python\Anaconda\envs\pytorch_gpu\lib\site-packages\django\conf\__init__.py",line 82,in __getattr__
self._setup(name)
File "D:\Python\Anaconda\envs\pytorch_gpu\lib\site-packages\django\conf\__init__.py",line 69,in _setup
self._wrapped = Settings(settings_module)
File "D:\Python\Anaconda\envs\pytorch_gpu\lib\site-packages\django\conf\__init__.py",line 170,in __init__
mod = importlib.import_module(self.SETTINGS_MODULE)
File "D:\Python\Anaconda\envs\pytorch_gpu\lib\importlib\__init__.py",line 127,in import_module
return _bootstrap._gcd_import(name[level:],package,level)
File "<frozen importlib._bootstrap>",line 1006,in _gcd_import
File "<frozen importlib._bootstrap>",line 983,in _find_and_load
File "<frozen importlib._bootstrap>",line 967,in _find_and_load_unlocked
File "<frozen importlib._bootstrap>",line 677,in _load_unlocked
File "<frozen importlib._bootstrap_external>",line 728,in exec_module
File "<frozen importlib._bootstrap>",line 219,in _call_with_frames_removed
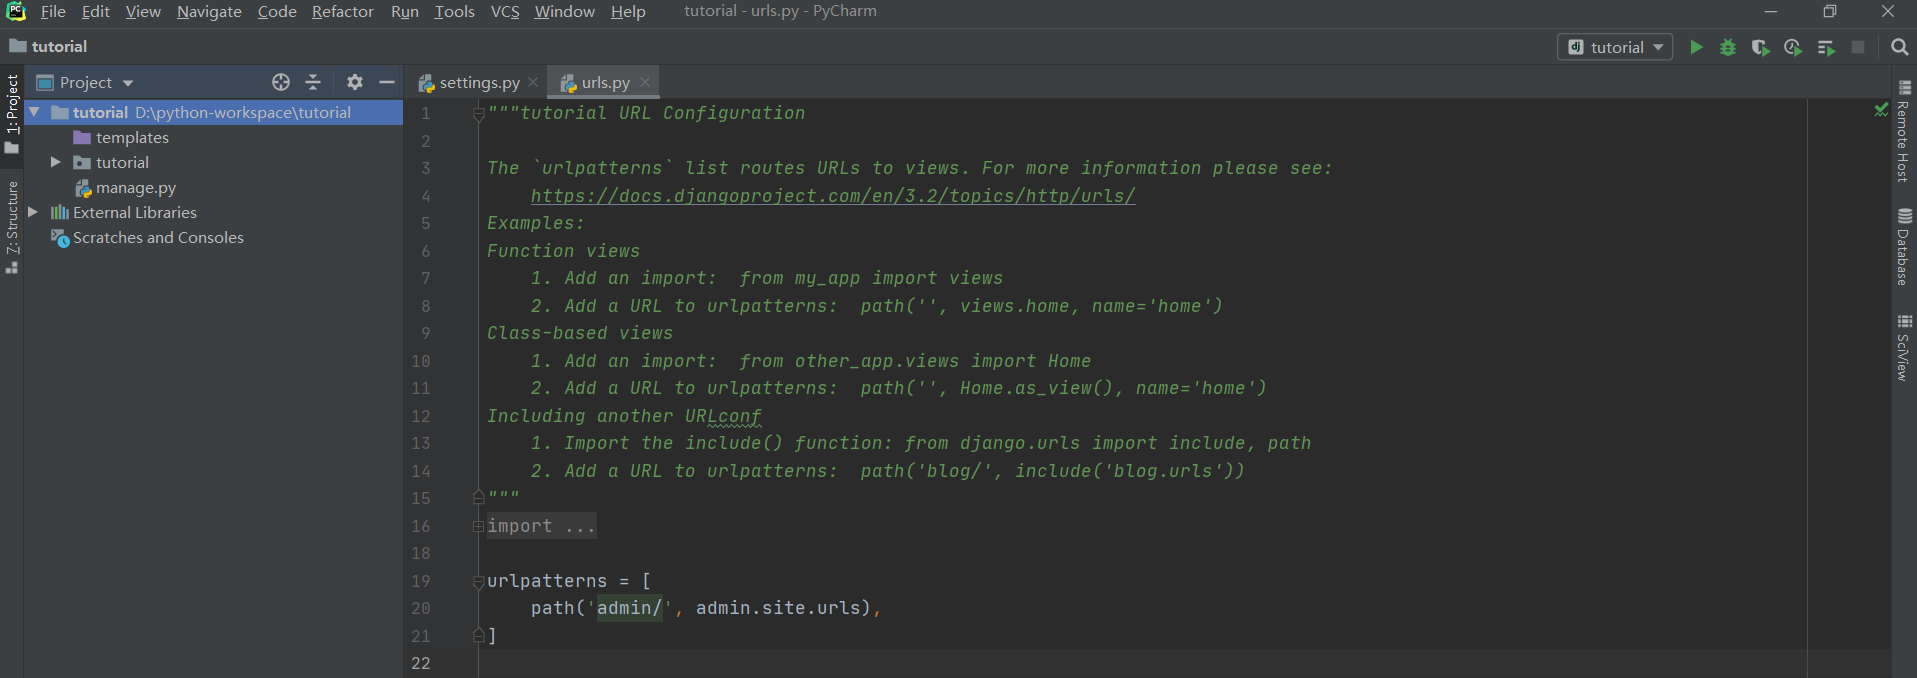
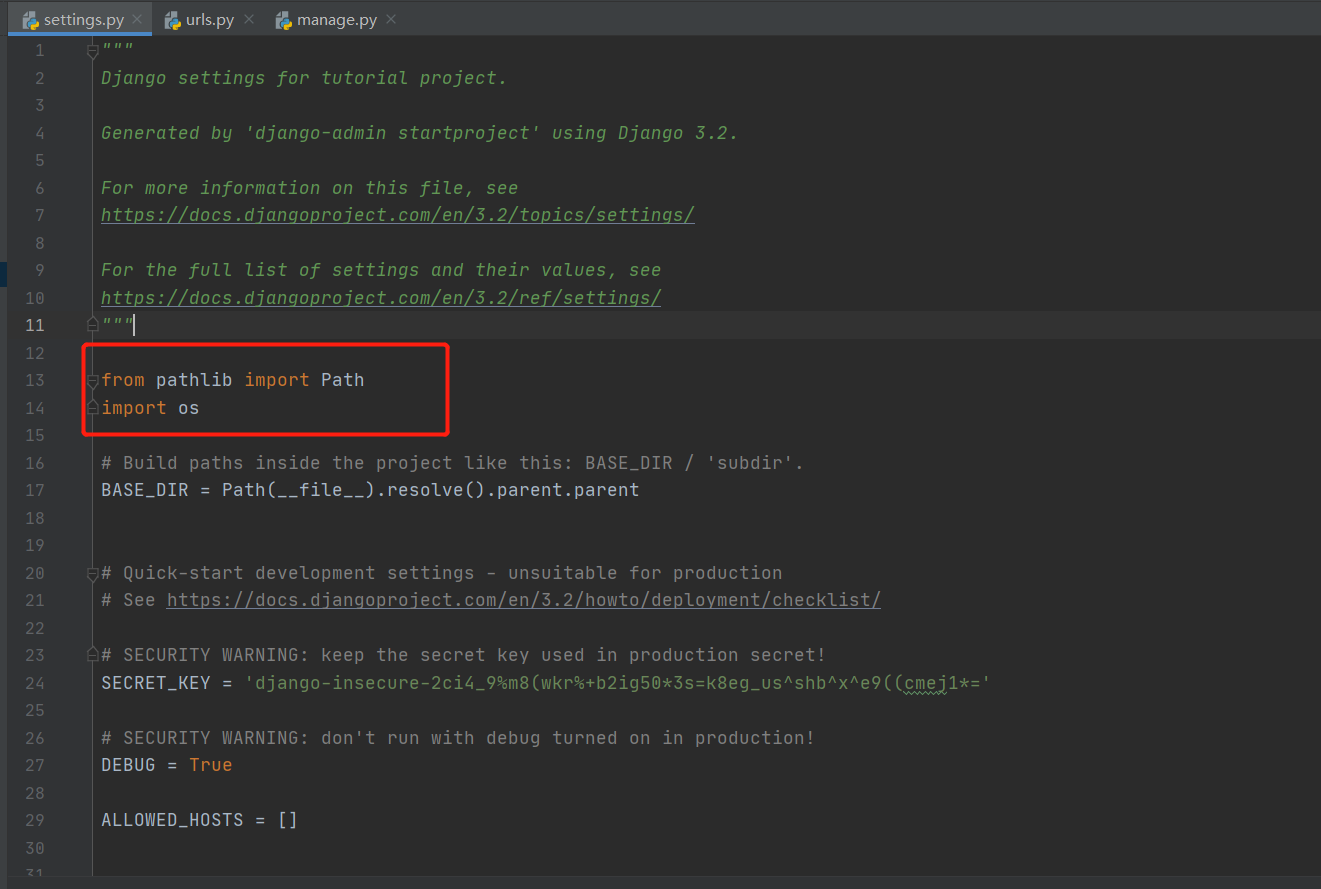
File "D:\python-workspace\tutorial\tutorial\settings.py",line 57,in <module>
'DIRS': [os.path.join(BASE_DIR,'templates')]
NameError: name 'os' is not defined
解决方案
找到 seetings。py 文件,然后在settings.py文件头加上:import os
再次执行: python manage.py runserver


出现上面这个界面基本上Django项目就搭建好了。
2.6 解决一点小问题
在启动 Django 项目的时候我发现控制台出现了下面一点小提示
You have 18 unapplied migration(s). Your project may not work properly until you apply the migrations for app(s): admin,auth,contenttypes,sessions.
Run 'python manage.py migrate' to apply them.
这个问题的我也不是了解是啥原因直接给大家上解决方案。
解决方法: 先 Ctrl + C 结束服务,执行这个命令 python manage.py migrate
Operations to perform:
  Apply all migrations: admin,sessions
Running migrations:
  Applying contenttypes.0001_initial... OK
  Applying auth.0001_initial... OK
  Applying admin.0001_initial... OK
  Applying admin.0002_logentry_remove_auto_add... OK
  Applying admin.0003_logentry_add_action_flag_choices... OK
  Applying contenttypes.0002_remove_content_type_name... OK
  Applying auth.0002_alter_permission_name_max_length... OK
  Applying auth.0003_alter_user_email_max_length... OK
  Applying auth.0004_alter_user_username_opts... OK
  Applying auth.0005_alter_user_last_login_null... OK
  Applying auth.0006_require_contenttypes_0002... OK
  Applying auth.0007_alter_validators_add_error_messages... OK
  Applying auth.0008_alter_user_username_max_length... OK
  Applying auth.0009_alter_user_last_name_max_length... OK
  Applying auth.0010_alter_group_name_max_length... OK
  Applying auth.0011_update_proxy_permissions... OK
  Applying auth.0012_alter_user_first_name_max_length... OK
  Applying sessions.0001_initial... OK
这样就大功告成了。
3. 一点小补充
可能有些人使用的社区版本,打开Pycharm 没有和我一样的界面显示,这里我推荐你们看下下面这个视频的教程,讲的还是挺详细的。
如何在pycharm community 版中搭建 django+mysql 开发环境
 继承APIView和ViewSetMixin;作用也与APIView基本类似,提供...
 一、Django介绍Python下有许多款不同的 Web 框架。Django是重...
 本文从nginx快速掌握到使用,gunicorn快速掌握到使用,实现小...
 uniapp微信小程序订阅消息发送服务通知