[root@ajing ~]# mkdir /data/www
[root@ajing ~]# cd /data/www
[root@ajing www]# wget http://download.comsenz.com/discuzX/3.2/discuz_X3.2_SC_GBK.zip
[root@ajing www]# unzip discuz_X3.2_SC_GBK.zip //解压
[root@ajing www]# ls
discuz_X3.2_SC_GBK.zip readme upload utility //程序存放在upload目录下
[root@ajing www]# mv upload/* ./ (把upload目录的文件全部移出来)

[root@ajing www]# rm -rf readme/ utility/ upload/ discuz_X3.2_SC_GBK.zip //把多余的目录删掉

//检查apache是否启动 ,下图表示未启动

//下面开始配置虚拟主机:


//虚拟主机的配置文件在conf目录下的extra目录下去掉#号
Include conf/extra/httpd-vhosts.conf
//按esc,:wq 保存退出
//此文件已生效加载。

//编辑虚拟主机配置文件

编辑成如下图:

检查文件是否有错
[root@ajing www]# /usr/local/apache2/bin/apachectl -t
Syntax OK
vim /usr/local/apache2/conf/httpd.conf

ServerName www.example.com:80 //去掉#号,保存退出ok.

[root@ajing www]# vim /etc/hosts

//ping 百度,在本地生效。
在windows下找到hosts文件,编辑192.168.1.105 www.test.com www.aaa.com 保存退出
[root@ajing www]# vim /usr/local/apache2/conf/httpd.conf

//改成如下图:

[root@ajing www]# /usr/local/apache2/bin/apachectl -t
Syntax OK
[root@ajing www]# /usr/local/apache2/bin/apachectl restart
[root@ajing www]#
//在ie里运行 www.test.com 图1

图2:

图3:


[root@ajing www]# chown -R daemon config data uc_client/data uc_server/data //此目录文件权限改为可写状态
[root@ajing www]#
//刷新ie就可以了。

//下一步

//第一次安装,直接下一步即可。
//配置数据库:

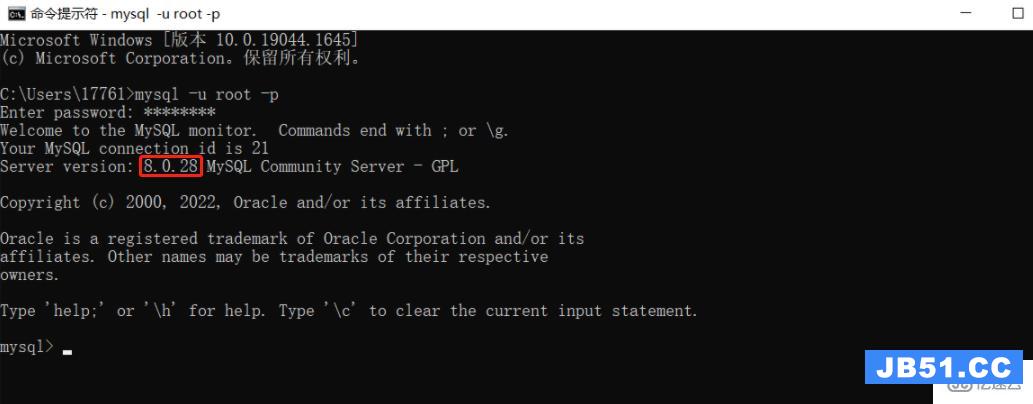
[root@ajing /]# whereis mysql // 查找以前配置的MysqL路径
MysqL: /usr/lib64/MysqL /usr/local/MysqL /usr/share/MysqL
[root@ajing /]# rpm -qa |grep MysqL* //查看MysqL包名
MysqL-libs-5.1.73-5.el6_6.x86_64
[root@ajing /]# yum remove MysqL //卸载以前配置的MysqL,因为discuz自带数据库
//如果想直接使用MysqL,需要编辑环境变量。
[root@ajing www]# MysqL
-bash: MysqL: command not found
[root@ajing www]# vim /etc/profile.d/path.sh
//编辑内容如下:

[root@ajing www]# source !$
source /etc/profile.d/path.sh
[root@ajing www]# MysqL
Welcome to the MysqL monitor. Commands end with ; or \g.
Your MysqL connection id is 6
Server version: 5.1.73 MysqL Community Server (GPL)
copyright (c) 2000, 2013, Oracle and/or its affiliates. All rights reserved.
Oracle is a registered Trademark of Oracle Corporation and/or its
affiliates. Other names may be Trademarks of their respective
owners.
Type 'help;' or '\h' for help. Type '\c' to clear the current input statement.
MysqL> quit
Bye
[root@ajing www]# which MysqL
[root@ajing www]# MysqL
Welcome to the MysqL monitor. Commands end with ; or \g.
Your MysqL connection id is 7
Server version: 5.1.73 MysqL Community Server (GPL)
copyright (c) 2000, 2013, Oracle and/or its affiliates. All rights reserved.
Oracle is a registered Trademark of Oracle Corporation and/or its
affiliates. Other names may be Trademarks of their respective
owners.
Type 'help;' or '\h' for help. Type '\c' to clear the current input statement.
MysqL> create database discuz; //创建数据库
Query OK, 1 row affected (0.04 sec)
MysqL> grant all on discuz.* to 'ajing'@'localhost' identified by 'ajing'; //为该库创建用户和密码
Query OK, 0 rows affected (0.06 sec)
//以上参数配置ok后,编辑数据库信息。如下图:(此处管理员密码为123456)

//下一步,处理完后如下图所示:

点击 您的论坛已完成安装,点此访问