序
在前面的文章C# 如何插入、修改、删除Word批注一文中介绍了如何操作Word批注的一些方法,在本篇文章中继续介绍操作Word批注的方法。分以下三种情况来介绍:
1. 插入图片到Word批注
2. 读取Word批注
3. 回复Word批注
所需工具
- Free Spire.Doc for .NET 6.3(社区版)
- Visual Studio
PS:下载安装Free Spire.Doc 后,注意在你的程序中添加引用Spire.Doc.dll(dll文件可以在安装路径下的Bin文件夹中获取)
示例代码
1. 插入图片到Word批注
步骤 1:添加using指令
using Spire.Doc;
 Spire.Doc.Documents;
 Spire.Doc.Fields;
using System.Drawing;
步骤 2:创建文档,加载测试文件
Document doc = new Document();
doc.LoadFromFile("testfile.docx");
步骤 3 :获取段落
Paragraph paragraph = doc.Sections[0].Paragraphs[2];
步骤 4 :添加文本、图片到批注
Comment comment = paragraph.AppendComment(探索黑科技,小米为发烧而生!");
comment.Format.Author = Administor;

DocPicture docPicture =  DocPicture(doc);
Image img = Image.FromFile(mi.png);
docPicture.LoadImage(img);
//插入图片到批注
comment.Body.AddParagraph().ChildObjects.Add(docPicture);
步骤 5 :保存文件
doc.SaveToFile(result.docx,FileFormat.Docx2013);
System.Diagnostics.Process.Start(");
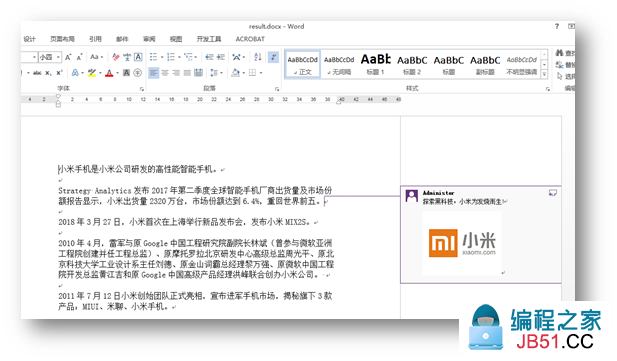
测试结果:
C#全部代码:


 System.Drawing;

namespace InsertImgToComment_Doc
{
    class Program
    {
        static void Main(string[] args)
        {
            实例化Document类,加载文档
            Document doc =  Document();
            doc.LoadFromFile();

            获取需要添加批注的段落
            Paragraph paragraph = doc.Sections[2];

            添加文本批注内容、批注作者
            Comment comment = paragraph.AppendComment();
            comment.Format.Author = ;

            实例化DocPicture类,加载图片
            DocPicture docPicture =  DocPicture(doc);
            Image img = Image.FromFile();
            docPicture.LoadImage(img);
            插入图片到批注
            comment.Body.AddParagraph().ChildObjects.Add(docPicture);

            保存文件并打开文档
            doc.SaveToFile();
        }
    }
}
VB.NET代码:
Imports Spire.Doc
 Spire.Doc.Documents
 Spire.Doc.Fields
 System.Drawing

Namespace InsertImgToComment_Doc
    Class Program
        Private Shared Sub Main(ByVal args As String())
            Dim doc As Document = New Document()
            doc.LoadFromFile()
            Dim paragraph As Paragraph = doc.Sections(0).Paragraphs(Dim comment As Comment = paragraph.AppendComment()
            comment.Format.Author = "
            Dim docPicture As DocPicture =  DocPicture(doc)
            Dim img As Image = Image.FromFile()
            docPicture.LoadImage(img)
            comment.Body.AddParagraph().ChildObjects.Add(docPicture)
            doc.SaveToFile()
        End Sub
    End Class
End Namespace
2.读取Word批注
步骤 1 :添加using指令
 System.Text;
 System.IO;
using Spire.Doc.Fields;
步骤 2 :创建实例,加载文档
Document doc = test.docx");
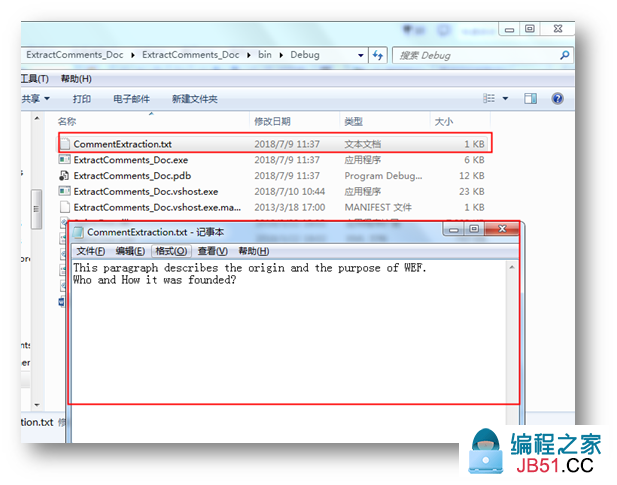
步骤 3 :将批注内容写入Txt文档
实例化StringBuilder类
StringBuilder SB =  StringBuilder();
遍历所有word批注,将批注内容写入Txt文档
foreach (Comment comment in doc.Comments)
{
    foreach (Paragraph p  comment.Body.Paragraphs)
    {
        SB.AppendLine(p.Text);
    }
}
File.WriteAllText(CommentExtraction.txt");
C# 全部代码:
 Spire.Doc.Fields;

 ExtractComments
{
    创建实例,加载文档
            Document doc = 实例化StringBuilder类
            StringBuilder SB =  StringBuilder();
            遍历所有word批注,将批注内容写入Txt文档
             doc.Comments)
            {
                 comment.Body.Paragraphs)
                {
                    SB.AppendLine(p.Text);
                }
            }
            File.WriteAllText();
        }
    }
}
VB.NET 代码
 System.Text
 System.IO
 Spire.Doc.Fields

 ExtractComments
    Dim SB As StringBuilder =  StringBuilder()

            For Each comment As Comment In doc.Comments

                Each p As Paragraph  comment.Body.Paragraphs
                    SB.AppendLine(p.Text)
                Next
            Next

            File.WriteAllText(End Namespace
3. 回复Word批注内容
步骤 1 :添加using指令
using Spire.Doc.Fields;
步骤 2 :创建实例
Document doc = ");
步骤 3 :获取批注
Comment comment = doc.Comments[0];
步骤 4 :回复批注
Comment replyComment =  Comment(doc);
replyComment.Format.Author = Adam;
replyComment.Body.AddParagraph().AppendText(这条批注内容请再丰富一下,内容有些单调);
comment.ReplyToComment(replyComment);
步骤 5 :保存文件
doc.SaveToFile(ReplyToComment.docx");
测试结果:

C# 全部代码:
 ReplyComment_Doc
{
    实例化Document类,加载文件
            Document doc = 获取第一个批注
            Comment comment = doc.Comments[0实例化Comment类,添加批注回复作者以及回复内容
            Comment replyComment =  Comment(doc);
            replyComment.Format.Author = ;
            replyComment.Body.AddParagraph().AppendText();
            comment.ReplyToComment(replyComment);

            保存文件并打开
            doc.SaveToFile();
        }
    }
}
VB.NET 代码:
 ReplyComment_Doc
    As Comment = doc.Comments(Dim replyComment As Comment =  Comment(doc)
            replyComment.Format.Author =
            replyComment.Body.AddParagraph().AppendText()
            comment.ReplyToComment(replyComment)
            doc.SaveToFile(End Namespace
以上为本次关于操作Word批注的全部内容。
(本文完)
如需转载,请注明出处。
 项目中经常遇到CSV文件的读写需求,其中的难点主要是CSV文件...
 简介 本文的初衷是希望帮助那些有其它平台视觉算法开发经验的...
 这篇文章主要简单记录一下C#项目的dll文件管理方法,以便后期...
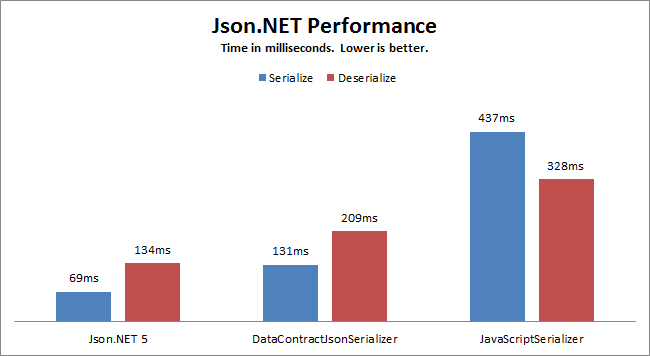 在C#中的使用JSON序列化及反序列化时,推荐使用Json.NET——...
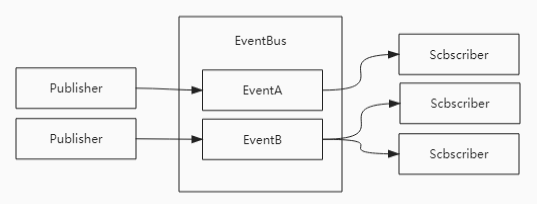 事件总线是对发布-订阅模式的一种实现,是一种集中式事件处理...
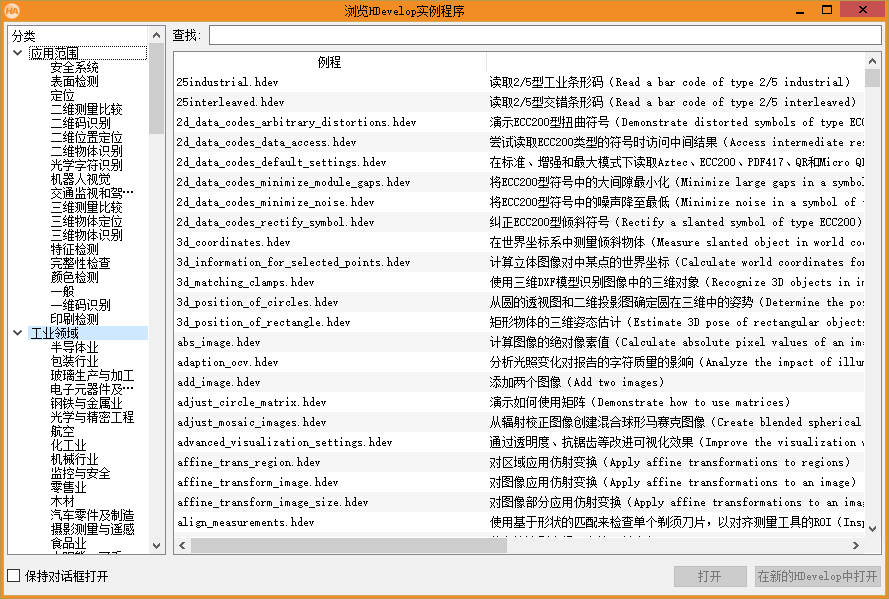 通用翻译API的HTTPS 地址为https://fanyi-api.baidu.com/api...