配置中心是我们平常使用微服务架构时重要的一个模块,常用的配置中心组件也比较多,从早期的Spring Cloud Config,到Disconf、Apollo、Nacos等,它们支持的功能、产品的性能以及给用户的体验也各有不同。
虽然说功能上有不少差异,但是它们解决的最核心问题,无疑是配置文件修改后的实时生效,有时候在搬砖之余Hydra就在好奇实时生效是如何实现的、如果让我来设计又会怎么去实现,于是这几天抽出了点空闲时间,摸鱼摸出了个简易版的单机配置中心,先来看看效果:

之所以说是简易版本,首先是因为实现的核心功能就只有配置修改后实时生效,并且代码的实现也非常简单,一共只用了8个类就实现了这个核心功能,看一下代码的结构,核心类就是core包中的这8个类:

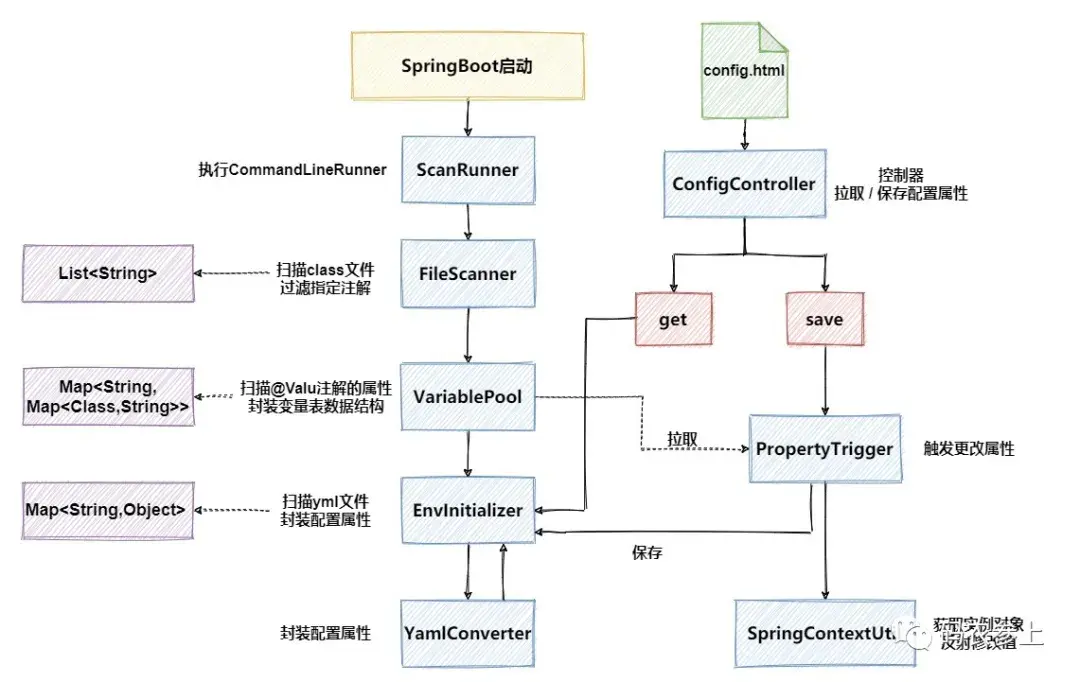
看到这是不是有点好奇,虽说是低配版,就凭这么几个类也能实现一个配置中心?那么先看一下总体的设计流程,下面我们再细说代码。
代码简要说明
下面对8个核心类进行一下简要说明并贴出核心代码,有的类中代码比较长,可能对手机浏览的小伙伴不是非常友好,建议收藏后以后电脑浏览器打开(骗波收藏,计划通!)。另外Hydra已经把项目的全部代码上传到了git,有需要的小伙伴可以移步文末获取地址。1、ScanRunner
ScanRunner实现了CommandLineRunner接口,可以保证它在springboot启动最后执行,这样就能确保其他的Bean已经实例化结束并被放入了容器中。至于为什么起名叫ScanRunner,是因为这里要实现的主要就是扫描类相关功能。先看一下代码:复制@Component
public class ScanRunner implements CommandLineRunner {
@Override
public void run(String... args) throws Exception {
doScanComponent();
}
private void doScanComponent(){
String rootPath = this.getClass().getResource("/").getPath();
List<String> fileList = FileScanner.findFileByType(rootPath,null,FileScanner.TYPE_CLASS);
doFilter(rootPath,fileList);
EnvInitializer.init();
}
private void doFilter(String rootPath, List<String> fileList) {
rootPath = FileScanner.getRealRootPath(rootPath);
for (String fullPath : fileList) {
String shortName = fullPath.replace(rootPath, "")
.replace(FileScanner.TYPE_CLASS,"");
String packageFileName=shortName.replaceAll(Matcher.quoteReplacement(File.separator),"\.");
try {
Class clazz = Class.forName(packageFileName);
if (clazz.isAnnotationPresent(Component.class)
|| clazz.isAnnotationPresent(Controller.class)
||clazz.isAnnotationPresent(Service.class)){
VariablePool.add(clazz);
}
} catch (ClassNotFoundException e) {
e.printStackTrace();
}
}
}
}
1.2.3.4.5.6.7.8.9.10.11.12.13.14.15.16.17.18.19.20.21.22.23.24.25.26.27.28.29.30.31.32.33.34.真正实现文件扫描功能是调用的FileScanner,它的实现我们后面具体再说,在功能上它能够根据文件后缀名扫描某一目录下的全部文件,这里首先扫描出了target目录下全部以.class结尾的文件:

扫描到全部class文件后,就可以利用类的全限定名获取到类的Class对象,下一步是调用doFilter方法对类进行过滤。这里我们暂时仅考虑通过@Value注解的方式注入配置文件中属性值的方式,那么下一个问题来了,什么类中的@Value注解会生效呢?答案是通过@Component、@Controller、@Service这些注解交给spring容器管理的类。
综上,我们通过这些注解再次进行过滤出符合条件的类,找到后交给VariablePool对变量进行处理。
2、FileScanner
FileScanner是扫描文件的工具类,它可以根据文件后缀名筛选出需要的某个类型的文件,除了在ScanRunner中用它扫描了class文件外,在后面的逻辑中还会用它扫描yml文件。下面,看一下FileScanner中实现的文件扫描的具体代码:复制public class FileScanner {
public static final String TYPE_CLASS=".class";
public static final String TYPE_YML=".yml";
public static List<String> findFileByType(String rootPath, List<String> fileList,String fileType){
if (fileList==null){
fileList=new ArrayList<>();
}
File rootFile=new File(rootPath);
if (!rootFile.isDirectory()){
addFile(rootFile.getPath(),fileList,fileType);
}else{
String[] subFileList = rootFile.list();
for (String file : subFileList) {
String subFilePath=rootPath + "\" + file;
File subFile = new File(subFilePath);
if (!subFile.isDirectory()){
addFile(subFile.getPath(),fileList,fileType);
}else{
findFileByType(subFilePath,fileList,fileType);
}
}
}
return fileList;
}
private static void addFile(String fileName,List<String> fileList,String fileType){
if (fileName.endsWith(fileType)){
fileList.add(fileName);
}
}
public static String getRealRootPath(String rootPath){
if (System.getProperty("os.name").startsWith("Windows")
&& rootPath.startsWith("/")){
rootPath = rootPath.substring(1);
rootPath = rootPath.replaceAll("/", Matcher.quoteReplacement(File.separator));
}
return rootPath;
}
}
1.2.3.4.5.6.7.8.9.10.11.12.13.14.15.16.17.18.19.20.21.22.23.24.25.26.27.28.29.30.31.32.33.34.35.36.37.38.39.40.41.42.查找文件的逻辑很简单,就是在给定的根目录rootPath下,循环遍历每一个目录,对找到的文件再进行后缀名的比对,如果符合条件就加到返回的文件名列表中。
至于下面的这个getRealRootPath方法,是因为在windows环境下,获取到项目的运行目录是这样的:
复制/F:/Workspace/hermit-purple-config/target/classes/
1.而class文件名是这样的:
复制F:Workspacehermit-purple-configtargetclassescomcnhermimtpurpletestserviceUserService.class
1.如果想要获取一个类的全限定名,那么首先要去掉运行目录,再把文件名中的反斜杠替换成点.,这里就是为了删掉文件名中的运行路径提前做好准备。
3、VariablePool
回到上面的主流程中,每个在ScanRunner中扫描出的带有@Component、@Controller、@Service注解的Class,都会交给VariablePool进行处理。顾名思义,VariablePool就是变量池的意思,下面会用这个容器封装所有带@Value注解的属性。复制public class VariablePool {
public static Map<String, Map<Class,String>> pool=new HashMap<>();
private static final String regex="^(\$\{)(.)+(\})#34;;
private static Pattern pattern;
static{
pattern=Pattern.compile(regex);
}
public static void add(Class clazz){
Field[] fields = clazz.getDeclaredFields();
for (Field field : fields) {
if (field.isAnnotationPresent(Value.class)){
Value annotation = field.getAnnotation(Value.class);
String annoValue = annotation.value();
if (!pattern.matcher(annoValue).matches())
continue;
annoValue=annoValue.replace("${","");
annoValue=annoValue.substring(0,annoValue.length()-1);
Map<Class,String> clazzMap = Optional.ofNullable(pool.get(annoValue))
.orElse(new HashMap<>());
clazzMap.put(clazz,field.getName());
pool.put(annoValue,clazzMap);
}
}
}
public static Map<String, Map<Class,String>> getPool() {
return pool;
1.2.3.4.5.6.7.8.9.10.11.12.13.14.15.16.17.18.19.20.21.22.23.24.25.26.27.28.29.30.31.32.简单说一下这块代码的设计思路:
通过反射拿到Class对象中所有的属性,并判断属性是否加了@Value注解@Value如果要注入配置文件中的值,一定要符合${xxx}的格式(这里先暂时不考虑${xxx:defaultValue}这种设置了默认值的格式),所以需要使用正则表达式验证是否符合,并校验通过后去掉开头的${和结尾的},获取真正对应的配置文件中的字段VariablePool中声明了一个静态HashMap,用于存放所有配置文件中属性-类-类中属性的映射关系,接下来就要把这个关系存放到这个pool中简单来说,变量池就是下面这样的结构:

这里如果不好理解的话可以看看例子,我们引入两个测试Service:
复制@Service
public class UserService {
@Value("${person.name}")
String name;
@Value("${person.age}")
Integer age;
}
@Service
public class UserDeptService {
@Value("${person.name}")
String pname;
}
1.2.3.4.5.6.7.8.9.10.11.12.13.在所有Class执行完add方法后,变量池pool中的数据是这样的:

可以看到在pool中,person.name对应的内层Map中包含了两条数据,分别是UserService中的name字段,以及UserDeptService中的pname字段。
4、EnvInitializer
在VariablePool封装完所有变量数据后,ScanRunner会调用EnvInitializer的init方法,开始对yml文件进行解析,完成配置中心环境的初始化。其实说白了,这个环境就是一个静态的HashMap,key是属性名,value就是属性的值。复制public class EnvInitializer {
private static Map<String,Object> envMap=new HashMap<>();
public static void init(){
String rootPath = EnvInitializer.class.getResource("/").getPath();
List<String> fileList = FileScanner.findFileByType(rootPath,null,FileScanner.TYPE_YML);
for (String ymlFilePath : fileList) {
rootPath = FileScanner.getRealRootPath(rootPath);
ymlFilePath = ymlFilePath.replace(rootPath, "");
YamlMapFactoryBean yamlMapFb = new YamlMapFactoryBean();
yamlMapFb.setResources(new ClassPathResource(ymlFilePath));
Map<String, Object> map = yamlMapFb.getObject();
YamlConverter.doConvert(map,null,envMap);
}
}
public static void setEnvMap(Map<String, Object> envMap) {
EnvInitializer.envMap = envMap;
}
public static Map<String, Object> getEnvMap() {
return envMap;
}
}
1.2.3.4.5.6.7.8.9.10.11.12.13.14.15.16.17.18.19.20.21.22.23.首先还是使用FileScanner扫描根目录下所有的.yml结尾的文件,并使用spring自带的YamlMapFactoryBean进行yml文件的解析。但是这里有一个问题,所有yml文件解析后都会生成一个独立的Map,需要进行Map的合并,生成一份配置信息表。至于这一块具体的操作,都交给了下面的YamlConverter进行处理。
我们先进行一下演示,准备两个yml文件,配置文件一:application.yml
复制spring:
application:
name: hermit-purple
server:
port: 6879
person:
name: Hydra
age: 18
1.2.3.4.5.6.7.8.配置文件二:config/test.yml
复制my:
name: John
friend:
name: Jay
sex: male
run: yeah
1.2.3.4.5.6.先来看一看环境完成初始化后,生成的数据格式是这样的:

5、YamlConverter
YamlConverter主要实现的方法有三个:doConvert():将EnvInitializer中提供的多个Map合并成一个单层MapmonoToMultiLayer():将单层Map转换为多层Map(为了生成yml格式字符串)convert():yml格式的字符串解析为Map(为了判断属性是否发生变化)由于后面两个功能暂时还没有涉及,我们先看第一段代码:
复制public class YamlConverter {
public static void doConvert(Map<String,Object> map,String parentKey,Map<String,Object> propertiesMap){
String prefix=(Objects.isNull(parentKey))?"":parentKey+".";
map.forEach((key,value)->{
if (value instanceof Map){
doConvert((Map)value,prefix+key,propertiesMap);
}else{
propertiesMap.put(prefix+key,value);
}
});
}
//...
}
1.2.3.4.5.6.7.8.9.10.11.12.13.逻辑也很简单,通过循环遍历的方式,将多个Map最终都合并到了目的envMap中,并且如果遇到多层Map嵌套的情况,那么将多层Map的key通过点.进行了连接,最终得到了上面那张图中样式的单层Map。
其余两个方法,我们在下面使用到的场景再说。
6、ConfigController
ConfigController作为控制器,用于和前端进行交互,只有两个接口save和get,下面分别介绍。get
前端页面在开启时会调用ConfigController中的get接口,填充到textArea中。先看一下get方法的实现:复制@GetMapping("get")
public String get(){
ObjectMapper objectMapper = new ObjectMapper(new YAMLFactory());
String yamlContent = null;
try {
Map<String, Object> envMap = EnvInitializer.getEnvMap();
Map<String, Object> map = YamlConverter.monoToMultiLayer(envMap, null);
yamlContent = objectMapper.writeValueAsString(map);
} catch (Exception e) {
e.printStackTrace();
}
return yamlContent;
}
1.2.3.4.5.6.7.8.9.10.11.12.13.之前在项目启动时,就已经把配置文件属性封装到了EnvInitializer的envMap中,并且这个envMap是一个单层的Map,不存在嵌套关系。但是我们这里要使用jackson生成标准格式的yml文档,这种格式不符合要求,需要将它还原成一个具有层级关系的多层Map,就需要调用YamlConverter的monoToMultiLayer()方法。
monoToMultiLayer()方法的代码有点长,就不贴在这里了,主要是根据key中的.进行拆分并不断创建子级的Map,转换完成后得到的多层Map数据如下:

在获得这种格式后的Map后,就可以调用jackson中的方法将Map转换为yml格式的字符串传递给前端了,看一下处理完成后返回给前端的字符串:

save
在前端页面修改了yml内容后点击保存时,会调用save方法保存并更新配置,方法的实现如下:复制@PostMapping("save")
public String save(@RequestBody Map<String,Object> newValue) {
String ymlContent =(String) newValue.get("yml");
PropertyTrigger.change(ymlContent);
return "success";
}
1.2.3.4.5.6.在拿到前端传过来的yml字符串后,调用PropertyTrigger的change方法,实现后续的更改逻辑。
7、PropertyTrigger
在调用change方法后,主要做的事情有两件:修改EnvInitializer中的环境envMap,用于前端页面刷新时返回新的数据,以及下一次属性改变时进行对比使用修改bean中属性的值,这也是整个配置中心最重要的功能先看一下代码:
复制public class PropertyTrigger {
public static void change(String ymlContent) {
Map<String, Object> newMap = YamlConverter.convert(ymlContent);
Map<String, Object> oldMap = EnvInitializer.getEnvMap();
oldMap.keySet().stream()
.filter(key->newMap.containsKey(key))
.filter(key->!newMap.get(key).equals(oldMap.get(key)))
.forEach(key->{
System.out.println(key);
Object newVal = newMap.get(key);
oldMap.put(key, newVal);
doChange(key,newVal);
});
EnvInitializer.setEnvMap(oldMap);
}
private static void doChange(String propertyName, Object newValue) {
System.out.println("newValue:"+newValue);
Map<String, Map<Class, String>> pool = VariablePool.getPool();
Map<Class, String> classProMap = pool.get(propertyName);
classProMap.forEach((clazzName,realPropertyName)->{
try {
Object bean = SpringContextUtil.getBean(clazzName);
Field field = clazzName.getDeclaredField(realPropertyName);
field.setAccessible(true);
field.set(bean, newValue);
} catch (NoSuchFieldException | IllegalAccessException e) {
e.printStackTrace();
}
});
}
}
1.2.3.4.5.6.7.8.9.10.11.12.13.14.15.16.17.18.19.20.21.22.23.24.25.26.27.28.29.30.31.32.33.34.前面铺垫了那么多,其实就是为了实现这段代码中的功能,具体逻辑如下:
调用YamlConverter的convert方法,将前端传来的yml格式字符串解析封装成单层Map,数据格式和EnvInitializer中的envMap相同遍历旧的envMap,查看其中的key在新的Map中对应的属性值是否发生了改变,如果没有改变则不做之后的任何操作如果发生改变,用新的值替换envMap中的旧值通过属性名称,从VariablePool中拿到涉及改变的Class,以及类中的字段Field。并通过后面的SpringContextUtil中的方法获取到这个bean的实例对象,再通过反射改变字段的值将修改后的Map写回EnvInitializer中的envMap到这里,就实现了全部的功能。
8、SpringContextUtil
SpringContextUtil通过实现ApplicationContextAware接口获得了spring容器,而通过容器的getBean()方法就可以容易的拿到spring中的bean,方便进行后续的更改操作。复制@Component
public class SpringContextUtil implements ApplicationContextAware {
private static ApplicationContext applicationContext;
@Override
public void setApplicationContext(ApplicationContext applicationContext) throws BeansException {
this.applicationContext = applicationContext;
}
public static <T> T getBean(Class<T> t) {
return applicationContext.getBean(t);
}
}
1.2.3.4.5.6.7.8.9.10.11.
9、前端代码
至于前端代码,就是一个非常简单的表单,代码的话可以移步git查看。最后
到这里全部的代码介绍完了,最后做一个简要的总结吧,虽然通过这几个类能够实现一个简易版的配置中心功能,但是还有不少的缺陷,例如:没有处理@ConfigurationProperties注解只处理了yml文件,没有处理properties文件目前处理的bean都是基于singleton模式,如果作用域为prototype,也会存在问题反射性能低,如果某个属性涉及的类很多会影响性能目前只能代码嵌入到项目中使用,还不支持独立部署及远程注册功能……总的来说,后续需要完善的点还有不少,真是感觉任重道远。
最后再聊聊项目的名称,为什么取名叫hermit-purple呢,来源是jojo中二乔的替身隐者之紫,感觉这个替身的能力和配置中心的感知功能还是蛮搭配的,所以就用了这个哈哈。
那么这次的分享就到这里,我是Hydra,预祝大家虎年春节快乐,我们下篇再见。
责任编辑:武晓燕来源: 码农参上 作者:Dr Hydra
 所以很多人都会选择将这些生活琐事来交给智能化产品,在众多...
 “昨天的经历都将成为明天的力量。”
将绝大部分精力都奉献给...
“昨天的经历都将成为明天的力量。”
将绝大部分精力都奉献给... 最近,全球知名的通信产业盛会MWC 2024(2024世界移动通信大...
 今年上半年有很多值得关注的机型,其中华为最新的影像旗舰华...
 目前,2024世界移动通信大会(MWC)正在西班牙巴塞罗那举行,值...
 就在去年,真我推出了11 Pro+,用一个2亿像素传感器和zoom变...