1. 先完成自定义手势的Activity
1.1 因为需要存储手势文件所以需要声明权限:
<uses-permission android:name="android.permission.READ_EXTERNAL_STORAGE" /> //读取SD卡权限
<uses-permission android:name="android.permission.WRITE_EXTERNAL_STORAGE" /> //写入SD卡权限
1.2 简单写一个布局文件,其中用到了GestureOverlayView,相当于一个绘制组件。其中有一个重要属性gestureStrokeType,值为single时表示只绘制一笔,若要多笔绘制值应该设为multiple:
<?xml version="1.0" encoding="utf-8"?>
<LinearLayout xmlns:android="http://schemas.android.com/apk/res/android"
 xmlns:app="http://schemas.android.com/apk/res-auto"
 xmlns:tools="http://schemas.android.com/tools"
 android:layout_width="match_parent"
 android:layout_height="match_parent"
 android:orientation="vertical"
 tools:context=".addgesture.Main3Activity">
 <Button
  android:layout_width="match_parent"
  android:layout_height="wrap_content"
  android:onClick="recognition"
  android:text="识别手势" />
 <TextView
  android:layout_width="match_parent"
  android:layout_height="wrap_content"
  android:gravity="center"
  android:text="请绘制手势" />
 <android.gesture.GestureOverlayView
  android:id="@+id/activity_main3_gov"
  android:layout_width="match_parent"
  android:layout_height="match_parent"
  android:gestureStrokeType="multiple" //多笔绘制
  ></android.gesture.GestureOverlayView>
</LinearLayout>
1.3 这里自定义了AlertDialog的样式;
<?xml version="1.0" encoding="utf-8"?>
<LinearLayout xmlns:android="http://schemas.android.com/apk/res/android"
 android:layout_width="match_parent"
 android:layout_height="match_parent"
 android:orientation="vertical">
 <LinearLayout
  android:layout_width="match_parent"
  android:layout_height="wrap_content">
  <TextView
   android:layout_width="wrap_content"
   android:layout_height="match_parent"
   android:gravity="center"
   android:text="请输入手势名称" />
  <EditText  //输入手势的名称
   android:id="@+id/save_dialog_et"
   android:layout_width="match_parent"
   android:layout_height="match_parent" />
 </LinearLayout>
 <ImageView  //展示绘制的手势
  android:id="@+id/save_dialog_iv"
  android:layout_width="match_parent"
  android:layout_height="match_parent" />
</LinearLayout>
1.4 代码部分:
package com.example.mygesture.addgesture;
import android.Manifest;
import android.content.DialogInterface;
import android.content.Intent;
import android.content.pm.PackageManager;
import android.gesture.Gesture;
import android.gesture.GestureLibraries;
import android.gesture.GestureLibrary;
import android.gesture.GestureOverlayView;
import android.graphics.Bitmap;
import android.graphics.Color;
import android.support.v4.app.ActivityCompat;
import android.support.v7.app.AlertDialog;
import android.support.v7.app.AppCompatActivity;
import android.os.Bundle;
import android.view.View;
import android.widget.EditText;
import android.widget.ImageView;
import android.widget.Toast;
import com.example.mygesture.R;
import com.example.mygesture.recognitiongesture.Main4Activity;
public class Main3Activity extends AppCompatActivity {
 GestureOverlayView gov;   //定义绘制组件
 @Override
 protected void onCreate(Bundle savedInstanceState) {
  super.onCreate(savedInstanceState);
  setContentView(R.layout.activity_main3);
  if (ActivityCompat.checkSelfPermission(this,Manifest.permission.READ_EXTERNAL_STORAGE) != PackageManager.PERMISSION_GRANTED) {
   ActivityCompat.requestPermissions(this,new String[]{Manifest.permission.READ_EXTERNAL_STORAGE,Manifest.permission.WRITE_EXTERNAL_STORAGE},1);
  }    //高版本需要动态申请权限
  init();
 }
 private void init() {
  gov = findViewById(R.id.activity_main3_gov);
//  gov.setGestureColor(Color.RED);  //设置绘制的颜色
  gov.setGestureStrokeWidth(4);  //设置画笔的宽度
  gov.addOnGesturePerformedListener(new GestureOverlayView.OnGesturePerformedListener() { //设置绘制完成监听
   @Override
   public void onGesturePerformed(GestureOverlayView overlay,final Gesture gesture) {
    View saveDialog = getLayoutInflater().inflate(R.layout.save_dialog,null); //获取AlertDialog的布局样式
    final EditText editText = saveDialog.findViewById(R.id.save_dialog_et);
    ImageView imageView = saveDialog.findViewById(R.id.save_dialog_iv);
    Bitmap bitmap = gesture.toBitmap(128,128,10,0xFFFF0000);  //将手势转换为位图
    imageView.setImageBitmap(bitmap);   //用ImageView加载手势图片
    new AlertDialog.Builder(Main3Activity.this).setView(saveDialog).setPositiveButton("确定",new DialogInterface.OnClickListener() {
     @Override
     public void onClick(DialogInterface dialog,int which) {
      GestureLibrary gestureLibrary = GestureLibraries.fromFile("/mnt/sdcard/mygesture");//利用手势库获取存放手势文件的地址
      gestureLibrary.addGesture(editText.getText().toString(),gesture);  //向手势库中添加手势名称和手势
      gestureLibrary.save();    //保存手势库
      Toast.makeText(Main3Activity.this,"保存成功",Toast.LENGTH_SHORT).show();
     }
    }).setNegativeButton("取消",null)
      .show();
   }
  });
 }
 public void recognition(View view) {
  Intent intent = new Intent(this,Main4Activity.class);
  startActivity(intent);
 }
}
2. 接下来完成识别手势的Activity:
2.1 一样的先写布局文件
<?xml version="1.0" encoding="utf-8"?>
<LinearLayout xmlns:android="http://schemas.android.com/apk/res/android"
 xmlns:app="http://schemas.android.com/apk/res-auto"
 xmlns:tools="http://schemas.android.com/tools"
 android:layout_width="match_parent"
 android:layout_height="match_parent"
 android:orientation="vertical"
 tools:context=".recognitiongesture.Main4Activity">

 <TextView
  android:layout_width="match_parent"
  android:layout_height="wrap_content"
  android:gravity="center"
  android:text="请绘制需要识别的手势" />

 <android.gesture.GestureOverlayView
  android:id="@+id/activity_main4_gov"
  android:layout_width="match_parent"
  android:layout_height="match_parent"></android.gesture.GestureOverlayView>
</LinearLayout>
2.2 代码的编写
package com.example.mygesture.recognitiongesture;
import android.gesture.Gesture;
import android.gesture.GestureLibraries;
import android.gesture.GestureLibrary;
import android.gesture.GestureOverlayView;
import android.gesture.Prediction;
import android.support.v7.app.AlertDialog;
import android.support.v7.app.AppCompatActivity;
import android.os.Bundle;
import android.widget.ArrayAdapter;
import android.widget.Toast;
import com.example.mygesture.R;
import java.util.ArrayList;
import java.util.logging.Level;
public class Main4Activity extends AppCompatActivity {
 GestureOverlayView gov;
 GestureLibrary gestureLibrary;  //定义手势库
 @Override
 protected void onCreate(Bundle savedInstanceState) {
  super.onCreate(savedInstanceState);
  setContentView(R.layout.activity_main4);
  init();
 }
 private void init() {
  gestureLibrary = GestureLibraries.fromFile("/mnt/sdcard/mygesture"); //获取手势文件
  if (gestureLibrary.load()) {   //判断手势文件是否存在以及加载
   Toast.makeText(this,"手势文件加载成功",Toast.LENGTH_SHORT).show();
  } else {
   Toast.makeText(this,"手势文件加载失败",Toast.LENGTH_SHORT).show();
  }
  gov = findViewById(R.id.activity_main4_gov);
  gov.addOnGesturePerformedListener(new GestureOverlayView.OnGesturePerformedListener() {
   @Override
   public void onGesturePerformed(GestureOverlayView overlay,Gesture gesture) {
    ArrayList<Prediction> predictions = gestureLibrary.recognize(gesture); //匹配手势库中的所有手势
    ArrayList<String> result = new ArrayList<>();  //匹配结果数组
    for (Prediction pred : predictions) {
     if (pred.score > 2) {    //匹配手势库中的所有手势,并将相似度>2存入匹配结果数组
      result.add("相似度:" + pred.score);
     }
    }
    if (result.size() > 0) {  //这里用了适配器来作为AlertDialog的布局样式,用于显示所有手势的相似度
     ArrayAdapter<Object> arrayAdapter = new ArrayAdapter<Object>(Main4Activity.this,android.R.layout.simple_dropdown_item_1line,result.toArray());
     new AlertDialog.Builder(Main4Activity.this).setAdapter(arrayAdapter,null).setPositiveButton("确定",null).show();
    } else {
     Toast.makeText(Main4Activity.this,"未找到与之匹配的手势",Toast.LENGTH_SHORT).show();
    }
   }
  });
 }
}
总结
以上所述是小编给大家介绍的Android实现自定义手势和识别手势的功能,希望对大家有所帮助,如果大家有任何疑问请给我留言,小编会及时回复大家的。在此也非常感谢大家对我们网站的支持!
如果你觉得本文对你有帮助,欢迎转载,烦请注明出处,谢谢!
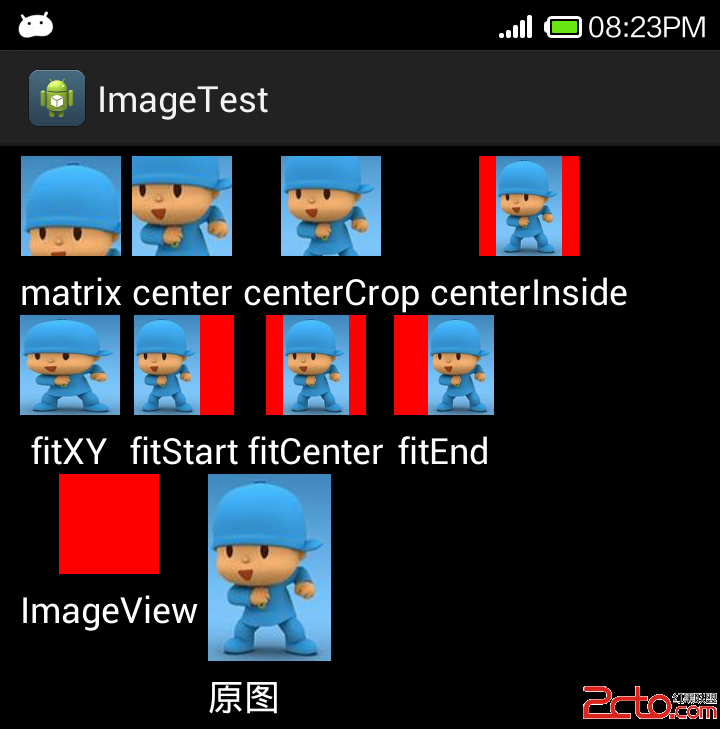 ImageView的scaleType的属性有好几种,分别是matrix(默认)...
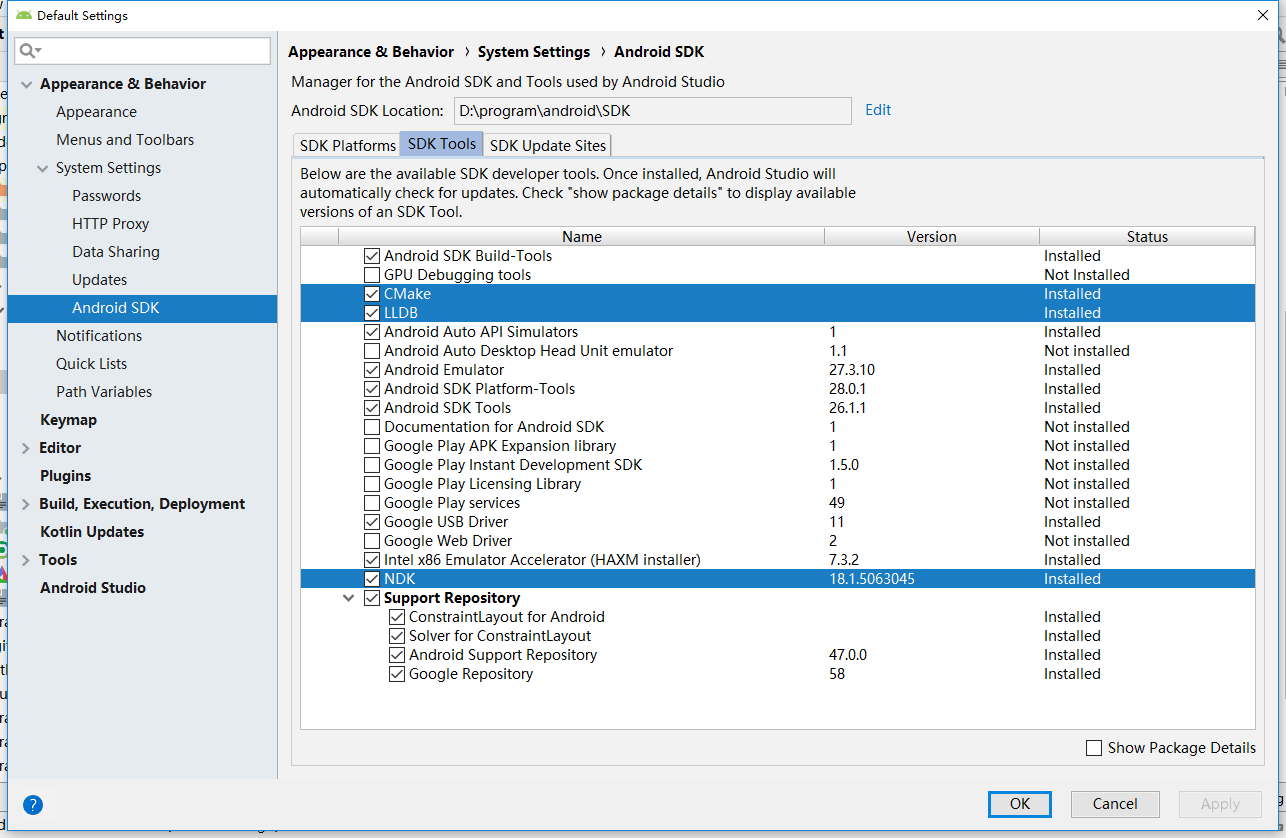 文章浏览阅读8.8k次,点赞9次,收藏20次。本文操作环境:win1...
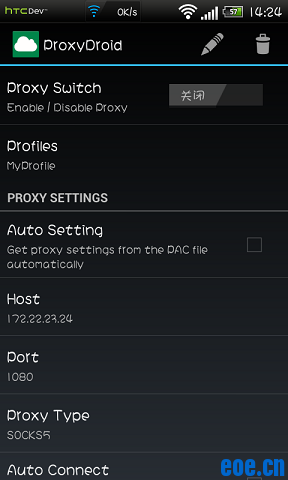 文章浏览阅读3.8w次。前言:最近在找Android上的全局代理软件...
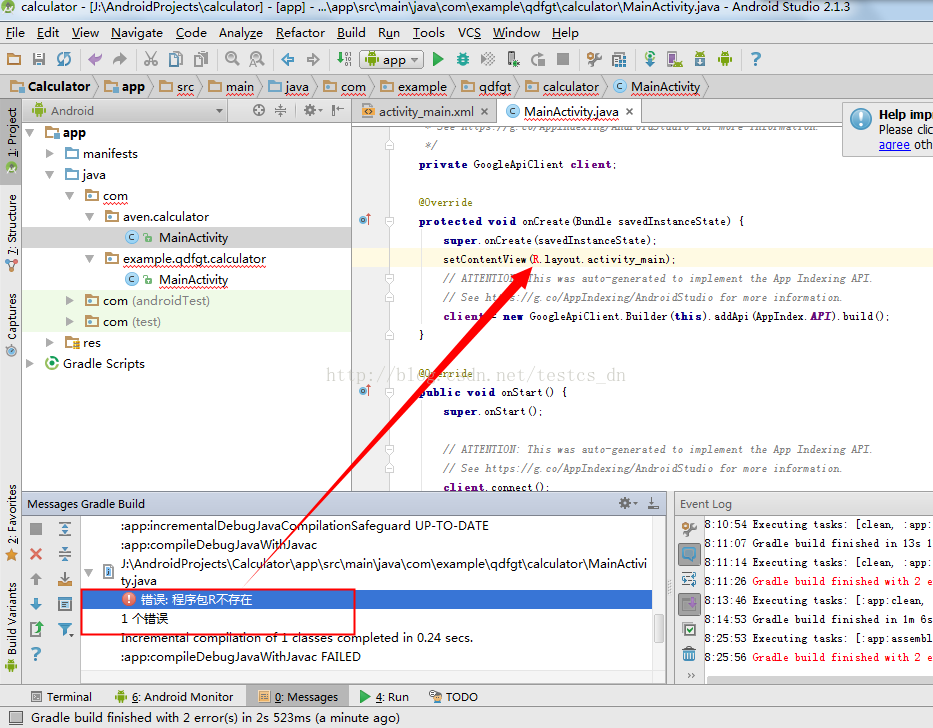 文章浏览阅读2.5w次,点赞17次,收藏6次。创建项目后,运行项...