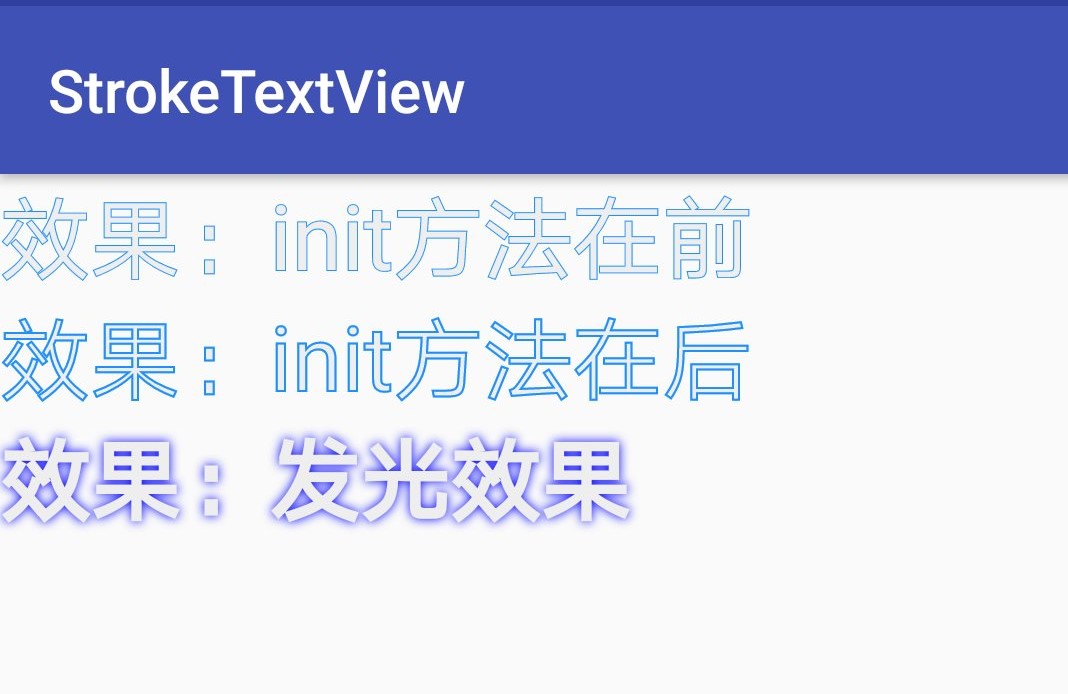
我希望在我的应用程序中有一个具有百分比值的气泡,我不能使用9个补丁,因为我希望它可以自定义并且它的背景颜色应该是可变的.
看起来应该是这样的
看起来应该是这样的
我该怎么做?这个泡泡会在其内部膨胀视图,如此百分比或一些较大的布局.
另外,根据布局(手机或平板电脑),它可能有一侧比另一侧大(箭头不在中心),这是我更喜欢以编程方式进行的另一个原因
解决方法
创建一个自定义Drawable并将其用于放置文本或其他视图的任何容器的背景.
您需要修改背景的填充以考虑气泡的指针.
下面的代码允许您将指针的对齐方式设置为LEFT,CENTER或RIGHT.
这只是一个基本版本,可以给你一个想法.您可以轻松地为气泡颜色添加一个setter,或者为’mPaint’添加stroke属性以获得额外的灵活性.
您需要修改背景的填充以考虑气泡的指针.
下面的代码允许您将指针的对齐方式设置为LEFT,CENTER或RIGHT.
这只是一个基本版本,可以给你一个想法.您可以轻松地为气泡颜色添加一个setter,或者为’mPaint’添加stroke属性以获得额外的灵活性.
public class BubbleDrawable extends Drawable {

    // Public Class Constants
    ////////////////////////////////////////////////////////////

    public static final int LEFT = 0;
    public static final int CENTER = 1;
    public static final int RIGHT = 2;

    // Private Instance Variables
    ////////////////////////////////////////////////////////////

    private Paint mPaint;
    private int mColor;

    private RectF mBoxRect;
    private int mBoxWidth;
    private int mBoxHeight;
    private float mCornerRad;
    private Rect mBoxPadding = new Rect();

    private Path mPointer;
    private int mPointerWidth;
    private int mPointerHeight;
    private int mPointeralignment;

    // Constructors
    ////////////////////////////////////////////////////////////

    public BubbleDrawable(int pointeralignment) {
        setPointeralignment(pointeralignment);
        initBubble();
    }

    // Setters
    ////////////////////////////////////////////////////////////

    public void setPadding(int left,int top,int right,int bottom) {
        mBoxPadding.left = left;
        mBoxPadding.top = top;
        mBoxPadding.right = right;
        mBoxPadding.bottom = bottom;
    }

    public void setCornerRadius(float cornerRad) {
        mCornerRad = cornerRad;
    }

    public void setPointeralignment(int pointeralignment) {
        if (pointeralignment < 0 || pointeralignment > 3) {
            Log.e("BubbleDrawable","Invalid pointeralignment argument");
        } else {
            mPointeralignment = pointeralignment;
        }
    }

    public void setPointerWidth(int pointerWidth) {
        mPointerWidth = pointerWidth;
    }

    public void setPointerHeight(int pointerHeight) {
        mPointerHeight = pointerHeight;
    }

    // Private Methods
    ////////////////////////////////////////////////////////////

    private void initBubble() {
        mPaint = new Paint();
        mPaint.setAntiAlias(true);
        mColor = Color.RED;
        mPaint.setColor(mColor);
        mCornerRad = 0;
        setPointerWidth(40);
        setPointerHeight(40);
    }

    private void updatePointerPath() {
        mPointer = new Path();
        mPointer.setFillType(Path.FillType.EVEN_ODD);

        // Set the starting point
        mPointer.moveto(pointerHorizontalStart(),mBoxHeight);

        // Define the lines
        mPointer.rLineto(mPointerWidth,0);
        mPointer.rLineto(-(mPointerWidth / 2),mPointerHeight);
        mPointer.rLineto(-(mPointerWidth / 2),-mPointerHeight);
        mPointer.close();
    }

    private float pointerHorizontalStart() {
        float x = 0;
        switch (mPointeralignment) {
        case LEFT:
            x = mCornerRad;
            break;
        case CENTER:
            x = (mBoxWidth / 2) - (mPointerWidth / 2);
            break;
        case RIGHT:
            x = mBoxWidth - mCornerRad - mPointerWidth;
        }
        return x;
    }

    // Superclass Override Methods
    ////////////////////////////////////////////////////////////

    @Override
    public void draw(Canvas canvas) {
        mBoxRect = new RectF(0.0f,0.0f,mBoxWidth,mBoxHeight);
        canvas.drawRoundRect(mBoxRect,mCornerRad,mPaint);
        updatePointerPath();
        canvas.drawPath(mPointer,mPaint);
    }

    @Override
    public int getopacity() {
        return 255;
    }

    @Override
    public void setAlpha(int alpha) {
        // Todo Auto-generated method stub

    }

    @Override
    public void setColorFilter(ColorFilter cf) {
        // Todo Auto-generated method stub

    }

    @Override
    public boolean getPadding(Rect padding) {
        padding.set(mBoxPadding);

        // Adjust the padding to include the height of the pointer
        padding.bottom += mPointerHeight;
        return true;
    }

    @Override
    protected void onBoundsChange(Rect bounds) {
        mBoxWidth = bounds.width();
        mBoxHeight = getBounds().height() - mPointerHeight;
        super.onBoundsChange(bounds);
    }
}
MainActivity.java
public class MainActivity extends Activity {

    @Override
    protected void onCreate(Bundle savedInstanceState) {
        super.onCreate(savedInstanceState);
        setContentView(R.layout.activity_main);
        LinearLayout linearLayout = (LinearLayout)findViewById(R.id.myLayout);
        BubbleDrawable myBubble = new BubbleDrawable(BubbleDrawable.CENTER);
        myBubble.setCornerRadius(20);
        myBubble.setPointeralignment(BubbleDrawable.RIGHT);
        myBubble.setPadding(25,25,25);
        linearLayout.setBackgroundDrawable(myBubble);
    }
}
activity_main.xml中
<RelativeLayout xmlns:android="http://schemas.android.com/apk/res/android"
    xmlns:tools="http://schemas.android.com/tools"
    android:layout_width="match_parent"
    android:layout_height="match_parent"
    android:paddingBottom="@dimen/activity_vertical_margin"
    android:paddingLeft="@dimen/activity_horizontal_margin"
    android:paddingRight="@dimen/activity_horizontal_margin"
    android:paddingTop="@dimen/activity_vertical_margin"
    tools:context=".MainActivity" >

    <LinearLayout
        android:id="@+id/myLayout"
        android:orientation="vertical"
        android:layout_width="wrap_content"
        android:layout_height="wrap_content"
        android:layout_alignParentLeft="true"
        android:layout_alignParentTop="true" >

        <TextView
            android:id="@+id/textView1"
            android:layout_width="wrap_content"
            android:layout_height="wrap_content"
            android:text="Some Text"
            android:textAppearance="?android:attr/textAppearanceLarge" />

        <TextView
            android:id="@+id/textView2"
            android:layout_width="wrap_content"
            android:layout_height="wrap_content"
            android:text="Some Other Text"
            android:textAppearance="?android:attr/textAppearanceLarge" />
        </LinearLayout>

</RelativeLayout>